

POPO the Panda is a charming plush-style amigurumi project built around a simple black-and-white panda silhouette and finished with a tiny watermelon purse. The finished character has a rounded head, soft cheeks, black facial sections, separate ears and arms, two small black legs, and a colorful accessory that adds a bright contrast to the body. This guide presents the supplied POPO The Panda 2022 pattern as a detailed workshop-style article, with the construction checkpoints arranged so that each part can be understood before moving to the next.
The technical information in this guide follows the supplied pattern. Stitch counts, round numbers, color changes, placement instructions, hook information, yarn specification, and finishing directions are retained rather than estimated or replaced. When the source contains a notation that is not explained further, it is preserved as written. That is particularly important for R12 of the head, where the source reads “18c†before the black and white color sections.
The project is designed for chunky yarn and uses a 4mm crochet hook, although the original source notes that another hook size may be appropriate depending on the yarn brand. The listed yarn is Himalaya Dolphin Baby or alternatives such as Bernat Blanket, Parfait, and Yarn Art, with the source specifying 120m for 100g.
What Makes This Panda Work
The visual identity of POPO comes from several small decisions working together. The head is crocheted in white with black facial colorwork built into the rounds. The safety eyes are placed at a fixed position and spacing. The cheeks, eye lines, nose, and mouth are added afterward. The body begins with two separate legs, but the second leg remains attached so the two can be joined with a chain of 3 in white. The ears and arms are worked separately and sewn on later. Finally, the watermelon purse introduces red, cream, and green.
This construction makes the project useful as a practical amigurumi exercise because it combines increases, decreases, color changes, joining two crocheted components, stuffing, embroidery, and sewing. Each technique has a specific role in the final shape.
Project Materials
- 4mm crochet hook for chunky yarn, or another size depending on the yarn brand.
- Yarn: Himalaya Dolphin Baby, or examples given in the source such as Bernat Blanket, Parfait, or Yarn Art, 120m for 100g.
- Stitch marker
- Scissors
- Needle and thread, with the bigger needle intended for yarn.
- Embroidery thread
- Safety eyes
Abbreviations Used in the Pattern
- Mr – magic ring or make ch 2 and 6sc on the first ch.
- Sc – single crochet.
- Inc – increase.
- Dec – decrease (invisible dec).
- (…)*n – repeat in braces n times.
- [color] – change the color.
- Slst – slip stitch.
- Ch – chain.
- Dc – double crochet.
- Hdc – half double crochet.
- Tr – treble crochet.
- BLO – back loop only.
- FLO – front loop only.
Workshop 1: Establish the Panda Face

The head is the first major component and also the most visually detailed part of the pattern. It begins with a small white center and expands through repeated increases before narrowing again with decreases. The black sections appear within the head rounds, creating the panda eye areas without requiring separate black patches to be sewn on afterward.
Head – White
- Mr 8sc (8)
- 8inc (16)
- (sc, inc)*8 (24)
- (3sc, inc)*6 (30)
- 2sc, inc (4sc, inc)*5, 2sc (36)
- (5sc, inc)*6 (42)
- 42sc (42)
- 42sc (42)
- 16sc, black 3sc, white 4sc, black 3sc, white 16sc (42)
- 15sc, black 4sc, white 4sc, black 4sc, white 15sc (42)
- 10sc, inc, 3-hdc into one stitch, 2sc, black 5sc, white 4sc black 5sc, white 2sc, 3-hdc into one stitch, inc, 10sc (48)
- 18c, black 3sc, white 6sc, black 3sc, white 18sc (48)
- 3sc, dec (6sc, dec)*5 3sc (42)
- (5sc, dec)*6 (36)
- 2sc, dec (4sc, dec)*5 2sc (30)
- (3sc, dec)*6 (24)
- sc, dec (2sc, dec)*5, sc (18)
Fasten off and cut the yarn after R17. The source then gives a very specific shaping instruction: stuff the head chubby and add some extra at the cheeks. This is not just a general stuffing suggestion; it is part of the original finishing direction and helps create the rounded facial silhouette shown in the reference photographs.
Important notation: R12 is reproduced exactly as supplied: “18c, black 3sc, white 6sc, black 3sc, white 18sc (48).†The source does not explain what “18c†means, so it is not silently changed here.
Face Placement Checkpoint
Once the head has been shaped and stuffed, the facial components can be positioned. Insert the 12mm safety eyes between R10-11, 6 stitches apart. The source also instructs the maker to use worsted weight white yarn to create the white line beside the eyes.
The pink cheeks are embroidered with pink yarn. The nose is inserted between R11-12 at the center of the face. The mouth is embroidered using worsted weight black yarn.
For a balanced expression, treat the numerical placement instructions as fixed checkpoints. The center of the face should remain clear for the nose, while the eye spacing should be measured from the crochet structure rather than estimated by eye alone.
Workshop 2: Build the Body From the Feet Up
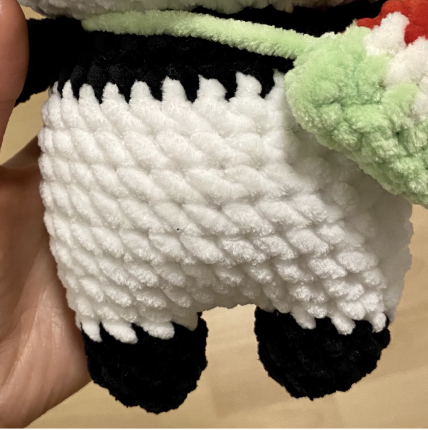
The body has a different construction logic from the head. The pattern begins with one small leg, then a second leg. The first leg is fastened off, while the second leg remains connected. The second leg is then continued with a chain of 3 in white and joined to the first leg. This creates the foundation for a single continuous body.
First Leg
- Mr 5sc (5)
- 5inc (10)
- 10sc (10)
- 10sc (10)
Fasten off and cut the yarn.
Second Leg and Joining Instruction
Make another leg using the same four rounds, but do not cut off the yarn. Continue by making ch 3 in white and join the first leg.
This is an important checkpoint. If the yarn is cut from the second leg too early, the stated joining sequence cannot be followed in the same way. Keep the working yarn attached until the chain and joining step are complete.
Body Rounds
- 10sc + 3sc (first side of the chains) + 10sc + 3sc (other side of the chains) (26)
- (3sc, inc)*6, 2sc (32)
- 32sc (32)
- 32sc (32)
- 32sc (32)
- 32sc (32)
- 32sc (32)
- 32sc (32)
- 7sc, dec, (14sc, dec), 7sc (30)
- Black 30sc (30)
- (3sc, dec)*6 (24)
- (2sc, dec)*6 (18)
Fasten off and leave a long tail to sew the body to the head. The original pattern gives a strong stuffing instruction here: “Please stuff the body a lot!†Follow that direction before the body is sewn to the head.
Body Stitch Checkpoints
- R5: 26 stitches after the two legs and chain are joined.
- R6: 32 stitches.
- R7-R12: 32 stitches.
- R13: 30 stitches.
- R14: Black 30sc (30).
- R15: 24 stitches.
- R16: 18 stitches.
These checkpoints are particularly helpful when working with plush yarn because individual stitches can be difficult to see. If a checkpoint does not match the written count, pause and review the previous round rather than modifying the next round to compensate.
Workshop 3: Make the Ears Soft and Simple
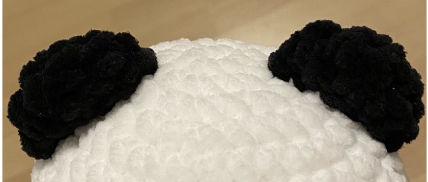
The ears are deliberately uncomplicated. They are crocheted in black and then sewn to the head. Their small size means the construction is quick, but their placement has a direct effect on the panda’s silhouette.
Ears – Black
- Mr 6sc (6)
- 6inc (12)
- 12sc (12)
Fasten off and leave a long tail for sewing between R3-6 on the head. The original source explicitly says, “I don’t stuff the ears.â€
That instruction should be preserved during finishing. The reference image shows the ears as soft black pieces attached to the top of the rounded head rather than as firm stuffed balls.
Workshop 4: Add the Arms at the Correct Round
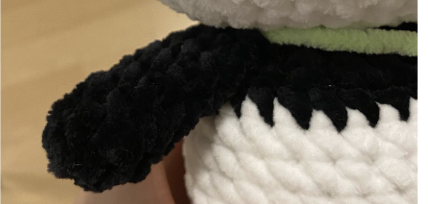
The arms use another small tubular construction. They are also left unstuffed, and the pattern gives a specific body round for sewing them into place.
Arms – Black
- Mr 4sc (4)
- 4inc (8)
- 8sc (8)
- 8sc (8)
- 8sc (8)
- 8sc (8)
- 8sc (8)
Fasten off and leave a long tail for sewing at R15 of the body. The original source says, “I don’t stuff the arms.â€
When sewing, use R15 as the technical reference. This is preferable to attaching the arm simply where it looks convenient because the stated round is part of the original construction instructions.
Workshop 5: Finish With the Watermelon Purse
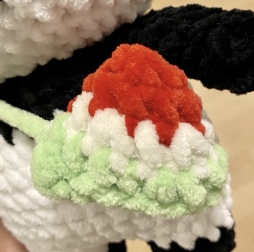
The watermelon purse is a separate miniature component and provides the strongest color contrast in the finished project. It uses red first, then cream, and finally green.
Water Melon Purse – Red
- Mr 5sc (5)
- 5inc (10)
- 10sc (10)
- Cream (sc, inc)*5 (15)
- Green (4sc, inc)*3 (18)
Use the long yarn tail to sew the purse fast. The source also instructs the maker to use the same green yarn to make the purse’s stripe.
The purse may be stuffed, but the designer states that the sample was not stuffed. Keeping the purse unstuffed is therefore consistent with the photographed sample, while the pattern still allows stuffing as an option.
How the Pieces Fit Together
One useful way to approach the finishing stage is to think in layers. The head and body create the main structure. The ears and arms are attached to that structure. The facial embroidery gives the head its expression. The purse is then added as an accessory.
- Complete the head through R17.
- Stuff the head chubby and add extra stuffing at the cheeks.
- Insert the 12mm safety eyes between R10-11, 6 stitches apart.
- Add the white eye lines, pink cheeks, centered nose, and black embroidered mouth.
- Complete the two legs and join them with ch 3 in white as specified.
- Continue the body through R16.
- Stuff the body a lot.
- Use the long body tail to sew the body to the head.
- Attach the unstuffed ears between R3-6 on the head.
- Attach the unstuffed arms at R15 of the body.
- Make and attach the watermelon purse.
- Add the purse stripe using the same green yarn.
Where to Concentrate Your Attention
Not every round has the same visual importance. The early head rounds establish the size of the base, while R9-R12 introduce the black facial areas. The decrease sequence from R13-R17 closes the head. The eye and nose placement then determines the final expression.
On the body, the leg join is the critical structural transition. R5 follows the two sides of the chain and establishes the 26-stitch foundation. The body then reaches 32 stitches and stays there through R12 before decreasing toward the neck connection.
The ears and arms are comparatively straightforward, but their attachment rounds are specific. The ears go between R3-6 of the head, and the arms go at R15 of the body. These details should be kept beside the work during assembly.
Stuffing Strategy for a Plush Finish
The pattern does not call for the same amount of stuffing in every component. The head should be chubby, with extra stuffing around the cheeks. The body should be stuffed a lot. The ears and arms are not stuffed. The watermelon purse can be stuffed, although the sample was left unstuffed.
This creates a useful contrast. The head and body provide the rounded plush volume, while the ears and arms remain soft and flexible. The purse can remain flatter so that it reads visually as a small accessory rather than another stuffed character component.
When stuffing the head, the cheek area deserves special attention because the source specifically calls for extra fullness there. When stuffing the body, distribute the filling through the torso rather than concentrating it in one place. These are finishing considerations based on the source’s stated stuffing directions, not new measurements or substitute pattern instructions.
Color-Change Checkpoints
The head is predominantly white, but black and white sections are incorporated in the later rounds. The body has its own black and white construction, with R14 explicitly written as Black 30sc (30). The watermelon purse then shifts from red to cream and green.
Because plush yarn can hide the exact location of stitches, it helps to complete each color section carefully before moving to the next. Keep the written sequence visible, especially for R9-R12 of the head, where the facial colorwork is established.
Do not add extra rounds to “improve†the color blocks. The purpose of this guide is to preserve the original construction rather than reinterpret it.
Assembly Troubleshooting
The Face Looks Uneven
First check the fixed placements rather than changing the embroidery. The eyes should be 12mm, positioned between R10-11, and 6 stitches apart. The nose belongs between R11-12 at the center. The cheeks and mouth should then be positioned in relation to those established points.
The Head Does Not Look Round Enough
Review the stuffing instruction. The source asks for a chubby head and extra stuffing at the cheeks. Also check the complete decrease sequence from R13 through R17.
The Body Join Feels Wrong
Review the transition from the second leg. The first leg is fastened off, while the second leg remains attached. The pattern then calls for ch 3 in white and joining the first leg before R5 works around both legs and both sides of the chain.
The Arms Feel Too Stiff
The source specifically says not to stuff the arms. Remove unnecessary filling rather than changing the arm’s stitch count.
The Ears Look Too Bulky
The ears are also intentionally unstuffed. Check the sewing position between R3-6 on the head.
The Watermelon Purse Looks Too Puffy
The sample shown in the source was not stuffed. The pattern says the purse can be stuffed, so leaving it unstuffed is a direct option supported by the original instructions.
Quick Pattern Reference
For easier use while crocheting, the principal stitch-count progression can be kept as a compact reference:
- Head: 8, 16, 24, 30, 36, 42, 42, 42, 42, 42, 48, 48, 42, 36, 30, 24, 18.
- Each leg: 5, 10, 10, 10.
- Body: 26, 32, 32, 32, 32, 32, 32, 32, 30, 30, 24, 18.
- Ears: 6, 12, 12.
- Arms: 4, 8, 8, 8, 8, 8, 8.
- Watermelon purse: 5, 10, 10, 15, 18.
Use this list as a checkpoint only. The complete round instructions remain the authoritative pattern, particularly where special stitches and color changes are involved.
Final Assembly Checklist
- Head completed through R17.
- Head stuffed chubby with extra stuffing at the cheeks.
- 12mm safety eyes placed between R10-11, 6 stitches apart.
- White lines beside the eyes embroidered with worsted weight white yarn.
- Pink cheeks embroidered.
- Nose placed between R11-12 at the center.
- Mouth embroidered with worsted weight black yarn.
- Two legs completed.
- Second leg joined to the first using ch 3 in white.
- Body completed through R16.
- Body stuffed a lot.
- Long tail left for sewing the body to the head.
- Ears completed and left unstuffed.
- Ears sewn between R3-6 on the head.
- Arms completed and left unstuffed.
- Arms sewn at R15 of the body.
- Watermelon purse completed through R5.
- Green purse stripe added using the same green yarn.
- Purse sewn using the long yarn tail.
Frequently Asked Questions
Is a 4mm hook required?
The source recommends a 4mm crochet hook for chunky yarn, while noting that another size may depend on the yarn brand.
Which yarn is recommended?
The source lists Himalaya Dolphin Baby and gives Bernat Blanket, Parfait, and Yarn Art as examples of alternatives. The stated yarn specification is 120m for 100g.
What size are the safety eyes?
The pattern specifies 12mm safety eyes.
How far apart are the eyes?
They are placed 6 stitches apart between R10-11.
Where should the nose be placed?
The nose goes between R11-12 at the center of the face.
Should the head be firmly stuffed?
The source says to stuff the head chubby and add some extra at the cheeks.
How much stuffing does the body need?
The original instruction says, “Please stuff the body a lot!â€
Are the ears stuffed?
No. The designer states that the ears are not stuffed.
Are the arms stuffed?
No. The designer states that the arms are not stuffed.
Where are the ears attached?
They are sewn between R3-6 on the head.
Where are the arms attached?
They are sewn at R15 of the body.
Can the watermelon purse be stuffed?
Yes, the source says it can be stuffed, but the designer did not stuff the sample.
Finished POPO the Panda
Once the final sewing is complete, the project becomes a cohesive plush character rather than a collection of separate crocheted pieces. The rounded white head carries the panda expression, the black ears frame the top of the head, and the black arms and feet reinforce the familiar panda silhouette. The white body provides the central volume, while the watermelon purse adds the bright red, cream, and green detail visible in the finished photographs.
The most important part of finishing POPO is not adding more detail than the pattern calls for. The original design already establishes the character through its stitch counts, colorwork, embroidery, stuffing directions, and attachment points. Following those checkpoints carefully is what keeps the finished piece close to the supplied reference.
Take particular care with the head’s facial placement, the leg-joining sequence, the specified sewing rounds, and the stuffing instructions. These are the areas where small construction decisions have the greatest effect on the finished appearance.
With the technical checkpoints preserved, POPO the Panda becomes a manageable project: build the head, complete the facial details, form the body from the two legs, add the unstuffed ears and arms, and finish with the watermelon purse. The result is a soft, expressive amigurumi panda with a distinctive handmade accessory.
Enjoy making POPO the Panda, and have fun with the finishing stage.
Pattern source: POPO The Panda 2022 by @rin.meow21, supplied in the project materials. The original source contains its own copyright and sharing notice.