
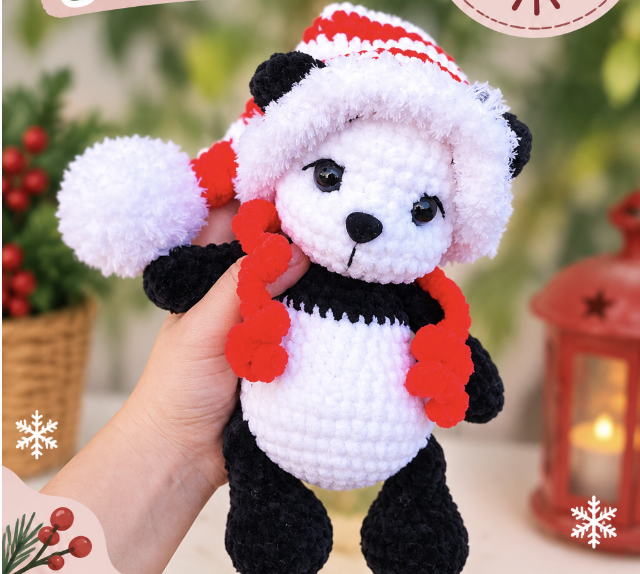

A large plush panda is already an enjoyable amigurumi project, but adding a striped Christmas hat turns it into something especially charming for the holiday season. This pattern combines soft plush yarn, a rounded panda body, carefully sculpted facial features, and a detailed seasonal accessory. The finished toy has a substantial presence, so it is a project for crocheters who enjoy taking their time with multiple components and careful assembly.
This tutorial presents the project as a complete construction guide, taking you from the first stitches of the head through the individual limbs, body connections, facial finishing, Christmas hat, pom-pom, and straps. The technical instructions remain exactly as specified in the original pattern. The project can also be made as a panda without the Christmas hat if you want a version that can be enjoyed throughout the year.
The pattern designer is plushworld_by_stefi. The original sample uses Wolans Bunny Baby plush yarn in white, black, and red. Fluffy yarn is used for the pom-pom, while small amounts of black and white cotton yarn are used for face sculpting and embroidery. A 3.5 mm crochet hook, 12 mm safety eyes, and a 12 mm safety nose complete the principal materials.
Before You Start: Organizing a Large Amigurumi
This panda is made from several pieces, so preparation is particularly useful. You will make the head, tail, two ears, two arms, two legs, body, Christmas hat, pom-pom, and two straps. Some of these pieces are crocheted independently and sewn later, while the legs and arms are incorporated directly into the body during specific rounds.
Keep your stitch marker close at hand and have your needle ready whenever a component needs to be folded, closed, sculpted, or sewn. Because plush yarn can make stitches less visually obvious, counting is more reliable than trying to estimate the location of a stitch from the fuzzy surface.
Materials for the Panda
- Plush yarn: Wolans Bunny Baby in white, black, and red was used in the original project.
- Fluffy yarn: For the pom-pom.
- Black and white cotton yarn: For face sculpting and embroidering the mouth, eyes, and eyebrows.
- 3.5 mm crochet hook.
- 12 mm safety eyes.
- 12 mm safety nose.
- Scissors.
- Needle.
- Fiber filling.
- Stitch marker.
The pattern notes that you can use a hook size and safety eyes matching your yarn. The stated hook size for the project itself is 3.5 mm, with 12 mm safety eyes and a 12 mm safety nose.
Pattern Language at a Glance
The following abbreviations are used throughout the original instructions. Keeping this list nearby can save time when moving between sections.
- MR: Magic ring
- st/sts: Stitch/stitches
- ch: Chain
- sc: Single crochet
- Rnd/Rnds: Round/rounds
- inc: Single crochet increase, 2 sc in 1 st
- dec: Invisible decrease, decreasing 2 sts together FLO
- (…)*: Repeat the instruction inside the brackets the specified number of times
- (…): Total number of stitches in the round or row
- sl st: Slip stitch
Stage One: Crochet the White Head
The head is worked in white and stuffed as you go. Its construction begins with a six-stitch magic ring, expands gradually, stays at 30 stitches for three rounds, then reaches 36 stitches before the facial components are positioned and the crown begins to decrease.
- Rnd 1. 6 sc in MR (6)
- Rnd 2. 6 inc (12)
- Rnd 3. (1 sc, inc)* 6 (18)
- Rnd 4. (2 sc, inc)* 6 (24)
- Rnd 5. (3 sc, inc)* 6 (30)
- Rnds 6-8. 30 sc (3 Rnds)
- Rnd 9. (4 sc, inc)* 6 (36)
- Rnds 10-13. 36 sc (4 Rnds)
The facial safety components have precise placement points. Insert the safety eyes between Rounds 9-10, with a distance of 5 visible stitches between them. Insert the safety nose between Rounds 11-12.
Continue the head decreases as follows:
- Rnd 14. (4 sc, dec)* 6 (30)
- Rnd 15. (3 sc, dec)* 6 (24)
- Rnd 16. (2 sc, dec)* 6 (18)
- Rnd 17. (1 sc, dec)* 6 (12)
- Rnd 18. 6 dec (6)
Sew the hole closed. Fasten off and weave in the ends. At this point the basic head shape is complete, but the panda’s face still needs its sculpting and embroidered details.
Giving the Panda Its Facial Expression

The face sculpting stage gives the panda additional definition. Follow the steps shown in the reference picture. Tighten each end of the thread well, and then tighten both ends at once.
Once the tightening has been completed, embroider the eyelids and eyebrows. The muzzle is embroidered below the nose according to the reference pictures. These details are small, but they have a major visual effect on the character because they give the otherwise rounded plush head its expression.
When working on the face, take time to inspect the panda from the front. This does not alter the pattern; it simply makes it easier to check that the embroidered features correspond with the specified safety-eye and nose placement.
Stage Two: Make the Black Tail
The tail is a compact black piece that is stuffed as you go. It uses only four rounds.
- Rnd 1. 6 sc in MR
- Rnd 2. 6 inc (12)
- Rnd 3. 12 sc
- Rnd 4. 6 dec
Fasten off and leave a tail for sewing. The finished tail is sewn onto the back between Rounds 8 and 9.
Since this piece is small, it can be easy to lose track of the sewing tail. Leaving the specified tail before cutting the yarn makes the later attachment much simpler.
Stage Three: Form the Two Ears
Each ear is crocheted in black and remains unstuffed. Make two identical pieces.
- Rnd 1. 6 sc in MR
- Rnd 2. 6 inc (12)
- Rnd 3. 12 sc
Fold the ear and crochet 6 sc through both layers. Fasten off and leave a tail for sewing.
One of the most important assembly notes in this project concerns these ears. Do not sew them onto the panda until after the hat has been made. This allows the ear openings in the hat to be used to determine the correct fitting. The original placement for the ears is between Rounds 5 and 9.
Stage Four: Crochet the Two Arms
Make two black arms. Stuff them as you go until Round 7. The construction starts with an increase section and then narrows through decreases before continuing with eight-stitch rounds.
- Rnd 1. 6 sc in MR
- Rnd 2. 6 inc (12)
- Rnd 3. (1 sc, inc)* 6 (18)
- Rnd 4. (1 sc, dec)* 6 (12)
- Rnd 5. 3 sc, 3 dec, 3 sc (9)
- Rnd 6. 3 sc, dec, 4 sc (8)
- Rnds 7-11. 8 sc (5 Rnds)
Fold the arm and crochet 4 sc through both layers. Fasten off and weave in the ends. Complete both arms before moving to the body so they are ready when Round 17 is reached.
Stage Five: Shape the Two Legs
The legs are also black. Stuff as you go until Round 11. Compared with the arms, the legs begin with a wider section, reaching 24 stitches before several decrease rounds narrow the piece.
- Rnd 1. 6 sc in MR
- Rnd 2. 6 inc (12)
- Rnd 3. (1 sc, inc)* 6 (18)
- Rnd 4. (2 sc, inc)* 6 (24)
- Rnds 5-6. 24 sc (2 Rnds)
- Rnd 7. 6 sc, 6 dec, 6 sc (18)
- Rnd 8. 5 sc, 4 dec, 5 sc (14)
- Rnd 9. 5 sc, 2 dec, 5 sc (12)
- Rnds 10-14. 12 sc (5 Rnds)
Fold each leg and crochet 6 sc through both layers. Fasten off and weave in the ends. The legs will be connected directly to the body in Body Round 8.
Stage Six: Construct the Panda Body
The body begins in white and is stuffed as you go. Its first rounds create a steadily expanding base before the legs are joined into the crochet fabric.
- Rnd 1. 6 sc in MR
- Rnd 2. 6 inc (12)
- Rnd 3. (1 sc, inc)* 6 (18)
- Rnd 4. (2 sc, inc)* 6 (24)
- Rnd 5. (3 sc, inc)* 6 (30)
- Rnd 6. (4 sc, inc)* 6 (36)
- Rnd 7. (5 sc, inc)* 6 (42)
The next round is the first major joining point:
Rnd 8. 8 sc, 6 sc with the left leg, 14 sc, 6 sc with the right leg, 8 sc (42)
Continue around the body:
- Rnds 9-10. 42 sc (2 Rnds)
- Rnd 11. (5 sc, dec)* 6 (36)
- Rnd 12. 36 sc
- Rnd 13. 2 sc, dec, (4 sc, dec)* 5, 2 sc (30)
- Rnd 14. 30 sc
Change the color to black.
- Rnd 15. 30 sc
- Rnd 16. (3 sc, dec)* 6 (24)
The arms are joined during the next round. The stitch marker must be placed in the center of the back. Add or remove sc if necessary.
Rnd 17. 4 sc, 4 sc with the left arm, 8 sc, 4 sc with the right arm, 4 sc (24)
Complete the final body shaping:
- Rnd 18. (2 sc, dec)* 6 (18)
- Rnd 19. (1 sc, dec)* 6 (12)
Fasten off and leave a long tail for sewing the body with the head.
Body Construction Checkpoint
Before joining the head, it is useful to verify the main body checkpoints. The body should have reached 42 stitches in Round 7. The legs are incorporated during Round 8. The work remains at 42 stitches through Rounds 9-10 before decreasing. After the white section, the color changes to black at Round 15. The arms are incorporated during Round 17, and the body finishes at 12 stitches in Round 19.
The stitch marker has a specific role when joining the arms. The instructions place it in the center of the back and allow sc to be added or removed if necessary. Follow that instruction rather than forcing the arm positions into place without checking the center reference.
Stage Seven: Crochet the Striped Christmas Hat
The hat is one of the most distinctive parts of the project. It begins with red yarn and alternates between red and white sections as it expands. Follow every color change carefully because the sequence is part of the finished appearance.
- Rnd 1. 6 sc in MR
- Rnd 2. (2 sc, inc)* 2 (8)
- Rnd 3. 8 sc
- Rnd 4. (3 sc, inc)* 2 (10)
Change the color to white.
- Rnd 5. 10 sc
- Rnd 6. (4 sc, inc)* 2 (12)
Change the color to red.
- Rnd 7. 12 sc
- Rnd 8. (5 sc, inc)* 2 (14)
Change the color to white.
- Rnd 9. 14 sc
- Rnd 10. (6 sc, inc)* 2 (16)
Change the color to red.
- Rnd 11. 16 sc
- Rnd 12. (7 sc, inc)* 2 (18)
Change the color to white.
- Rnd 13. 18 sc
- Rnd 14. (8 sc, inc)* 2 (20)
Change the color to red.
- Rnd 15. 20 sc
- Rnd 16. (9 sc, inc)* 2 (22)
Change the color to white.
- Rnd 17. 22 sc
- Rnd 18. (10 sc, inc)* 2 (24)
Change the color to red.
- Rnd 19. 24 sc
- Rnd 20. (5 sc, inc)* 4 (28)
Change the color to white.
- Rnd 21. 28 sc
- Rnd 22. (6 sc, inc)* 4 (32)
Change the color to red.
- Rnd 23. 32 sc
- Rnd 24. (7 sc, inc)* 4 (36)
Change the color to white.
Rnd 25. 36 sc
Round 26 is especially important because it creates the two ear openings:
Rnd 26. 8 sc, chain 6 (skip 6), 8 sc (between the ears), chain 6 (skip 6), 8 sc (36)
Change the color to red.
- Rnd 27. (5 sc, inc)* 6 (42)
- Rnd 28. (6 sc, inc)* 6 (48)
- Rnd 29. 48 sc
The next round is crocheted with fluffy yarn:
Rnd 30. 48 inc
If plush yarn is used instead of fluffy yarn, the original pattern provides this alternative: make ch, sl st all around the hat.
Hat Fitting and Ear Placement
The ear openings are why it is better not to permanently sew the ears before the hat is finished. Once Round 26 has created the openings and the remaining rounds have been completed, place the hat over the panda and check how the openings correspond to the ears.
After making the hat, sew the ears between Rounds 5 and 9. This sequence allows the accessory and the panda to work together instead of having the ear placement determined before the hat is available for fitting.
Stage Eight: Make the White Hat Pom-Pom
The pom-pom is crocheted in white and stuffed as you go. Its rounded construction mirrors the compact shaping used elsewhere in the pattern.
- Rnd 1. 6 sc in MR
- Rnd 2. 6 inc (12)
- Rnd 3. (1 sc, inc)* 6 (18)
- Rnd 4. (2 sc, inc)* 6 (24)
- Rnds 5-6. 24 sc (2 Rnds)
- Rnd 7. (2 sc, dec)* 6 (18)
- Rnd 8. (1 sc, dec)* 6 (12)
- Rnd 9. 6 dec
Sew the hole closed. Fasten off and leave a tail for sewing the pom-pom to the hat. The ball is sewn onto Round 1 of the hat. Finish by fastening off and weaving in the ends.
Stage Nine: Finish the Two Red Hat Straps
Make two straps using red yarn. Attach the yarn on the side of the hat at Round 29, directly under the edge of the ear holes.
Make chain 30, then work 1 sc in each loop and attach with a slip stitch to the hat in the same loop. Repeat for the second strap.
These straps are the final structural details of the Christmas accessory. Their attachment point is important, so use Round 29 and the area directly under the ear-hole edge as the reference.
Assembly Tips for a Balanced Panda
Once all the crocheted components are ready, assembly becomes the stage where the separate shapes become one character. The legs and arms have already been incorporated into the body through their specified rounds, while the tail and ears require sewing. The head and body are joined using the long tail left from the body.
For the best visual balance, keep the panda upright while checking the position of the sewn components. The tail belongs between Rounds 8 and 9 on the back. The ears belong between Rounds 5 and 9, but only after the hat has been completed. The face should be checked from the front so that the embroidered features complement the safety eyes and nose.
Working Successfully with Fluffy and Plush Yarn
Plush yarn produces the soft appearance that makes this panda so appealing, but it can hide stitch definition. A stitch marker is therefore particularly valuable. Marking the working round and counting the stitches at important checkpoints can prevent errors from accumulating.
When stuffing is required, the original pattern repeatedly specifies “stuff as you go” or gives a specific stopping round. Follow those instructions rather than changing when the filling is inserted. The head and body, for example, are stuffed as you crochet, while the arms and legs have specific stuffing limits.
Matching components are another area where patience helps. Make the two arms and two legs with the exact same round structure, and compare their finished shapes before attaching them. This can help with visual symmetry without changing any of the technical instructions.
Important Details to Double-Check
- The hook size is 3.5 mm.
- The safety eyes are 12 mm.
- The safety nose is 12 mm.
- The head is crocheted in white.
- The tail, ears, arms, and legs are crocheted in black.
- The body begins in white and changes to black at Round 15.
- The legs are connected during Body Round 8.
- The arms are connected during Body Round 17.
- The head eyes are placed between Rounds 9-10.
- The distance between the eyes is 5 visible stitches.
- The nose is placed between Rounds 11-12.
- The tail is sewn between Body Rounds 8 and 9.
- The ears are sewn between Rounds 5 and 9 after the hat is made.
- Hat Round 26 contains the two ear openings.
- The pom-pom is sewn onto Round 1 of the hat.
- The straps begin at Round 29 beneath the ear-hole edges.
Frequently Asked Questions
Can the panda be made without the Christmas hat?
Yes. The original description notes that you can crochet the panda without making the hat. The Christmas accessory is optional, allowing the panda itself to be used as a non-seasonal plush toy.
Does the panda require stuffing?
Yes. The pattern specifies fiber filling and gives stuffing instructions for the different pieces. The head and body are stuffed as you go. The arms are stuffed as you go until Round 7, and the legs are stuffed as you go until Round 11. The tail and pom-pom are also stuffed as you go, while the ears are specifically not stuffed.
When should the ears be sewn onto the panda?
The ears should not be sewn until after the hat has been made. This allows you to obtain the correct fitting with the ear openings. The stated sewing position is between Rounds 5 and 9.
Where does the tail go?
The black tail is sewn onto the back between Rounds 8 and 9.
Where are the arms joined?
The arms are incorporated into the body during Round 17. The stitch marker should be placed in the center of the back, and sc may be added or removed if necessary.
What yarn is used for the hat edge?
Round 30 is crocheted with fluffy yarn. If plush yarn is used instead of fluffy yarn, the original instructions specify making a chain and working slip stitches all around the hat.
Final Project Review
This panda is best approached as a collection of manageable stages rather than one enormous crochet task. The head establishes the face and expression. The black tail, ears, arms, and legs provide the characteristic panda features. The body then joins the legs and arms at specific rounds before being sewn to the completed head.
The Christmas hat adds a second layer of construction. Its alternating red and white sections require careful color changes, while Round 26 introduces the ear openings that influence the final fitting. The fluffy edge, separate pom-pom, and two red straps complete the seasonal accessory.
The most important principle throughout the project is accuracy. Do not rely on the visual appearance of plush stitches alone. Track the rounds, watch the stated stitch counts, follow the placement instructions, and use the provided reference image when sculpting and embroidering the face.
Final Finishing Checklist
- Head completed through Rnd 18 and opening sewn closed.
- Safety eyes positioned between Rnds 9-10 with 5 visible stitches between them.
- Safety nose positioned between Rnds 11-12.
- Face tightened and sculpted according to the reference.
- Eyelids and eyebrows embroidered.
- Muzzle embroidered below the nose.
- Tail attached between Rnds 8 and 9.
- Two ears completed without stuffing.
- Ears sewn between Rnds 5 and 9 after the hat has been made.
- Two arms completed and folded through both layers.
- Two legs completed and folded through both layers.
- Legs incorporated into Body Rnd 8.
- Arms incorporated into Body Rnd 17.
- Body finished through Rnd 19.
- Long sewing tail used to join the body and head.
- Christmas hat completed through Rnd 30.
- Two ear openings made in Hat Rnd 26.
- White pom-pom attached to Hat Rnd 1.
- Two red straps attached from Hat Rnd 29.
- All appropriate ends fastened off and woven in.
Conclusion
The plush crochet panda with Christmas hat is a rewarding project for anyone who enjoys large, soft amigurumi and detailed finishing work. Its construction combines straightforward single crochet with increases, invisible decreases, folded pieces, direct limb joins, facial sculpting, embroidery, and color changes. Although the project is long, breaking it into individual components makes the overall process easier to manage.
The finished panda can stand on its own as a charming plush character, while the optional Christmas hat gives it a festive seasonal identity. The red-and-white stripes, fluffy edge, pom-pom, and straps create a strong contrast with the black-and-white panda body.
Take your time with stitch counting, stuffing, facial placement, and assembly. If each checkpoint is followed carefully, the many individual pieces come together into the large plush panda shown in the original project. The result is a soft handmade character that can be enjoyed during the Christmas season or displayed without the hat as a classic panda throughout the rest of the year.