
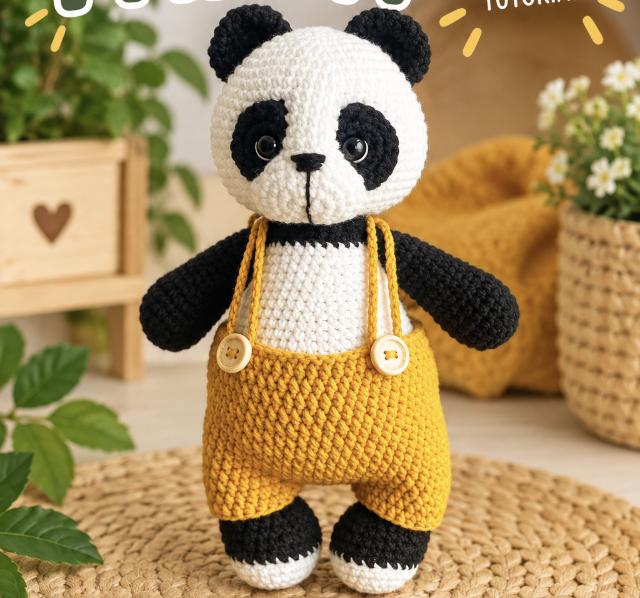

If you love making character amigurumi with plenty of personality, this crochet panda in pants is a fun project to add to your handmade collection. Ron the Panda combines a classic black-and-white panda body with a colorful pair of removable overalls, creating a charming toy that is both decorative and playful. The project is worked using the amigurumi technique, with separate pieces crocheted and then assembled into the finished character.
This tutorial walks through the construction of Ron the Panda from the head and body to the ears, arms, legs, tail, muzzle, and removable overalls. The clothing is especially interesting because the overalls are designed to come off, while the straps are attached with buttons. The face also includes a sculpting step that gives the panda more depth and helps create the characteristic amigurumi expression.
The original project uses YarnArt Jeans yarn in white, black, and yellow, together with a 2 mm crochet hook and 10 mm safety eyes. The finished panda is approximately 24 cm tall. Although there are several individual components to make, each section follows a clear sequence of rounds and stitch counts.
Project Overview
Ron the Panda is built from several crocheted components. The main head and body establish the overall shape, while the muzzle, eyes, and ears create the facial character. Two arms and two legs complete the body, and a small tail is added at the center of the back. The final clothing component is the pair of overalls, which is constructed separately and can be removed from the panda.
The body begins with white yarn and transitions to black yarn at Round 31. The legs also begin in white before changing to black at Round 6. This creates the familiar panda color arrangement while giving the finished toy a clean contrast between its different sections.
One useful feature of this pattern is that the construction details are given with exact stitch counts throughout. Keeping track of those counts is important because the shaping of the head, body, arms, and legs depends on the increases and decreases being worked correctly.
Materials and Tools
Before beginning, gather all the supplies needed for the panda and its clothing. Using the specified materials helps maintain the intended proportions of the finished toy.
- Yarn: YarnArt Jeans 62 in white, YarnArt Jeans 53 in black, and YarnArt Jeans 84 in yellow
- Crochet hook: 2 mm
- Safety eyes: 10 mm
- Stuffing: Polyfill or a similar stuffing material
- Stitch markers
- Pins
- Buttons
- Sewing needle: For assembling the crocheted parts
- Scissors
The yellow yarn is used for the clothing in the supplied pattern. The designer recommends YarnArt Jeans, a cotton-blend yarn, for the project. Keep the three colors separated and ready before starting so that the color changes in the body and legs can be completed without interruption.
Abbreviations Used in the Pattern
The pattern uses standard crochet abbreviations. If you are comfortable with amigurumi worked in single crochet, the majority of the construction will be familiar.
- MR: Magic Ring
- ch: Chain stitch
- sl st: Slip stitch
- sc: Single crochet
- hdc: Half double crochet
- inc: Increase, meaning 2 sc in the same stitch
- dec: Decrease, with invisible decrease preferred
- (…) x n: Repeat the sequence n times
When working the amigurumi sections, maintain the stated stitch count at the end of every round. This is particularly helpful when moving from the increasing rounds into the straight rounds and later into the decreases.
Step 1: Crochet the Panda Head
The head is the first major component and establishes the rounded shape of Ron’s face. Begin with white yarn and a magic ring. The head gradually expands from 6 stitches to 60 stitches before the decreases begin.
- Rnd 1: 6 sc in MR (6)
- Rnd 2: 6 inc (12)
- Rnd 3: (1 sc, inc) repeat 6 times (18)
- Rnd 4: (2 sc, inc) repeat 6 times (24)
- Rnd 5: (3 sc, inc) repeat 6 times (30)
- Rnd 6: (4 sc, inc) repeat 6 times (36)
- Rnd 7: (5 sc, inc) repeat 6 times (42)
- Rnd 8: (6 sc, inc) repeat 6 times (48)
- Rnd 9: (7 sc, inc) repeat 6 times (54)
- Rnd 10-11: 54 sc
- Rnd 12: (8 sc, inc) repeat 6 times (60)
- Rnd 13-21: 60 sc
- Rnd 22: (8 sc, dec) repeat 6 times (54)
- Rnd 23: (7 sc, dec) repeat 6 times (48)
- Rnd 24: (6 sc, dec) repeat 6 times (42)
- Rnd 25: (5 sc, dec) repeat 6 times (36)
- Rnd 26: (4 sc, dec) repeat 6 times (30)
- Rnd 27: (1 sc, dec) x 10 (20)
Fasten off and leave a long tail for sewing. Do not discard this tail because it will be needed when attaching the head during assembly.

Step 2: Build the Body
The body follows a similar increasing structure but becomes considerably larger than the head. Start with white yarn and work the increasing rounds carefully. The body reaches 66 stitches at Round 11 and remains at that stitch count through Round 18 before shaping begins.
- Rnd 1: 6 sc in MR (6)
- Rnd 2: 6 inc (12)
- Rnd 3: (1 sc, inc) repeat 6 times (18)
- Rnd 4: (2 sc, inc) repeat 6 times (24)
- Rnd 5: (3 sc, inc) repeat 6 times (30)
- Rnd 6: (4 sc, inc) repeat 6 times (36)
- Rnd 7: (5 sc, inc) repeat 6 times (42)
- Rnd 8: (6 sc, inc) repeat 6 times (48)
- Rnd 9: (7 sc, inc) repeat 6 times (54)
- Rnd 10: (8 sc, inc) repeat 6 times (60)
- Rnd 11: (9 sc, inc) repeat 6 times (66)
- Rnd 12-18: 66 sc
- Rnd 19: (9 sc, dec) repeat 6 times (60)
- Rnd 20: 60 sc
- Rnd 21: (8 sc, dec) repeat 6 times (54)
- Rnd 22: 54 sc
- Rnd 23: (7 sc, dec) repeat 6 times (48)
- Rnd 24: 48 sc
- Rnd 25: (6 sc, dec) repeat 6 times (42)
- Rnd 26: 42 sc
- Rnd 27: (5 sc, dec) repeat 6 times (36)
- Rnd 28: 36 sc
- Rnd 29: (4 sc, dec) repeat 6 times (30)
- Rnd 30: 30 sc
- Rnd 31: Change yarn to black, 30 sc
- Rnd 32: (1 sc, dec) x 10 (20)
- Rnd 33-34: 20 sc
Fasten off and stuff the body firmly, paying particular attention to the belly area. The stuffing should provide enough support to keep the body shape stable without distorting the stitches.
Step 3: Make the Eyes
Two crocheted eye pieces are made for the panda. Each eye begins with 5 sc in a magic ring and then continues in turning rows. The safety eye is inserted through the center of the magic ring.
For each eye, work:
- Rnd 1: 5 sc in MR, sl st (5)
- Rnd 2: ch 1, 5 inc (10)
- Rnd 3: ch 1, inc, 8 sc, inc (12)
- Rnd 4: ch 1, 12 sc
Fasten off and leave a tail for sewing. Insert the 10 mm safety eyes through the centers of the magic rings. Attach the eyes between rows 16-17 of the head, with 10 stitches between them.
Step 4: Shape the Muzzle
The muzzle is a compact crocheted piece that gives the face additional dimension. Work the following rounds:
- Rnd 1: 8 sc in MR (8)
- Rnd 2: 8 inc (16)
- Rnd 3: 3 sc, 4 inc, 4 sc, 4 inc, 1 sc (24)
- Rnd 4: 24 sc
Fasten off and leave a long tail for sewing. The muzzle will later be sewn between the eyes. The face also requires sculpting according to the reference image, so take care during assembly to position the muzzle and facial details accurately.
Step 5: Crochet the Ears
Make two identical ears. Each ear starts with a magic ring and increases to 18 stitches before several straight rounds create the necessary height.
- Rnd 1: 6 sc in MR (6)
- Rnd 2: 6 inc (12)
- Rnd 3: (1 sc, inc) repeat 6 times (18)
- Rnd 4-6: 18 sc
Fold each ear in half and sew across the open edge with 8 sc. Keep both ears consistent in size and shape so the finished panda has a balanced appearance.
Step 6: Crochet the Arms
Two arms are required. The arms start with a rounded increase section and then continue into a narrower tube. Stuffing is added only up to row 12, leaving the upper portion suitable for folding and sewing.
- Rnd 1: 6 sc in MR (6)
- Rnd 2: 6 inc (12)
- Rnd 3: (1 sc, inc) repeat 6 times (18)
- Rnd 4: (2 sc, inc) repeat 6 times (24)
- Rnd 5-8: 24 sc
- Rnd 9: (2 sc, dec) repeat 6 times (18)
- Rnd 10-12: 18 sc
- Rnd 13: (7 sc, dec) repeat 2 times (16)
- Rnd 14-20: 16 sc
- Rnd 21: (2 sc, dec) repeat 4 times (12)
Stuff the arm until row 12. Fold it in half and sew across the open edge with 6 sc. Repeat the complete process to create the second arm.
Step 7: Create the Legs
The legs introduce the panda’s black-and-white color arrangement. Begin with white yarn, then change to black yarn at Round 6. The color change is worked in the back loops only at that round.
- Rnd 1: 8 sc in MR (8)
- Rnd 2: 8 inc (16)
- Rnd 3: (1 sc, inc) repeat 8 times (24)
- Rnd 4-5: 24 sc
- Rnd 6: Change to black yarn, work in back loops only, 24 sc
- Rnd 7-9: 24 sc
- Rnd 10: 9 sc, 3 dec, 9 sc (21)
- Rnd 11: 8 sc, 3 dec, 7 sc (18)
- Rnd 12: 7 sc, 2 dec, 7 sc (16)
- Rnd 13-22: 16 sc
Fold the leg in half and sew across the open edge with 8 sc. Stuff firmly up to row 13. Make two legs with the same construction so that both sides of the finished panda remain symmetrical.
Step 8: Make the Tail
The tail is a small rounded piece that is quick to crochet. It will eventually be sewn to the center of the back between rows 13-15.
- Rnd 1: 6 sc in MR (6)
- Rnd 2: (1 sc, inc) repeat 3 times, sl st (9)
Fasten off and leave a tail for sewing.
Step 9: Crochet the Removable Overalls
The overalls are one of the most distinctive parts of this project. Unlike a permanently attached clothing detail, the pants are removable. This makes the panda especially versatile and gives the finished toy an additional playful feature.
Begin by chaining 55 and joining the chain into a ring. Continue with the following instructions:
- Rnd 1: Chain 55, join into a ring
- Rnd 2: 55 sc
- Rnd 3: 10 hdc, (inc) repeat 5 times (60)
- Rnd 4-6: 60 hdc
- Rnd 7-8: Create tail opening: 57 hdc, ch 6, skip 4 stitches, insert hook into 5th stitch, 60 hdc
- Rnd 9-15: 62 hdc

Next, form the pant legs. Mark 6 center stitches on both the front and back, then sew them together. Each pant leg has 25 stitches. Crochet 2 rows of 25 hdc for each pant leg.
Step 10: Make the Overall Straps
The straps are simple separate pieces, but they play an important role in the removable clothing design. Make two straps using the specified chain length:
Straps: Make 2. Chain 70.

The overalls are finished with buttons so that the straps can be fastened. Because the clothing is removable, this construction also allows the panda to be displayed with or without its pants.
Putting Ron the Panda Together
Assembly is where the individual crocheted pieces become a recognizable panda character. Before sewing each component permanently, use pins to check the placement. This is particularly useful for the ears, muzzle, arms, legs, and tail because small placement differences can affect the final expression and symmetry.
Begin with the facial sculpting. Sculpt the face according to the reference image, then sew the muzzle between the eyes. Embroider the eye whites and the nose to complete the main facial details.
Next, attach the ears between the designated rows. Make sure they are positioned evenly on both sides of the head. The ears should be checked from the front before the sewing is completed.
Attach the legs between rows 13-14. Their position should be checked before sewing firmly into place. Since the legs have been stuffed firmly up to row 13, they should retain enough structure to support their intended shape.
Finally, sew the tail at the center of the back between rows 13-15. The tail should be positioned centrally so that it remains aligned with the body when viewed from behind.

Face Sculpting and Expression
The face is one of the most important visual features of this panda. The supplied pattern specifically calls for sculpting the face according to the reference image. This technique creates depth instead of leaving the facial area completely flat.
When working on the face, take your time with positioning rather than rushing through the sewing stage. The muzzle should sit between the eyes, while the embroidered eye whites and nose provide the finishing details. The 10 mm safety eyes are inserted through the centers of the crocheted eye pieces and positioned between rows 16-17 of the head with 10 stitches separating them.
Because the eyes and muzzle establish the expression, checking the face from several angles before completing the sewing can be helpful. The goal is to preserve the placement specified by the pattern while making sure both sides look balanced.
Tips for Keeping the Amigurumi Neat
Small details can make a noticeable difference in a finished amigurumi project. Keep your tension as consistent as possible throughout the increasing and decreasing rounds. If your tension changes significantly, the shape of a component may look different from the intended proportions.
Stitch markers can also make it easier to identify the beginning of a round and maintain accurate stitch counts. This becomes especially useful during the longer body section, where multiple rounds have the same stitch count before shaping begins.
When working decreases, the pattern recommends an invisible decrease. Using this technique can help maintain a smooth surface on the rounded parts of the panda. It is particularly useful during the shaping of the head and body, where visible gaps or bumps could distract from the clean amigurumi appearance.
Stuffing Checkpoints
Stuffing should be added gradually rather than only at the very end. The body needs to be stuffed firmly, especially around the belly area. This helps the completed panda retain its shape.
The arms have a specific stuffing limit: stuff them until row 12. The legs should be stuffed firmly up to row 13. Following these stated checkpoints helps preserve the construction described in the pattern and leaves the folded upper sections ready for sewing.
Avoid changing the specified stuffing areas simply to make a component feel firmer or softer. The original instructions provide different stuffing points for different pieces, so keeping those instructions consistent is important for maintaining the intended construction.
Quick Construction Checklist
- Gather YarnArt Jeans 62, 53, and 84.
- Prepare the 2 mm crochet hook.
- Prepare two 10 mm safety eyes.
- Make the head through Round 27.
- Make the body through Round 34.
- Make two eye pieces.
- Make the muzzle.
- Make two ears.
- Make two arms.
- Make two legs, including the white-to-black color change.
- Make the tail.
- Make the removable overalls.
- Make two 70-chain straps.
- Add the buttons to fasten the straps.
- Sculpt the face according to the reference image.
- Sew the muzzle between the eyes.
- Embroider the eye whites and nose.
- Attach the ears.
- Attach the legs between rows 13-14.
- Attach the tail between rows 13-15 at the center of the back.
Common Construction Checkpoints
There are several points where it is useful to pause and compare your work with the written instructions. On the head, the increasing section progresses to 60 stitches at Round 12, followed by 60 sc from Rounds 13-21. The decreases then gradually bring the piece down to 20 stitches at Round 27.
On the body, the widest section reaches 66 stitches at Round 11 and stays at 66 sc through Round 18. The shaping then progresses through a sequence of decreases before the yarn changes to black at Round 31.
The legs have another important checkpoint at Round 6, where black yarn is introduced while working in the back loops only. The following shaping reduces the leg to 16 stitches by Round 12, after which 16 sc continue through Round 22.
For the overalls, remember that the construction includes the tail opening and then transitions into the pant-leg formation. The 6 center stitches on both the front and back are marked before the pieces are sewn together.
Finishing the Panda
Once all of the crocheted pieces have been assembled, check the overall shape of the toy. Make sure the head is secure, the facial features are positioned according to the reference, and the arms and legs are firmly attached. The tail should sit at the center of the back between rows 13-15.
Put the completed overalls onto the panda and check that the straps sit correctly. The buttons provide the fastening detail that allows the clothing to remain removable. The yellow clothing color creates a bright contrast against the panda’s black-and-white body.
The completed Ron the Panda measures approximately 24 cm tall. With its removable pants, sculpted face, rounded ears, and carefully assembled limbs, it makes a distinctive handmade amigurumi character that can be displayed as a decoration or enjoyed as a soft crocheted toy.
Why This Panda Makes a Fun Crochet Project
This pattern brings together several useful amigurumi techniques in one project. You practice working into a magic ring, building rounded shapes through increases, shaping with decreases, changing yarn colors, working in back loops only, creating separate facial components, folding and sewing pieces, and constructing removable clothing.
The overalls add an extra layer of interest because they are made separately from the panda itself. The straps and buttons also give the finished project a clothing detail that makes Ron feel more like a complete character rather than a simple stuffed animal.
For crocheters who enjoy detailed finishing work, the face provides another engaging stage. Sculpting according to the reference image, positioning the muzzle between the eyes, adding embroidered eye whites, and embroidering the nose all contribute to the final expression.
Final Thoughts
Ron the Panda in Pants is a charming amigurumi project with a satisfying combination of simple shapes and detailed finishing. The construction begins with the head and body, continues through the smaller facial and limb components, and ends with the removable overalls and final assembly.
For the best result, keep the technical instructions exactly in sequence, monitor the stitch counts at the end of each round, and pay close attention to the specified placement instructions during assembly. The body should be stuffed firmly, the arms and legs should follow their stated stuffing limits, and the facial features should be positioned according to the reference.
Once the last sewing details are complete and the straps are fastened with buttons, your crocheted panda is ready. The finished character combines the classic appeal of panda colors with a playful pair of removable pants, making it a memorable handmade amigurumi project.
Finished Size: Approximately 24 cm tall.
Designer: evgi_toys.khv