
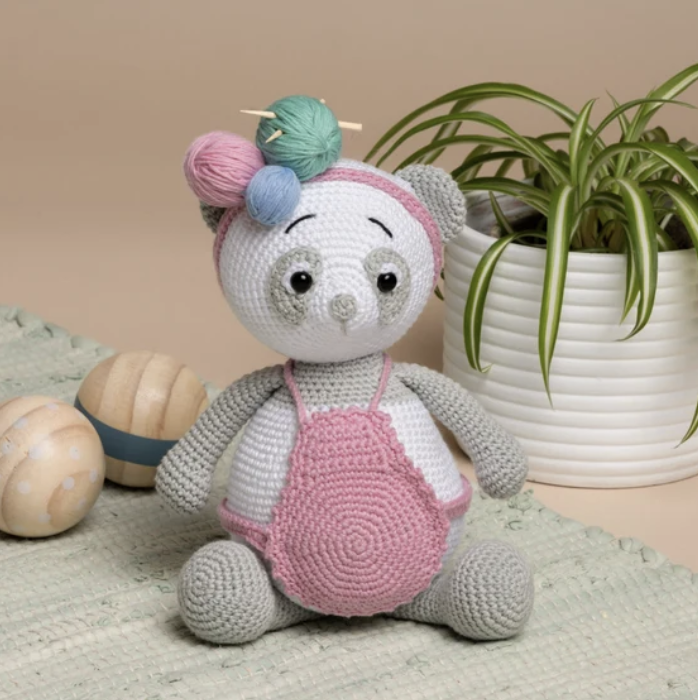

Making Pif Panda Mum is the kind of crochet project where small details make a big difference. The finished panda combines several individual amigurumi components with facial details, a decorative apron, a ribbon, tiny yarn balls, and carefully positioned features. The result is a character that feels expressive and complete rather than simply being a collection of crocheted shapes.
This guide approaches the project as a crochet workshop. Instead of treating the pattern as one long sequence, each major stage is organized around useful stitch checkpoints. That makes it easier to pause, count, inspect the shape, and make sure the construction is progressing as intended before moving to the next component.
The pattern uses tight amigurumi crochet and several small pieces. For that reason, keeping your stitch counts accurate is particularly important. The original pattern should remain your technical reference throughout the project, especially for round numbers, stitch counts, placement instructions, and assembly.
Project Snapshot Before You Begin
Pif Panda Mum has a finished size of approximately 24 cm (9.4 inches). The pattern is worked with a 2.50 mm crochet hook and Friends Cotton 8/4 yarn.
The yarn quantities and colors specified for the project are:
- Friends Cotton 8/4 White (#001) – 1 skein
- Friends Cotton 8/4 Silver (#118) – 1 skein
- Friends Cotton 8/4 Candyfloss (#045) – 1 skein
You will also need:
- 2 safety eyes, 8 mm
- 1 wooden button, 12 mm
- Black scrap yarn for the eyebrows
- Scrap yarn in 3 colors for the ribbon
- Fiberfill
- 2 matches for the knitting needles used with the small yarn balls
The pattern specifically notes that matches should not be used when the finished item is intended for babies or children. If the panda is being made as a child-oriented item, this detail should be taken seriously.
Abbreviations Used in the Pattern
Keeping the abbreviations nearby makes it easier to follow the individual rounds without repeatedly stopping to interpret them.
- ch – chain
- sc – single crochet
- sl st – slip stitch
- mr – magic ring
- hdc – half double crochet
- inc – increase
- dec – decrease
- rnd(s) – round(s)
- (xx) – number of stitches at the end of the round or row
The pattern uses the same crochet terminology throughout, so maintain the terminology and abbreviations as written rather than converting them to another crochet system.
Build the Small Components First
One useful way to approach this project is to complete the smaller pieces before committing to the larger body construction. The arms, eye pieces, ears, snout, and tail are all relatively compact. Completing them first gives you a collection of finished components ready for the assembly stages.
Arms: Silver #118
Make 2 arms using Silver #118.
Begin with a magic ring and work:
- Rnd 1: 6 sc in a mr.
- Rnd 2: (inc) 6 times (12).
- Rnd 3: (1 sc, inc) 6 times (18).
- Rnds 4-7: 1 sc in each st (18).
Stuff the hand and arm lightly at this point.
- Rnd 8: (dec) 5 times, 8 sc (13).
- Rnds 9-23: 1 sc in each st (13).
Fasten off and leave a long tail for sewing. The light stuffing is intentional. The arms should remain flexible enough to sit naturally against the body rather than becoming rigid.
The White Eye Pieces
Make 2 white eye pieces. Work Rnd 1: 4 sc in a mr.
Do not tighten the magic ring completely. Leave a long tail. The pattern also provides an alternative of creating the white embroidery edge around the eye, so follow the construction shown in the source.

Grey Eye Pieces: Silver #118
Make 2 grey eye pieces in Silver #118. These pieces are worked in rows and then edged around the complete shape.
- Row 1: Ch 4, turn.
- Row 2: Begin in the 2nd chain, (inc) 3 times, ch 1, turn (6).
- Row 3: (inc) 6 times, ch 1, turn (12).
- Row 4: Work around the entire eye, 1 sc in each st and 2 sc in each corner (19).
Attach the safety eye at the edge of the eye piece, positioned 3 rounds below the top. The curved part should face outward. This placement becomes important later when the two eye pieces are positioned on the head.
The Head: Your Main Facial Checkpoint
The head is worked in White #001. Because the eyes, snout, eyebrows, and ears all depend on the final head shape, this is a good stage to slow down and check your work frequently.
Work the head as follows:
- Rnd 1: 6 sc in a mr.
- Rnd 2: (inc) 6 times (12).
- Rnd 3: (1 sc, inc) 6 times (18).
- Rnd 4: 1 sc in each st (18).
- Rnd 5: (inc) 6 times, 12 sc (24).
- Rnd 6: (1 sc, inc) 6 times, 12 sc (30).
- Rnd 7: (4 sc, inc) 6 times (36).
- Rnd 8: 1 sc in each st (36).
- Rnd 9: (5 sc, inc) 6 times (42).
- Rnd 10: (6 sc, inc) 6 times (48).
- Rnd 11: (7 sc, inc) 6 times (54).
- Rnd 12: (8 sc, inc) 6 times (60).
- Rnd 13: (9 sc, inc) 6 times (66).
At this point, pause for the facial construction. Place the grey eye pieces together with the safety eyes. The safety eyes should be positioned between Rnds 6 and 7, with 12 sc between the eyes. There should be approximately 6 sc between the upper grey eye pieces.
The snout points upwards. The white eye pieces are positioned around the safety eyes, and the magic rings are tightened. Sew the grey eye pieces securely in place and stuff the head.

Continue the head:
- Rnds 14-25: 1 sc in each st (66).
- Rnd 26: (9 sc, dec) 6 times (60).
- Rnd 27: (8 sc, dec) 6 times (54).
- Rnd 28: (7 sc, dec) 6 times (48).
- Rnd 29: (6 sc, dec) 6 times (42).
- Rnd 30: (5 sc, dec) 6 times (36).
- Rnd 31: (4 sc, dec) 6 times (30).
- Rnd 32: (3 sc, dec) 6 times (24).
- Rnd 33: (2 sc, dec) 6 times (18).
- Rnd 34: (1 sc, dec) 6 times (12).
- Rnd 35: (2 sc, dec) 3 times (9).
Close the final 9 stitches through the front loop.
Face Finishing: Placement Matters More Than Speed
Once the head is crocheted, the facial features become the visual center of the entire project. Before sewing anything permanently, compare the placement of both sides and check that the eyes remain level.
The eyebrows are worked with black scrap yarn between Rnds 11 and 12, with 6 sc between them. The snout is sewn to the tip, and the stripe is embroidered downward.
These details are small, but they strongly influence the expression of the finished panda. A useful beginner habit is to temporarily position each piece before making the final sewing stitches. This allows you to inspect the overall expression rather than judging each component separately.
Body Construction: The Second Major Checkpoint
The body is worked in White #001 before changing to Silver #118 near the lower section.
- Rnd 1: 6 sc in a mr.
- Rnd 2: (inc) 6 times (12).
- Rnd 3: (1 sc, inc) 6 times (18).
- Rnd 4: (2 sc, inc) 6 times (24).
- Rnd 5: (3 sc, inc) 6 times (30).
- Rnd 6: (4 sc, inc) 6 times (36).
- Rnd 7: (5 sc, inc) 6 times (42).
- Rnd 8: (6 sc, inc) 6 times (48).
- Rnd 9: (7 sc, inc) 6 times (54).
- Rnd 10: (8 sc, inc) 6 times (60).
- Rnd 11: (9 sc, inc) 6 times (66).
Continue with:
- Rnds 12-24: 1 sc in each st (66).
Stuff the body firmly during this section. Firm stuffing helps the body maintain the intended shape, while the stitching must remain tight enough that the stuffing does not show through the fabric.
- Rnd 25: (9 sc, dec) 6 times (60).
- Rnds 26-27: 1 sc in each st (60).
- Rnd 28: (8 sc, dec) 6 times (54).
- Rnds 29-30: 1 sc in each st (54).
- Rnd 31: (7 sc, dec) 6 times (48).
- Rnds 32-33: 1 sc in each st (48).
- Rnd 34: (6 sc, dec) 6 times (42).
Change to Silver #118.
- Rnds 35-36: 1 sc in each st (42).
- Rnd 37: (5 sc, dec) 6 times (36).
Joining the Arms
The arms are joined during Rnd 38. Work 8 sc, then 6 sc with the first arm through both arm layers and all 4 loops, followed by 15 sc, 6 sc with the second arm through both arm layers and all 4 loops, and 1 sc (36).
- Rnd 39: 1 sc in each st (36).
- Rnd 40: (4 sc, dec) 6 times (30).
- Rnd 41: 1 sc in each st (30).

Legs: Shape and Stuffing Checkpoint
Make 2 legs in Silver #118.
- Rnd 1: 6 sc in a mr.
- Rnd 2: (inc) 6 times (12).
- Rnd 3: (1 sc, inc) 6 times (18).
- Rnd 4: (2 sc, inc) 6 times (24).
- Rnd 5: (3 sc, inc) 6 times (30).
- Rnd 6: (4 sc, inc) 6 times (36).
- Rnds 7-10: 1 sc in each st (36).
- Rnd 11: (dec) 6 times, 24 sc (30).
- Rnd 12: (3 sc, dec) 6 times (24).
- Rnd 13: (2 sc, dec) 6 times (18).
- Rnds 14-24: 1 sc in each st (18).
Stuff the foot firmly and the remainder of the leg lightly. This difference in stuffing is part of the original construction and helps preserve the intended balance between a stable foot and a softer upper section.
Ears and the Final Head Silhouette
Make 2 ears in Silver #118.
- Rnd 1: 6 sc in a mr.
- Rnd 2: (inc) 6 times (12).
- Rnd 3: (1 sc, inc) 6 times (18).
- Rnd 4: (5 sc, inc) 3 times (21).
- Rnds 5-7: 1 sc in each st (21).
During assembly, sew the ears onto Rnd 23 of the head, leaving approximately 13 sc between them. Take time to compare both sides before securing the stitches. Symmetry is especially noticeable in the ears because they define the upper outline of the panda’s head.

The Pink Apron: A Decorative Change of Pace
The apron uses Candyfloss #045 and provides a welcome contrast to the amigurumi body. Because it includes both rounds and turned rows, mark your progress carefully.
- Rnd 1: 6 sc in a mr.
- Rnd 2: (inc) 6 times (12).
- Rnd 3: (1 sc, inc) 6 times (18).
- Rnd 4: (2 sc, inc) 6 times (24).
- Rnd 5: (3 sc, inc) 6 times (30).
- Rnd 6: (4 sc, inc) 6 times (36).
- Rnd 7: (5 sc, inc) 6 times (42).
- Rnd 8: (6 sc, inc) 6 times (48).
- Rnd 9: 1 sc in each st (48).
Continue with the turned rows:
- Rows 10-13: 8 sc, ch 1, turn.
- Row 14: Skip the first st, 7 sc, ch 1, turn.
- Row 15: Skip the first st, 6 sc, ch 1, turn.
- Row 16: Edge the entire apron, approximately 58 sc.
- Row 17: Skip 1 st, (1 sc, ch 2, 1 sc) in the same st, repeat.
- Row 18: Ch 40 for the neck strap and attach to the other side.
For the apron tie strings, use Candyfloss #045:
- Rnd 1: Ch 37.
- Rnd 2: Begin in the 3rd chain, 35 hdc.
When the apron is attached later, the tie strings are sewn at each side of the apron and on the back.

Snout and Tail
The snout is made in Silver using a very small amount of crochet:
- Rnd 1: 6 sc in a mr, 1 sl st.
Sew the snout to the tip of the head and embroider the stripe downward.
The tail is also worked in Silver:
- Rnd 1: 6 sc in a mr.
- Rnd 2: (inc) 6 times (12).
- Rnd 3: (1 sc, inc) 6 times (18).
- Rnds 4-6: 1 sc in each st (18).
Stuff the tail lightly.
Creating the Ribbon and Tiny Yarn Balls
The ribbon uses Candyfloss #045:
- Rnd 1: Ch 75.
- Rnd 2: Join into a ring in the first ch, 74 sc.
The project also includes three tiny yarn balls in your preferred colors. The approximate sizes specified are 3.5 cm, 3 cm, and 2.5 cm.
The sample uses two matches as knitting needles for the miniature yarn balls. The edges are smoothed with sandpaper. Again, the original pattern specifically states that matches should not be used if the finished product is intended for a baby or child.

Assembly Workshop: Put the Character Together
Assembly is where every completed component begins to work as one character. It is helpful to have the head, body, arms, legs, ears, snout, tail, apron, ribbon, and yarn balls ready before beginning the final sewing.
Head and Ear Assembly
Sew the ears onto Rnd 23 of the head, leaving approximately 13 sc between them. The eyebrows go between Rnds 11 and 12, with 6 sc between them.
The grey eye pieces should already be positioned according to the facial instructions, with the safety eyes between Rnds 6 and 7 and 12 sc between the eyes. The snout is sewn to the tip, with the stripe embroidered downward.
Leg Placement
Sew the legs diagonally from Rnd 3. Before completing the sewing, inspect the panda from the front and side so that both legs sit consistently.
Head Decorations
Sew the yarn balls and ribbon onto the head as shown in the pattern. Keep the decorative elements secure without allowing the sewing stitches to pull the crocheted fabric out of shape.
Apron and Back Details
Attach the apron to the body. Sew the tie strings at each side of the apron and on the back. The 12 mm wooden button is attached to the back tie-string.
The tail is sewn to the middle of the back.
Joining Head and Body
Sew the head to the body. While sewing, stuff between the head and body as needed so the connection remains properly filled and supported.

Stuffing Guide: Different Pieces Need Different Density
Stuffing is not handled identically for every component. The original pattern gives specific guidance, and following those differences helps preserve the intended construction.
- Head: Stuff firmly.
- Body: Stuff firmly.
- Arms: Stuff lightly.
- Legs: Stuff the foot firmly and the remainder lightly.
- Tail: Stuff lightly.
The pattern also emphasizes working tightly enough to avoid holes. This is particularly important with amigurumi because visible gaps can expose the fiberfill and change the finished appearance.
Stitch Checkpoints for a More Controlled Crochet Session
When working a detailed amigurumi, it is easy to continue crocheting while assuming that a missed increase or decrease will somehow correct itself later. It usually will not. A better strategy is to create checkpoints.
After every increase-heavy section, count the stitches. For example, the head progresses from 6 stitches in Rnd 1 to 66 stitches by Rnd 13. The body similarly expands to 66 stitches by Rnd 11. These numbers provide clear points at which to verify the shape before continuing.
Color changes are another natural checkpoint. The body changes from White #001 to Silver #118 after Rnd 34, with Rnds 35-36 in Silver. The arm joins then take place in Rnd 38. Keeping these stages clearly separated can make the construction easier to manage.
The apron is another place where counting becomes important because the construction switches from rounds to rows. Marking Row 10 through Row 18 separately can prevent accidentally treating the apron like continuous circular crochet.
Common Beginner Problems and How to Check Your Work
The Head Does Not Look Symmetrical
Check the eye placement before assuming the crochet itself is incorrect. The safety eyes should be between Rnds 6 and 7, with 12 sc between them. The grey eye pieces also have specific positioning and should be attached consistently.
The Arms Feel Too Stiff
The pattern calls for the hands and arms to be stuffed lightly. Avoid adding dense stuffing simply because the piece feels empty before assembly.
The Legs Do Not Have the Same Shape
Compare both legs round by round. Each leg should follow the same stitch sequence, including the decrease rounds and the different stuffing densities between the foot and the remainder of the leg.
The Body Has Visible Gaps
Check your crochet tension. The pattern is intended to be worked tightly enough to avoid holes. If fiberfill is visible, review your tension rather than simply adding more stuffing.
The Apron Looks Uneven
Review the transition from Rnd 9 to Rows 10-13. The apron uses turned rows, followed by decreases in Rows 14 and 15 and an edging in Row 16. Keeping these sections distinct helps preserve its intended shape.
A Practical Final Assembly Checklist
- Confirm the finished size is approximately 24 cm (9.4 inches).
- Confirm the head is firmly stuffed.
- Confirm the body is firmly stuffed.
- Confirm the arms are lightly stuffed.
- Confirm the foot sections of the legs are firmly stuffed.
- Confirm the remainder of the legs is lightly stuffed.
- Confirm the tail is lightly stuffed.
- Check that the two 8 mm safety eyes are positioned according to the head instructions.
- Check that the grey eye pieces are sewn securely.
- Check that approximately 6 sc separate the eyebrows.
- Check the snout and downward embroidered stripe.
- Check the ears on Rnd 23 with approximately 13 sc between them.
- Check the legs are sewn diagonally from Rnd 3.
- Check the apron is securely attached.
- Check the tie strings on the sides and back.
- Check the 12 mm wooden button on the back tie-string.
- Check the tail at the middle of the back.
- Check the ribbon and three yarn balls.
- Check that the finished crochet fabric does not have holes exposing the stuffing.
Final Finishing Review
Before calling Pif Panda Mum finished, turn the project slowly and inspect it from every direction. The front should show the facial details clearly, while the side view should reveal a stable head-to-body connection and properly positioned arms and legs. The back should show the tail, apron tie-string, and wooden button in their intended positions.
Pay particular attention to the decorative pieces. The ribbon and yarn balls are small enough that loose sewing can become noticeable. Likewise, the apron should sit neatly against the body without pulling the surrounding stitches out of shape.
The final result depends less on rushing through the individual rounds and more on respecting the checkpoints built into the construction. Accurate stitch counts create the shapes, controlled stuffing supports those shapes, and careful placement gives Pif her recognizable expression.
Why This Project Works So Well as an Amigurumi Workshop
Pif Panda Mum combines several useful crochet techniques in one project. You work magic rings, increases, decreases, continuous rounds, turned rows, color changes, small accessory pieces, facial placement, embroidery, joining, stuffing, and sewing. That makes the finished panda not only a decorative project but also a practical opportunity to strengthen several amigurumi skills.
The most important lesson is consistency. A small component such as an eye piece may seem insignificant, but its position affects the expression of the whole head. Similarly, the density of stuffing in a foot affects how the finished panda sits, while the position of the ears affects the silhouette.
For that reason, take your time at each checkpoint. Count before moving on, compare matching pieces, and inspect the character from several angles during assembly. These habits are useful far beyond this one panda project.
Final Thoughts on Pif Panda Mum
Pif Panda Mum is a detailed character project with a combination of classic amigurumi construction and playful decorative elements. The White #001 and Silver #118 body colors establish the panda character, while Candyfloss #045 gives the apron and ribbon a distinctive finishing touch.
Once the technical rounds are complete, the personality of the project comes from the finishing work: the carefully positioned 8 mm safety eyes, grey eye pieces, embroidered eyebrows and snout stripe, ears, apron, wooden button, ribbon, and tiny yarn balls.
Keep the stitch counts and placement instructions as your guide from beginning to end. When the crochet is worked tightly, the stuffing is distributed according to the pattern, and the individual pieces are assembled carefully, the result is a charming approximately 24 cm (9.4 inch) panda with a wonderfully recognizable handmade character.