
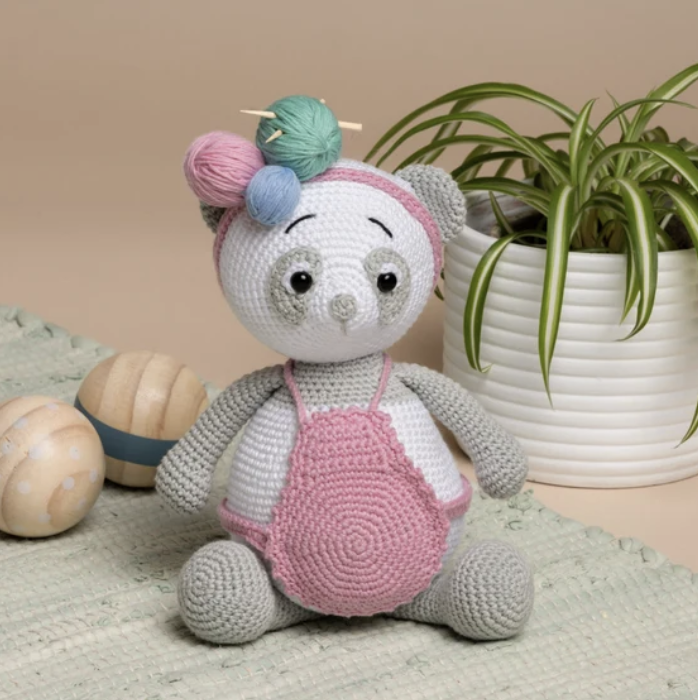

Pif Panda Mum is a charming amigurumi project that combines traditional stuffed-animal crochet with a collection of small decorative details. The finished character is approximately 24 cm (9.4 inches) tall and features a white and silver body, expressive facial details, a Candyfloss apron, a ribbon, a wooden button, and three tiny yarn balls.
This version of the tutorial is organized as a complete construction guide. Rather than treating the pattern as one uninterrupted list of rounds, we will look at how the individual pieces relate to one another and how the project moves from crocheted components to the finished character.
The technical instructions below follow the original pattern information. Keep your stitch counts, round numbers, row numbers, color changes, and placement instructions exactly as specified. This is especially important for amigurumi because even a small difference in a decrease or an assembly position can change the final proportions.
What Makes This Panda Special?
The personality of Pif Panda Mum comes from the combination of simple crocheted shapes and careful finishing. The head and body provide the main structure, while the silver arms, legs, ears, and tail create the panda appearance. The Candyfloss apron and ribbon add a softer decorative contrast.
The face is particularly important. The project uses 8 mm safety eyes together with handmade white and grey eye pieces, embroidered eyebrows, and a silver snout. The placement of these details determines the expression of the finished panda.
There are also several different stuffing requirements. The head and body are stuffed firmly, the arms are stuffed lightly, the feet are stuffed firmly while the remainder of the legs is stuffed lightly, and the tail is stuffed lightly. Following these differences helps maintain the intended shape.
Materials and Supplies
Before beginning, gather all of the materials listed in the pattern so that you can move between the construction stages without having to stop midway through a component.
- Friends Cotton 8/4 White (#001) – 1 skein
- Friends Cotton 8/4 Silver (#118) – 1 skein
- Friends Cotton 8/4 Candyfloss (#045) – 1 skein
- 2.50 mm crochet hook
- 2 safety eyes, 8 mm
- 1 wooden button, 12 mm
- Black scrap yarn for the eyebrows
- Scrap yarn in 3 colors for the ribbon and miniature yarn balls
- Fiberfill
- 2 matches for the miniature knitting needles used with the yarn balls
The pattern includes an important safety note concerning the matches. The sample uses two matches as knitting needles for the tiny yarn balls, with their edges smoothed using sandpaper. The pattern states that matches should not be used if the finished product is intended for babies or children.
Pattern Abbreviations
Keep this list beside your work while crocheting:
- ch – chain
- sc – single crochet
- sl st – slip stitch
- mr – magic ring
- hdc – half double crochet
- inc – increase
- dec – decrease
- rnd(s) – round(s)
- (xx) – stitch count at the end of the round or row
Use the same crochet terminology as the original pattern. Do not convert the instructions into a different crochet terminology system.
Stage One: Crochet the Arms
The arms are made in Silver #118. Make two identical arms and keep the long yarn tails because they are needed during assembly.
- Rnd 1: 6 sc in a mr.
- Rnd 2: (inc) 6 times (12).
- Rnd 3: (1 sc, inc) 6 times (18).
- Rnds 4-7: 1 sc in each st (18).
Stuff the hand and arm lightly.
- Rnd 8: (dec) 5 times, 8 sc (13).
- Rnds 9-23: 1 sc in each st (13).
Fasten off and leave a long tail. Repeat the complete process for the second arm.
Because these pieces will eventually be joined directly into the body, keep their shape even and avoid overstuffing them. The original pattern calls for light stuffing, so there is no need to make the arms firm like the body.
Stage Two: Prepare the Eye Details
The face contains several separate pieces. Preparing them before completing the head makes the later facial assembly much easier.
White Eye Pieces
Make two white eye pieces.
- Rnd 1: 4 sc in a mr.
Do not tighten the magic ring completely. Leave a long tail. The original pattern also gives an alternative of creating the white embroidery edge around the eye.
Grey Eye Pieces
Use Silver #118 to make two grey eye pieces.
- Row 1: Ch 4, turn.
- Row 2: Begin in the 2nd chain, (inc) 3 times, ch 1, turn (6).
- Row 3: (inc) 6 times, ch 1, turn (12).
- Row 4: Edge around the entire eye, 1 sc in each st and 2 sc in each corner (19).
The safety eye is attached at the edge of the grey eye piece, 3 rounds below the top. The curved part faces outward.

Stage Three: Crochet the Head
The head is worked in White #001. This is one of the most important sections of the entire project because nearly every facial feature depends on its shape and stitch placement.
- Rnd 1: 6 sc in a mr.
- Rnd 2: (inc) 6 times (12).
- Rnd 3: (1 sc, inc) 6 times (18).
- Rnd 4: 1 sc in each st (18).
- Rnd 5: (inc) 6 times, 12 sc (24).
- Rnd 6: (1 sc, inc) 6 times, 12 sc (30).
- Rnd 7: (4 sc, inc) 6 times (36).
- Rnd 8: 1 sc in each st (36).
- Rnd 9: (5 sc, inc) 6 times (42).
- Rnd 10: (6 sc, inc) 6 times (48).
- Rnd 11: (7 sc, inc) 6 times (54).
- Rnd 12: (8 sc, inc) 6 times (60).
- Rnd 13: (9 sc, inc) 6 times (66).
At this point, work on the facial placement before continuing with the remaining head rounds. Position the grey eye pieces with their safety eyes. The safety eyes should be between Rnds 6 and 7, with 12 sc between the eyes.
There should be approximately 6 sc between the upper grey eye pieces. The snout points upwards. Place the white eye pieces around the safety eyes and tighten their magic rings. Sew the grey eye pieces in position and stuff the head.

Continue the head:
- Rnds 14-25: 1 sc in each st (66).
- Rnd 26: (9 sc, dec) 6 times (60).
- Rnd 27: (8 sc, dec) 6 times (54).
- Rnd 28: (7 sc, dec) 6 times (48).
- Rnd 29: (6 sc, dec) 6 times (42).
- Rnd 30: (5 sc, dec) 6 times (36).
- Rnd 31: (4 sc, dec) 6 times (30).
- Rnd 32: (3 sc, dec) 6 times (24).
- Rnd 33: (2 sc, dec) 6 times (18).
- Rnd 34: (1 sc, dec) 6 times (12).
- Rnd 35: (2 sc, dec) 3 times (9).
Close the final 9 stitches through the front loop.
Stage Four: Complete the Facial Expression
Once the head is finished, the remaining facial details can be added. Use black scrap yarn for the eyebrows. They are positioned between Rnds 11 and 12, with 6 sc between them.
The snout is sewn to the tip of the head, and the stripe is embroidered downward. When working these details, compare both sides of the face before making the final stitches. The facial features are small, so even a slight difference in position can affect the expression.
Stage Five: Build the Body
The body begins in White #001 and gradually expands before narrowing toward the lower section. Keep a stitch marker handy and count at the end of every increase or decrease section.
- Rnd 1: 6 sc in a mr.
- Rnd 2: (inc) 6 times (12).
- Rnd 3: (1 sc, inc) 6 times (18).
- Rnd 4: (2 sc, inc) 6 times (24).
- Rnd 5: (3 sc, inc) 6 times (30).
- Rnd 6: (4 sc, inc) 6 times (36).
- Rnd 7: (5 sc, inc) 6 times (42).
- Rnd 8: (6 sc, inc) 6 times (48).
- Rnd 9: (7 sc, inc) 6 times (54).
- Rnd 10: (8 sc, inc) 6 times (60).
- Rnd 11: (9 sc, inc) 6 times (66).
Continue:
- Rnds 12-24: 1 sc in each st (66).
Stuff the body firmly.
- Rnd 25: (9 sc, dec) 6 times (60).
- Rnds 26-27: 1 sc in each st (60).
- Rnd 28: (8 sc, dec) 6 times (54).
- Rnds 29-30: 1 sc in each st (54).
- Rnd 31: (7 sc, dec) 6 times (48).
- Rnds 32-33: 1 sc in each st (48).
- Rnd 34: (6 sc, dec) 6 times (42).
Change to Silver #118.
- Rnds 35-36: 1 sc in each st (42).
- Rnd 37: (5 sc, dec) 6 times (36).
Joining the Arms Directly Into the Body
The arm attachment is worked during Rnd 38. This is a construction stage where accurate positioning matters.
Work 8 sc, then 6 sc with the arm through both arm layers and all 4 loops, followed by 15 sc, 6 sc with the second arm through both arm layers and all 4 loops, and 1 sc (36).
- Rnd 39: 1 sc in each st (36).
- Rnd 40: (4 sc, dec) 6 times (30).
- Rnd 41: 1 sc in each st (30).

Stage Six: Crochet the Legs
Make two legs in Silver #118.
- Rnd 1: 6 sc in a mr.
- Rnd 2: (inc) 6 times (12).
- Rnd 3: (1 sc, inc) 6 times (18).
- Rnd 4: (2 sc, inc) 6 times (24).
- Rnd 5: (3 sc, inc) 6 times (30).
- Rnd 6: (4 sc, inc) 6 times (36).
- Rnds 7-10: 1 sc in each st (36).
- Rnd 11: (dec) 6 times, 24 sc (30).
- Rnd 12: (3 sc, dec) 6 times (24).
- Rnd 13: (2 sc, dec) 6 times (18).
- Rnds 14-24: 1 sc in each st (18).
Stuff each foot firmly. Stuff the remainder of each leg lightly. The distinction between the foot and upper leg stuffing is part of the original pattern and should be maintained.
Stage Seven: Add the Ears
The ears are also worked in Silver #118. Make two.
- Rnd 1: 6 sc in a mr.
- Rnd 2: (inc) 6 times (12).
- Rnd 3: (1 sc, inc) 6 times (18).
- Rnd 4: (5 sc, inc) 3 times (21).
- Rnds 5-7: 1 sc in each st (21).
The ears are sewn onto Rnd 23 of the head, with approximately 13 sc between them. Check the distance between the ears before completing the sewing so that the head remains balanced.

Stage Eight: Crochet the Candyfloss Apron
The apron is made with Candyfloss #045. Unlike the main body and head, this component moves from rounds into turned rows, so it is useful to keep the row numbers clearly marked.
- Rnd 1: 6 sc in a mr.
- Rnd 2: (inc) 6 times (12).
- Rnd 3: (1 sc, inc) 6 times (18).
- Rnd 4: (2 sc, inc) 6 times (24).
- Rnd 5: (3 sc, inc) 6 times (30).
- Rnd 6: (4 sc, inc) 6 times (36).
- Rnd 7: (5 sc, inc) 6 times (42).
- Rnd 8: (6 sc, inc) 6 times (48).
- Rnd 9: 1 sc in each st (48).
Then work the rows:
- Rows 10-13: 8 sc, ch 1, turn.
- Row 14: Skip the first st, 7 sc, ch 1, turn.
- Row 15: Skip the first st, 6 sc, ch 1, turn.
- Row 16: Edge the entire apron, approximately 58 sc.
- Row 17: Skip 1 st, (1 sc, ch 2, 1 sc) in the same st, repeat.
- Row 18: Ch 40 for the neck strap and attach to the other side.
Apron Tie Strings
Make the apron tie strings in Candyfloss #045:
- Rnd 1: Ch 37.
- Rnd 2: Begin in the 3rd chain, 35 hdc.

Stage Nine: Small Finishing Components
Silver Snout
Work the snout in Silver:
- Rnd 1: 6 sc in a mr, 1 sl st.
The snout is sewn to the tip of the head, followed by the embroidered stripe downward.
Silver Tail
The tail is worked in Silver:
- Rnd 1: 6 sc in a mr.
- Rnd 2: (inc) 6 times (12).
- Rnd 3: (1 sc, inc) 6 times (18).
- Rnds 4-6: 1 sc in each st (18).
Stuff the tail lightly before sewing it to the middle of the back.
Candyfloss Ribbon
Make the ribbon in Candyfloss #045:
- Rnd 1: Ch 75.
- Rnd 2: Join into a ring in the first ch, 74 sc.
Three Miniature Yarn Balls
The three tiny yarn balls are one of the playful features of Pif Panda Mum. They are made in your preferred colors and have approximate sizes of 3.5 cm, 3 cm, and 2.5 cm.
The sample uses two matches as miniature knitting needles. Their edges are smoothed with sandpaper. Remember the safety instruction in the pattern: do not use matches when the finished product is intended for babies or children.
These tiny accessories are best treated as decorative elements rather than something that needs to be made quickly. Their purpose is visual, so neat finishing and secure attachment are more important than rushing through the process.

Putting the Panda Together
Once all the crocheted components have been completed, the project changes from crochet construction to assembly. This stage deserves as much attention as the rounds themselves because the position of each component determines the final appearance.
Attach the Ears
Sew both ears onto Rnd 23 of the head. Leave approximately 13 sc between them. Check their position from the front before tightening the sewing thread.
Finish the Eyebrows and Snout
Embroider the eyebrows with black scrap yarn between Rnds 11 and 12, leaving 6 sc between them. Sew the snout to the tip of the head and embroider the stripe downward.
Attach the Legs
Sew the legs diagonally from Rnd 3. Compare both sides of the body before completing the stitches. Matching placement will help the finished panda maintain a balanced appearance.
Attach the Decorative Head Pieces
Sew the yarn balls and ribbon onto the head. Keep the stitches secure and avoid pulling the surrounding crochet too tightly.
Attach the Apron
Attach the apron to the body. Sew the tie strings at each side of the apron and on the back. Attach the 12 mm wooden button to the back tie-string.
Join the Head and Body
Sew the head to the body. Stuff between the head and body while sewing so the connection remains filled and supported.

Stuffing the Components Correctly
One of the easiest ways to change the character’s final shape is to change the amount of stuffing. For this project, the original instructions distinguish between firm and light stuffing.
- Head: Firm stuffing.
- Body: Firm stuffing.
- Arms: Light stuffing.
- Feet: Firm stuffing.
- Remaining leg sections: Light stuffing.
- Tail: Light stuffing.
Work tightly enough to avoid holes in the crocheted fabric. If the fiberfill is visible through the stitches, the crochet tension or stuffing method should be reviewed before continuing.
How to Keep the Construction Organized
A project containing this many small pieces can become confusing if completed components are mixed together. A simple organization system can make the process much more comfortable.
Keep the two arms together, the two legs together, and the two ears together. Store the eye pieces separately so they do not become mixed with the other silver components. Keep the apron, tie strings, ribbon, and tiny yarn balls together as decorative pieces.
It is also useful to write down which components have already been stuffed. The legs, for example, require two different stuffing densities, while the arms and tail require light stuffing. Recording your progress can prevent accidentally repeating a step.
Important Stitch-Count Checkpoints
Several numbers in the pattern are especially useful as progress checks.
The head begins with 6 sc and expands to 66 stitches by Rnd 13. It remains at 66 stitches through Rnds 14-25 before beginning the decrease sequence.
The body reaches 66 stitches at Rnd 11 and remains at that count through Rnd 24. The color change to Silver #118 happens after Rnd 34, and the arm joining is incorporated in Rnd 38.
The arms finish with 13 stitches during Rnds 9-23. The legs finish with 18 stitches during Rnds 14-24. Each ear reaches 21 stitches and remains there through Rnds 5-7.
These checkpoints are not replacement instructions. They are simply useful places to pause and verify that your work is following the original sequence.
Common Assembly Mistakes to Avoid
Moving the Eyes Too High or Too Low
The eye placement is specifically given between Rnds 6 and 7. Use this as your reference instead of judging the position by eye alone.
Forgetting the Space Between the Eyes
The pattern specifies 12 sc between the safety eyes. Keeping this measurement consistent helps preserve the intended facial proportions.
Uneven Ears
The ears belong on Rnd 23 with approximately 13 sc between them. Before sewing, compare the positions from the front, side, and top.
Overstuffing the Arms
The arms are supposed to be lightly stuffed. Overstuffing them can make the finished character less flexible and alter the intended proportions.
Using the Same Stuffing Density Everywhere
The body and head require firm stuffing, while the arms and tail require light stuffing. The legs also have a combination of firm and light stuffing. Following these distinctions is part of the construction.
Missing the Color Change
The body changes from White #001 to Silver #118 after Rnd 34. Mark this transition clearly so that the lower body section follows the intended color sequence.
Final Quality-Control Checklist
- Finished size is approximately 24 cm (9.4 inches).
- Hook size is 2.50 mm.
- White #001, Silver #118, and Candyfloss #045 are used as specified.
- Two 8 mm safety eyes are installed.
- The 12 mm wooden button is attached to the back tie-string.
- The head is firmly stuffed.
- The body is firmly stuffed.
- The arms are lightly stuffed.
- The feet are firmly stuffed.
- The remaining leg sections are lightly stuffed.
- The tail is lightly stuffed.
- The eyes are between Rnds 6 and 7.
- There are 12 sc between the eyes.
- The grey eye pieces are securely sewn.
- The eyebrows are between Rnds 11 and 12.
- There are 6 sc between the eyebrows.
- The ears are sewn onto Rnd 23.
- There are approximately 13 sc between the ears.
- The legs are sewn diagonally from Rnd 3.
- The apron is attached securely.
- The apron tie strings are attached at the sides and back.
- The tail is sewn to the middle of the back.
- The ribbon and three yarn balls are secured.
- The crocheted fabric is tight enough to prevent visible stuffing.
Finishing the Character
The final inspection is worth doing before trimming or hiding any remaining sewing ends. Look at Pif Panda Mum from the front first. The eyes, eyebrows, snout, and ears should create a balanced face. Then inspect the character from the side to check the head-to-body connection and the diagonal position of the legs.
Turn the panda around and check the back. The tail should be positioned in the middle of the back, while the apron tie-string and wooden button should remain secure. Inspect the decorative ribbon and yarn balls as well.
If something looks slightly uneven, compare it with the specific placement instruction rather than changing the original pattern dimensions. This keeps the finished character faithful to the source.
A Beginner-Friendly Way to Approach the Pattern
Although the project contains many pieces, it becomes much easier when divided into manageable sessions. One session can be devoted to the arms and eye pieces. Another can focus on the head and face. The body, legs, and ears can then be completed before moving to the apron and decorative accessories.
The final session can be reserved for assembly. This approach prevents the sewing and placement stages from becoming rushed simply because the crocheting took longer than expected.
It is also helpful to count deliberately rather than relying on the visual appearance of the work. Amigurumi shapes can sometimes look correct even when a stitch has been missed. The written stitch counts are therefore your most reliable checkpoint.
Why the Finishing Details Matter
Pif Panda Mum is a good example of how accessories can transform a basic crocheted character. Without the apron, ribbon, yarn balls, eyebrows, and carefully positioned eye pieces, the project would have a very different personality.
The Candyfloss apron introduces a strong visual contrast, while the small yarn balls reinforce the playful theme. The wooden button adds another tiny physical detail to the back of the character.
These details also make the project useful for practicing finishing techniques. You are not only crocheting rounds; you are learning how to combine crocheted pieces with embroidery, sewing, stuffing, and small decorative components.
Final Thoughts
Pif Panda Mum brings together a complete collection of amigurumi techniques in one approximately 24 cm (9.4 inch) project. The construction starts with small Silver arms and facial pieces, grows into a carefully shaped White head and body, and finishes with Silver limbs and ears plus a Candyfloss apron and ribbon.
The most successful approach is to treat every stage as part of the final character. Accurate stitch counts create the correct shapes. Appropriate stuffing keeps those shapes supported. Correct eye and ear placement establishes the expression. Finally, careful sewing connects everything into one cohesive panda.
Take your time with the facial details, keep the original round and row numbers visible while working, and use the specified stuffing and placement instructions as your final reference. With careful construction and patient finishing, the separate pieces come together to create the friendly Pif Panda Mum character.