
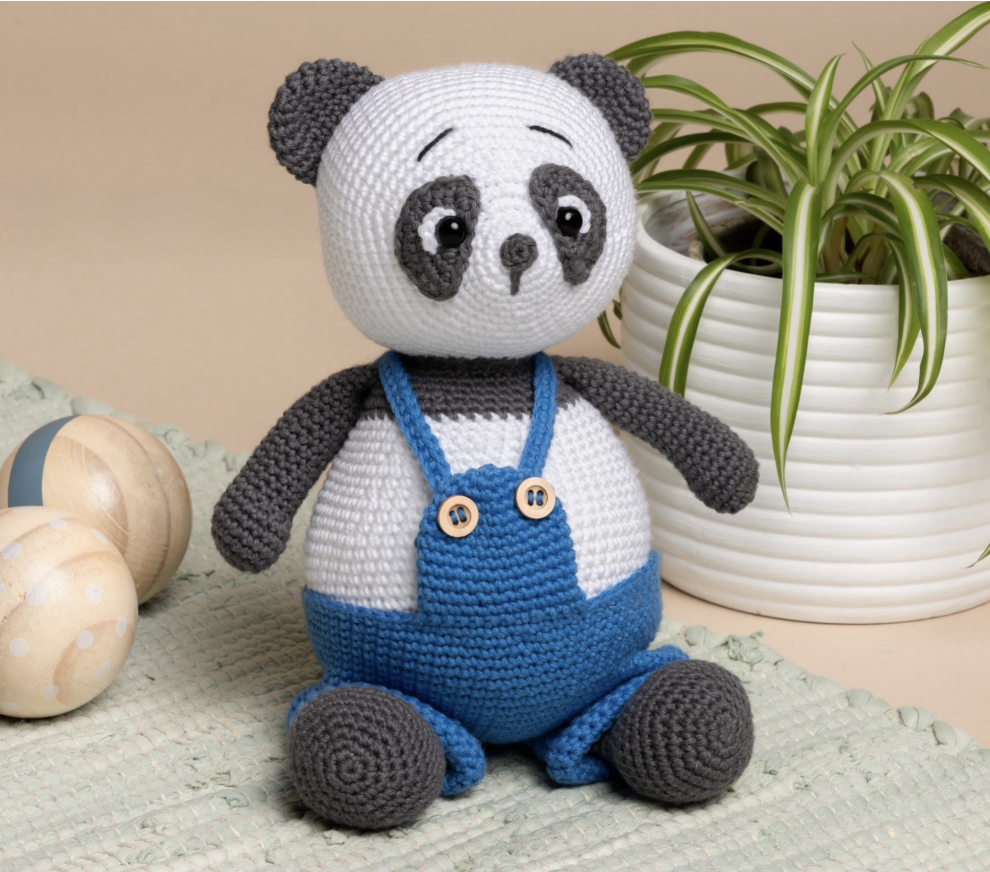
Paf the Panda Dad is an intermediate amigurumi project built from a collection of carefully shaped crochet pieces. Rather than treating the project as one long sequence of stitches, this guide approaches it as a character-building process: first establish the small components, then create the head and body, prepare the clothing, and finally use the stated placement instructions to turn those pieces into the finished panda.
The original pattern identifies the project as Paf – Panda Dad, No. 1020-211-2748. The finished measurement is approximately 22 cm (8.6 inches), and the recommended hook is 2.50 mm. The yarn is Friends Cotton 8/4 in White (#001), Anthracite (#122), and French Blue (#084). The project also calls for black scrap yarn for the eyebrows, two 8 mm safety eyes, two 12 mm wooden buttons, and fiberfill.
This fourth article uses a different presentation from a simple round-by-round tutorial. The focus here is construction logic and finishing checkpoints. The technical sequence remains the same, but the explanations are organized around the parts that make the character recognizable: the face, the rounded body, the limbs, and the overalls.
Project Snapshot Before You Begin
- Pattern: Paf – Panda Dad
- Pattern number: 1020-211-2748
- Skill level: Intermediate
- Hook: 2.50 mm
- Finished size: Approx. 22 cm (8.6 inches)
- Yarn: Friends Cotton 8/4
- White: #001, 1 skein
- Anthracite: #122, 1 skein
- French Blue: #084, 1 skein
- Additional materials: black scrap yarn, 2 safety eyes 8 mm, 2 wooden buttons 12 mm, fiberfill
The pattern abbreviations are ch for chain, sc for single crochet, sl st for slip stitch, mr for magic ring, inc for increase, dec for decrease, rnd(s) for round(s), and a number in parentheses for the number of stitches after a completed round. An increase means 2 stitches in the same stitch, while a decrease means 2 stitches together.
Read the Construction as Four Zones
There are four useful zones to keep in mind while working. The first is the facial zone, consisting of the two-part eye pieces, safety eyes, snout, eyebrows, and ears. The second is the central body zone, consisting of the head and body. The third is the support zone, made from the arms and legs. The fourth is the clothing zone, which is the French Blue overall system.
This way of thinking does not alter the pattern. It simply makes it easier to organize the work. When a small piece is finished, check it against its stitch count. When a large piece reaches a major increase or decrease checkpoint, count again. When assembly begins, use the specified round numbers and approximate stitch spacing rather than relying only on visual judgment.
Start With the Arms
Make 2 arms in Anthracite (#122). Each arm begins with a magic ring and expands to 18 stitches.
- Round 1: 6 sc in a mr.
- Round 2: (inc) 6 times (12).
- Round 3: (1 sc, inc) 6 times (18).
- Rounds 4-7: 1 sc in each st (18).
Stuff the hand and the arm as you work. The next round reduces the opening: Round 8 is (dec) 5 times, 8 sc (13). Then work Rounds 9-23: 1 sc in each st (13). Fasten off.
The important checkpoint is the transition from 18 stitches to 13 stitches. If the arm is still at 18 after Round 8, stop and review that round before continuing. These arms later become part of the body construction during Round 38, so the finishing tails should be left ready for sewing as instructed.
Build the Eye Components Separately
The eyes are assembled from two crocheted components in different colors. This is one of the most visually important details in the pattern, so keeping the pieces organized as a pair is helpful.
White Eye Part
Make 2 in White (#001). Round 1 is 4 sc in a mr. Do not tighten the loop, and leave a tail long enough for assembling.
Grey Eye Part
Make 2 in Anthracite (#122). Chain 1 to turn the work after each completed row.
- Row 1: ch 4, turn.
- Row 2: begin in the 2nd chain from the hook, (inc) 3 times, ch 1, turn (6).
- Row 3: (inc) 6 times, ch 1, turn (12).
- Row 4: make an edge around the entire eye, working 1 sc in each st and 2 sc in each corner (19).
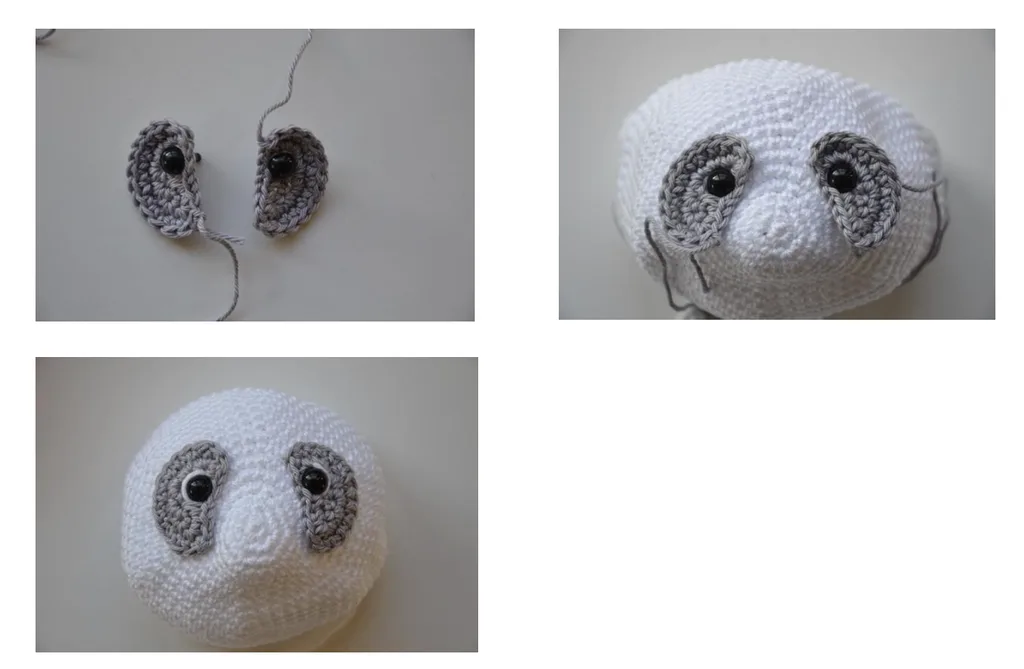
Fasten off and leave a tail long enough for sewing. Attach the safety eye at the edge of the grey part of the eye, 3 rounds below the top. The curved part should point outwards.
At this stage, compare the two eye pieces before attaching them to the head. Matching the direction of the curved portions is important because the face is symmetrical even though each individual grey piece has a shaped outline.
Shape the Head Around the Face
Work the head in White (#001). The crown grows steadily until it reaches 66 stitches.
- Round 1: 6 sc in a mr.
- Round 2: (inc) 6 times (12).
- Round 3: (1 sc, inc) 6 times (18).
- Round 4: 1 sc in each st (18).
- Round 5: (inc) 6 times, 12 sc (24).
- Round 6: (1 sc, inc) 6 times, 12 sc (30).
- Round 7: (4 sc, inc) 6 times (36).
- Round 8: 1 sc in each st (36).
- Round 9: (5 sc, inc) 6 times (42).
- Round 10: (6 sc, inc) 6 times (48).
- Round 11: (7 sc, inc) 6 times (54).
- Round 12: (8 sc, inc) 6 times (60).
- Round 13: (9 sc, inc) 6 times (66).
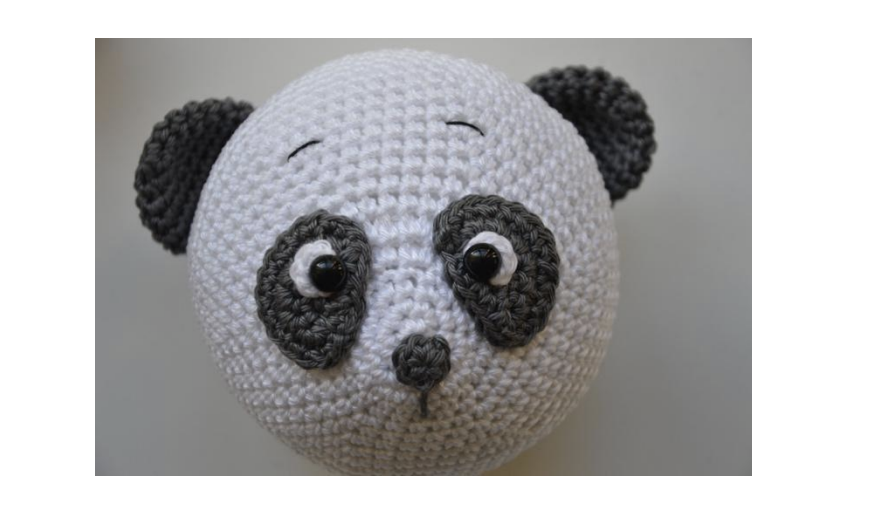
Now place the complete grey eye parts with their safety eyes. Insert the safety eyes between Rounds 6 and 7 on the head, with 12 sc between the eyes and approximately 6 sc between the upper parts of the grey pieces. Make sure the snout points upwards. Place the white part around the safety eye and tighten the magic ring. Sew the grey eye part onto the head.
Stuff the head as you make it. Work Rounds 14-25: 1 sc in each st (66).
The decrease sequence is:
- Round 26: (9 sc, dec) 6 times (60).
- Round 27: (8 sc, dec) 6 times (54).
- Round 28: (7 sc, dec) 6 times (48).
- Round 29: (6 sc, dec) 6 times (42).
- Round 30: (5 sc, dec) 6 times (36).
- Round 31: (4 sc, dec) 6 times (30).
- Round 32: (3 sc, dec) 6 times (24).
- Round 33: (2 sc, dec) 6 times (18).
- Round 34: (1 sc, dec) 6 times (12).
- Round 35: (2 sc, dec) 3 times (9).
Fasten off and leave a tail long enough for closing the hole. Use a needle to gather the last 9 stitches in the front loop and tighten the yarn to close the hole neatly. Weave in the ends.
The Body: Your Main Structural Piece
The body is worked in White (#001). It follows a broad increase section, a long straight section, then a series of decreases before changing to Anthracite.
- Round 1: 6 sc in a mr.
- Round 2: (inc) 6 times (12).
- Round 3: (1 sc, inc) 6 times (18).
- Round 4: (2 sc, inc) 6 times (24).
- Round 5: (3 sc, inc) 6 times (30).
- Round 6: (4 sc, inc) 6 times (36).
- Round 7: (5 sc, inc) 6 times (42).
- Round 8: (6 sc, inc) 6 times (48).
- Round 9: (7 sc, inc) 6 times (54).
- Round 10: (8 sc, inc) 6 times (60).
- Round 11: (9 sc, inc) 6 times (66).
- Rounds 12-24: 1 sc in each st (66).
Stuff the body as you make it. Then work Round 25: (9 sc, dec) 6 times (60). Rounds 26-27: 1 sc in each st (60). Round 28: (8 sc, dec) 6 times (54). Rounds 29-30: 1 sc in each st (54).
Continue with Round 31: (7 sc, dec) 6 times (48), Rounds 32-33: 1 sc in each st (48), and Round 34: (6 sc, dec) 6 times (42). Change to Anthracite (#122).
Rounds 35-36 are 1 sc in each st (42). Round 37 is (5 sc, dec) 6 times (36).
Round 38 is the major arm-attachment checkpoint. Attach the arms on this round by crocheting through both layers of the arm, using all 4 loops on the arm. Then work: 8 sc, 6 sc with arm, 15 sc, 6 sc with arm, 1 sc (36).
Round 39: 1 sc in each st (36). Round 40: (4 sc, dec) 6 times (30). Round 41: 1 sc in each st (30). Fasten off and leave a tail long enough for sewing.
Legs: Firm Feet, Lighter Upper Sections
Make 2 legs in Anthracite (#122).
- Round 1: 6 sc in a mr.
- Round 2: (inc) 6 times (12).
- Round 3: (1 sc, inc) 6 times (18).
- Round 4: (2 sc, inc) 6 times (24).
- Round 5: (3 sc, inc) 6 times (30).
- Round 6: (4 sc, inc) 6 times (36).
- Rounds 7-10: 1 sc in each st (36).
- Round 11: (dec) 6 times, 24 sc (30).
- Round 12: (3 sc, dec) 6 times (24).
- Round 13: (2 sc, dec) 6 times (18).
- Rounds 14-24: 1 sc in each st (18).
Stuff the foot firmly and the rest of the leg lightly with fiberfill. Fasten off and leave a tail long enough for sewing.
The different stuffing levels matter because the foot needs enough filling to hold its rounded form, while the rest of the leg can remain softer. This is a good example of why the finishing notes in the source are part of the technical instructions rather than optional decoration.
Shape the Ears
Make 2 ears in Anthracite (#122).
- Round 1: 6 sc in a mr.
- Round 2: (inc) 6 times (12).
- Round 3: (1 sc, inc) 6 times (18).
- Round 4: (5 sc, inc) 3 times (21).
- Rounds 5-7: 1 sc in each st (21).
Fasten off and leave a sufficiently long tail. Because the ears are a pair, compare their shape before sewing them onto the head.
The Overalls: Build the Clothing in Layers
The French Blue (#084) overalls are made in several sections. This is one of the most distinctive parts of the finished character, so it helps to complete each section separately before assembling the clothing.
First Pants Leg
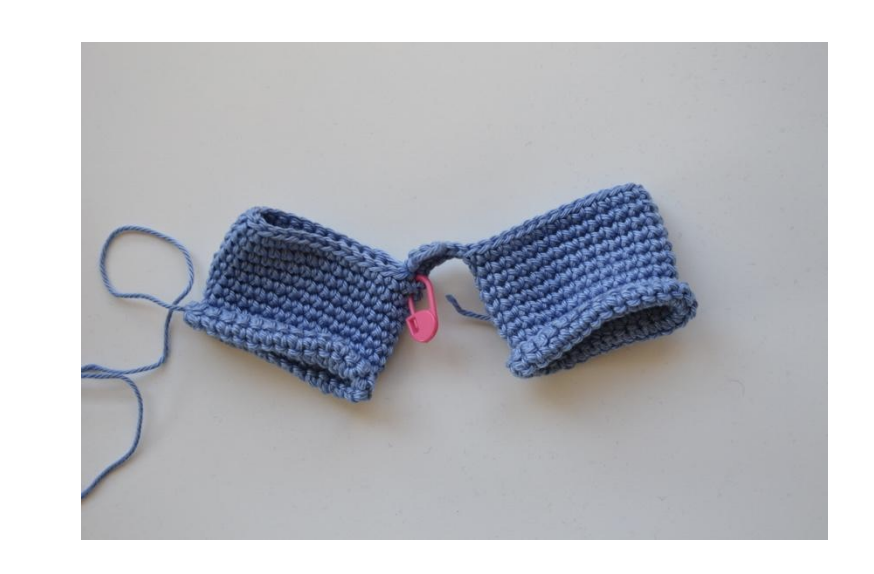
Round 1: ch 30 and join into a ring with a sc in the first ch. Rounds 2-12: 1 sc in each st (30). Fasten off.
Second Pants Leg and Joining
Make one more pants leg but do not break off the yarn. Chain 6 and attach the second pants leg to the first pants leg. Now work around both pants legs.
Round 13: 30 sc around one leg, 6 sc in the chains between the two legs, 30 sc around the second leg, 6 sc in the chains between the two legs (72).
Rounds 14-18: 1 sc in each st (72).
Round 19: 13 sc, dec, 34 sc, dec, 21 sc (70).
Rounds 20-31: 1 sc in each st (70).
Round 32: 15 sc to end at the side of the pants and finish nicely. Fasten off.
Front Panel
In French Blue (#084), work:
- Round 1: 6 sc in a mr.
- Round 2: (inc) 6 times (12).
- Round 3: (1 sc, inc) 6 times (18).
- Round 4: (2 sc, inc) 6 times (24).
- Rounds 5-13: 1 sc in each st (24).
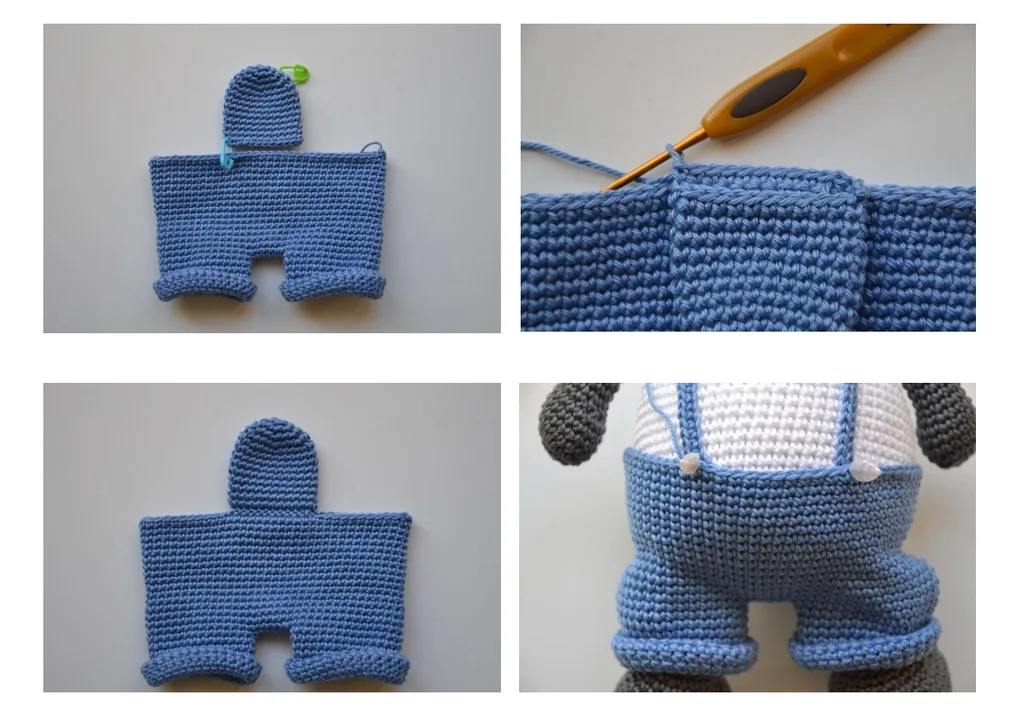
Fasten off. Attach the front panel on the front side of the pants in the middle and crochet the 2 layers together with 12 sc.
Straps
Make 2 straps in French Blue (#084). Round 1: ch 48, turn. Round 2: begin in the 2nd chain from the hook, 46 sc. Fasten off and leave a tail long enough for sewing.
Complete the Snout and Tail
Snout
In Anthracite (#122), work Round 1: 6 sc in a mr, 1 sl st. Fasten off and leave a tail long enough for sewing.
Tail
In Anthracite (#122), work:
- Round 1: 6 sc in a mr.
- Round 2: (inc) 6 times (12).
- Round 3: (1 sc, inc) 6 times (18).
- Rounds 4-6: 1 sc in each st (18).
- Round 7: (1 sc, dec) 6 times (12).
Stuff the tail lightly. Fasten off and leave a tail long enough for sewing.
Assembly: Follow the Placement Instructions
Assembly is the stage where the pattern’s separate measurements and stitch counts become a single character. The source gives specific locations, so these should be treated as the final technical checkpoints.
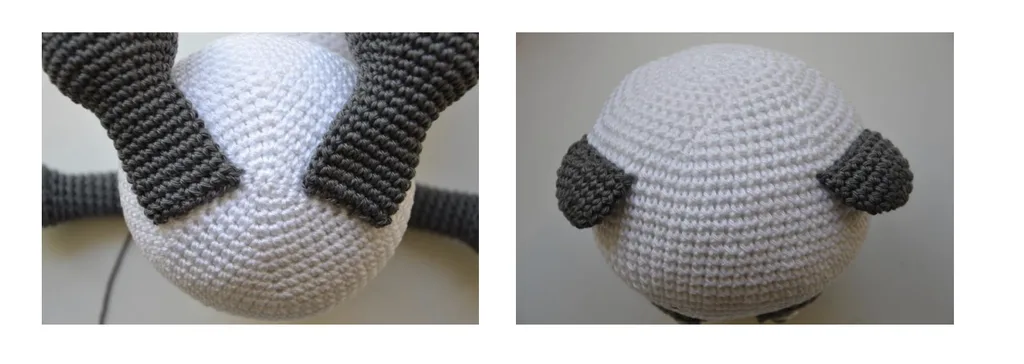
- Sew on the ears on Round 23 with approximately 13 sc in between.
- Embroider the eyebrows between Rounds 11 and 12 with 6 sc in between.
- Sew the snout to the tip and embroider a stripe downwards.
- Sew on the legs diagonally from Round 3.
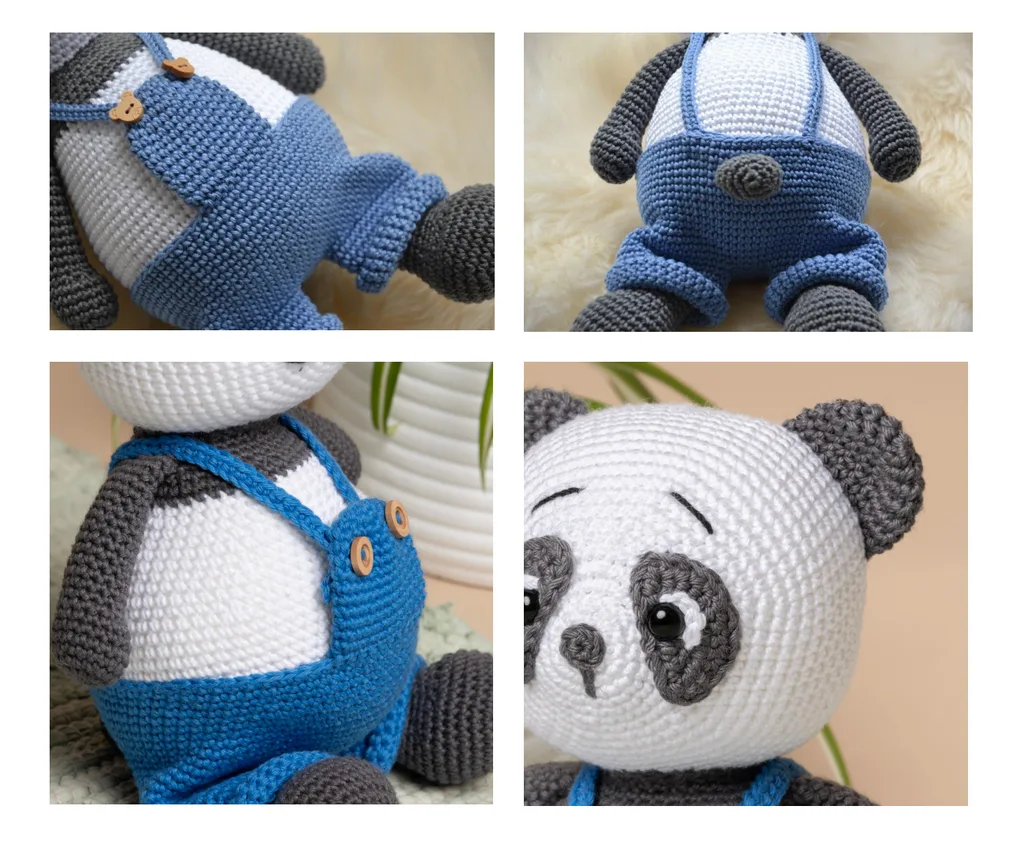
- Attach the overalls to the body.
- Sew the straps onto the middle of the back side of the overalls with approximately 10 sc in between.
- Sew on the buttons in front of the straps.
- Fold the pants legs up 2-3 times.
- Sew on the head.
- Sew on the tail in the middle of the back side of the pants.
When sewing the head to the body, remember the pattern’s specific stuffing instruction: stuff between the head and body as you sew the head on to avoid a wobbly head. This is especially useful because the head and body are both rounded pieces and the final seam supports the character’s posture.
Face Alignment Check
Before considering the panda finished, look directly at the face rather than from an angle. The safety eyes belong between Rounds 6 and 7, with 12 sc between the eyes. There should be approximately 6 sc between the upper parts of the grey eye pieces, and the snout should point upwards.
The eyebrows are embroidered between Rounds 11 and 12 with 6 sc in between. The snout is attached to the tip and receives the downward embroidered stripe. These details are small, but they have a large effect on the expression.
If one eye appears higher than the other, do not change the pattern’s round numbers. Instead, revisit the placement measurements and the way the grey eye pieces were oriented before sewing them permanently.
Stuffing and Tension: Two Quiet Skills That Matter
The pattern gives three general tips: always stuff the head and body firmly, always stuff between the head and body while sewing the head onto the body to avoid a wobbly head, and work tightly to avoid holes between the stitches.
These instructions are useful throughout the project. Consistent tension helps the increases and decreases produce smooth rounded forms. Firm stuffing in the head and body supports the silhouette, while the specified lighter stuffing in the legs and tail prevents those smaller pieces from becoming unnecessarily rigid.
If you notice holes between stitches, focus on maintaining the stated 2.50 mm hook and tighter, even tension rather than changing the pattern. The source does not instruct you to substitute another hook size, so the safest way to preserve the intended result is to work consistently with the specified materials.
Stitch-Count Checkpoints Worth Marking
- The arms reach 18 stitches at Round 3 and 13 stitches from Round 8 onward through Round 23.
- The grey eye piece reaches 19 stitches at Row 4.
- The head reaches 66 stitches at Round 13 and remains at 66 through Round 25.
- The head closes through the decrease sequence ending at 9 stitches in Round 35.
- The body reaches 66 stitches at Round 11 and remains there through Round 24.
- The body reaches 36 stitches at Round 37 before the arms are attached on Round 38.
- The legs reach 36 stitches at Round 6 and later settle at 18 stitches from Rounds 13-24.
- The ears reach 21 stitches at Round 4 and remain there through Round 7.
- The joined overalls reach 72 stitches at Round 13 and remain there through Round 18.
- The overalls decrease to 70 stitches at Round 19 and remain there through Round 31.
- The front panel reaches 24 stitches at Round 4 and remains there through Round 13.
- Each overall strap starts with ch 48 and contains 46 sc on Row 2.
Final Finishing Checklist
- Use the specified 2.50 mm crochet hook.
- Confirm the three yarn colors: White #001, Anthracite #122, and French Blue #084.
- Check that the two safety eyes are 8 mm.
- Check that the two wooden buttons are 12 mm.
- Confirm the head and body are firmly stuffed.
- Confirm the legs have firm stuffing in the feet and light stuffing in the remaining leg.
- Confirm the tail is lightly stuffed.
- Confirm the arms are attached through both layers using all 4 loops during Body Round 38.
- Confirm the ears are placed on Round 23 with approximately 13 sc between them.
- Confirm the eyebrows sit between Rounds 11 and 12 with 6 sc between them.
- Confirm the legs are sewn diagonally from Round 3.
- Confirm the overall straps have approximately 10 sc between them on the back side.
- Confirm the buttons are sewn in front of the straps.
- Confirm the pants legs are folded up 2-3 times.
- Confirm the head is sewn securely with stuffing between the head and body.
- Confirm the tail is centered on the middle of the back side of the pants.
Why the Assembly Order Helps
The project becomes much easier to manage when the sewing stage is treated as a sequence rather than one final rush. The ears and face establish the character’s identity. The legs establish the seated support. The overalls cover the central body area and add the strongest color contrast. The head then completes the silhouette, while the tail finishes the back.
This order also makes it easier to inspect the project at natural stopping points. For example, after the face is attached, you can check symmetry before adding the clothing. After the overalls are fitted, you can check the straps and buttons before folding the pants legs. After the head is sewn on, you can make sure the neck area is stable because the pattern specifically calls for stuffing between the two pieces during that seam.
Finished Character
When all components are complete and the final sewing is finished, Paf the Panda Dad reaches approximately 22 cm (8.6 inches). The finished character combines the soft white head and body with Anthracite ears, arms, legs, eye pieces, snout and tail. The French Blue overalls, straps and wooden buttons provide the clothing details, while the safety eyes and black embroidered eyebrows complete the face.
The strongest way to approach this project is not to hurry through the long sections. Count at the major increase and decrease checkpoints, keep paired components together, follow the stated placement measurements, and use the stuffing instructions as written. Those small habits make the final assembly considerably more predictable.
Paf the Panda Dad is therefore a useful intermediate project for practicing several core amigurumi skills in one piece: magic rings, increases, decreases, tight single crochet fabric, stuffing, separate component construction, facial placement, crocheted clothing, and detailed sewing. Once the last thread is woven in, the result is a complete approximately 22 cm panda character with a carefully structured face, body, limbs, and overalls.