

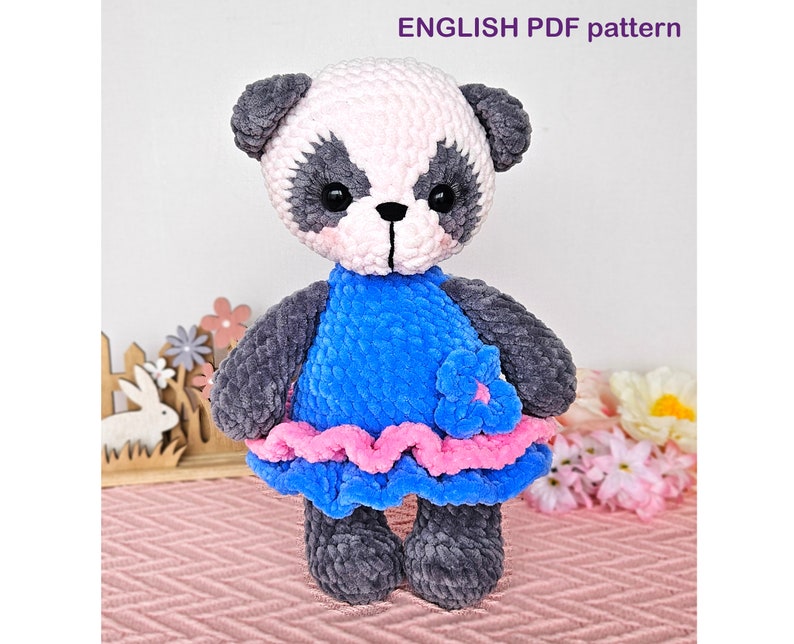
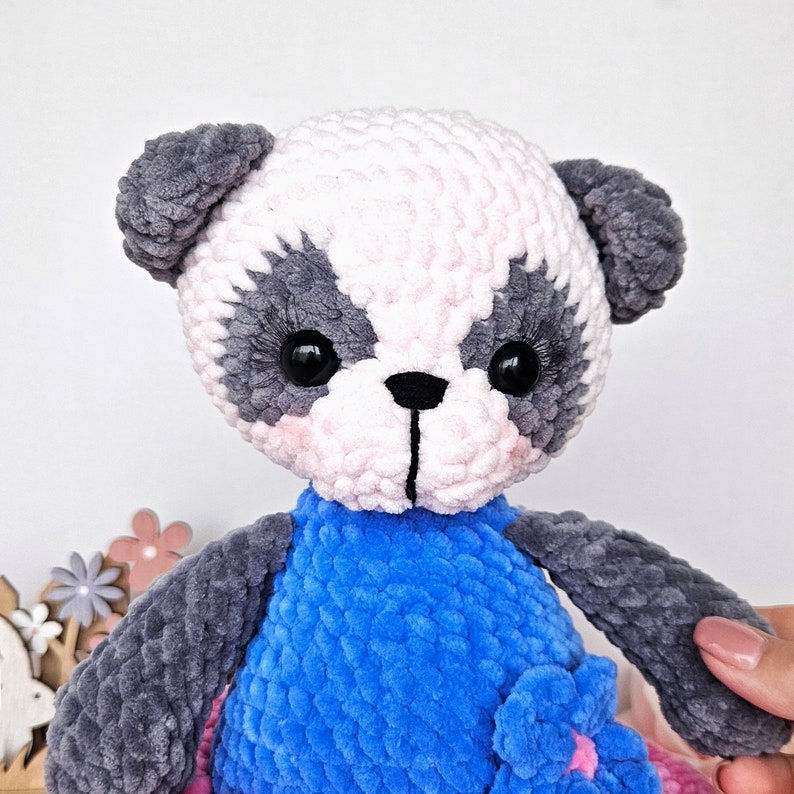
If you love soft, cuddly amigurumi with a sweet handmade personality, Mya the Plush Panda is a charming project to add to your crochet list. This adorable panda combines dark grey, white, pink, and blue plush yarn to create a soft stuffed toy with a pretty dress, flowers, expressive eyes, rounded ears, and a carefully sculpted muzzle.
This tutorial is based on the Mya the Plush Panda pattern designed by MarizzaToys. The original pattern uses US crochet terminology and is intended for crocheters who are already familiar with basic crochet stitches. The finished toy is approximately 26–28 cm (10–11″) tall when the specified materials are used.
Before You Begin
Mya is a medium-difficulty plush crochet project. The pattern does not include lessons explaining basic crochet stitches, so you should already be comfortable working stitches such as single crochet, half double crochet, double crochet, increases, decreases, chains, slip stitches, and magic rings.
Because plush yarn can make individual stitches harder to see, it is especially helpful to work slowly and keep a stitch marker in the indicated position. Counting carefully is important throughout the project because the body and head depend on specific stitch counts and carefully positioned joins.
The construction is divided into several major sections. You will make the arms, legs, body, dress, flowers, ears, tail, and head before completing the facial sculpting and embroidery and finally joining the head to the body.
Materials and Tools
The original pattern specifies the following materials and tools:
- Dark grey Himalaya Dolphin Baby 80320
- White Himalaya Dolphin Baby 80301
- Pink Himalaya Dolphin Baby 80303
- Blue Himalaya Dolphin Baby 80306
- Plush yarn, 100 g / 120 m
- Black thread for embroidering the muzzle; the pattern uses YarnArt Jeans 53
- 14 mm safety eyes
- 15 mm safety nose, optional
- 4.00 mm crochet hook
- Polyester fiber fill
Using the specified materials, the completed panda should measure approximately 26–28 cm (10–11″) tall. The original instructions use US crochet terminology.
Crochet Abbreviations
Keep the following abbreviations nearby while working:
- st – stitch
- ch – chain
- sl st – slip stitch
- sc – single crochet
- hdc – half double crochet
- dc – double crochet
- inc – increase
- dec – decrease
- (sc, inc)* n – repeat the stitches in brackets n times
How Mya the Panda Is Constructed
One of the most useful ways to approach this project is to think of it as a sequence of connected components rather than one large crochet piece. The arms and legs are made first. The legs are then joined as the starting point of the body. The body is worked upward, with the arms incorporated into the upper section. The dress is added afterward using the front loops of round 11.
The head is crocheted separately and includes the characteristic grey facial patches directly within rounds 5–7. The ears are joined while crocheting the head, and the completed head is then sculpted and embroidered before being sewn onto the body.
Step 1: Crochet the Arms
Make two arms using the dark grey yarn first. The pattern specifically instructs you to stuff only the lower two-thirds of each arm. This leaves the upper portion more flexible for joining to the body later.
Work the following rounds:
- 6 sc into a magic ring (6)
- 6 inc (12)
- (3 sc, inc)*3 (15)
- 15 sc
- 9 sc, 3 dec (12)
- 12 sc
- 12 sc
- 12 sc
Change the yarn to pink for round 9.
- 12 sl st
- Back loops only, working into the back loops of the slip stitches from round 9: 12 sc
- (2 sc, dec)*3 (9)
- 9 sc
- Crochet only 3–4 sc. The 3 decreases from round 5 should be positioned in the middle of the arm. Flatten the arm and crochet 4 sc through both sides.
Fasten off and cut the yarn. Repeat the same process for the second arm.
A useful checkpoint here is the location of the decreases from round 5. The instructions specifically call for these decreases to sit in the middle of the arm, so avoid flattening the piece randomly. Correct positioning will help the finished arms look consistent.
Step 2: Build the Two Legs
The legs are crocheted with dark grey yarn and should be stuffed as you go. Unlike the arms, the legs are worked as sturdy stuffed pieces that become the foundation of the body.
- 8 sc into a magic ring (8)
- 8 inc (16)
- (sc, inc)*8 (24)
- 24 sc
- 6 sc, (sc, dec)*4, 6 sc (20)
- 5 sc, 5 dec, 5 sc (15)
- 15 sc
- 15 sc
- 15 sc
At round 10, the two legs are handled differently because they will be connected into the body.
For the left leg, crochet only 11 sc, then fasten off and cut the yarn.
For the right leg, crochet 15 sc. Do not cut the yarn because the body will continue directly from the right leg.
Step 3: Join the Legs and Begin the Body
Continue from the right leg using dark grey yarn. Stuff as you go. Crochet 6 sc more on the right leg, then change to blue yarn. When attaching the blue yarn, leave a yarn tail for sewing.
Make a chain of 3 and attach the yarn to the left leg at the point where you stopped crocheting. The first joining round is constructed as follows:
- Make chain 3, attach the yarn to the left leg, crochet 15 sl st on the left leg, 3 sc on the front of the chain, 15 sl st on the right leg, and 3 sc on the back of the chain. Place the marker here (36). The marker should be positioned at the back.
- 15 sc on the back loops of the sl st, 3 inc, 15 sc on the back loops of the sl st, 3 inc (42)
- 42 sc
- 42 sc
- 42 sc
- 42 sc
- 42 sc
- 42 sc
- 42 sc
If you notice a hole between the legs, use the blue thread to sew the gap closed.
After these rounds, change to pink yarn.
- (5 sc, dec)*6 (36)
- Back loops only: 36 sc
- 36 sc
- (4 sc, dec)*6 (30)
- 30 sc
- (3 sc, dec)*6 (24)
Crochet 1–2 sc more so that the marker is exactly in the middle of the back.
Step 4: Attach the Arms to the Body
The arms are joined during round 16. This is an important construction point because their placement affects the overall symmetry of the panda.
Work round 16 as follows:
16. 4 sc, 4 sc through the first arm and the body, 8 sc, 4 sc through the second arm and the body, 4 sc (24)
Before continuing, check that the arms are symmetrical in relation to the legs. If they are not, correct the stitches before moving forward. This small checkpoint can make a significant difference to the finished toy.
Continue:
- (2 sc, dec)*6 (18)
- 18 sc
Make a slip stitch, fasten off, and cut the yarn, leaving a long tail for sewing. Stuff the body firmly, paying particular attention to the neck area.
Step 5: Add the Full Skirt
The dress is crocheted directly onto the body. Attach the pink yarn to the back in the front loops of round 11. Turn the body upside down while crocheting the dress, following the orientation shown in the original photographs.
- ch 2, (2 dc in one st)*36, sl st (72)
- ch 2, 72 dc, sl st (72)
- ch 2, 72 dc, sl st (72)
Change the yarn to blue for the decorative edge.
- (ch 2, sc in the next stitch)*72 (216)
Fasten off and cut the yarn. Hide the yarn end inside the dress.
The combination of the pink skirt and blue edging gives the panda a distinctly playful appearance. When working the skirt, take care to maintain the stitch count because round 4 contains a large number of repeated chain-and-single-crochet combinations.
Step 6: Crochet the Flowers
Mya has two small crocheted flowers. Make one with blue yarn and one with pink yarn.
Begin with a magic ring, or chain 2, and work the following five-petal repeat into it:
(ch 2, dc, ch 2, sl st)*5
Tighten the magic ring, fasten off, and cut the yarn, leaving a tail for sewing.
Sew the blue flower to the dress in round 11. Sew the pink flower onto the head near one of the ears.
Step 7: Make the Ears
The ears are crocheted in dark grey yarn. Do not stuff them.
- 7 sc into a magic ring (7)
- 7 inc (14)
- 14 sc
- Flatten the ear and crochet 7 sc through both sides.
Fasten off and cut the yarn. Make the second ear in the same way.
Because the ears are joined directly to the head later, try to keep both pieces as similar as possible in size and shape.
Step 8: Crochet and Attach the Tail
The tail is made with dark grey yarn and is only lightly stuffed.
- 6 sc into a magic ring (6)
- 6 inc (12)
- (3 sc, inc)*3 (15)
- 15 sc (15)
- (3 sc, dec)*3 (12)
Make a slip stitch, fasten off, and cut the yarn, leaving a long tail for sewing. Stuff the tail lightly and sew it onto the back in rounds 5–7.
Step 9: Crochet the Panda Head
The head is the most visually distinctive part of Mya. Start with white yarn and stuff as you go.
- 6 sc into a magic ring (6)
- 6 inc (12)
- (sc, inc)*6 (18)
- 18 sc
Rounds 5–7 introduce the grey facial areas. The original pattern specifies that the stitches shown in red in the instructional photograph are crocheted with grey yarn while all other stitches are worked with white yarn.
- 4 sc, inc hdc, 3 inc hdc, 2 inc hdc, 3 inc hdc, inc hdc, 4 sc (28)
- 5 sc, inc, (sc, inc)*3, (sc, inc)*2, sc, (inc, sc)*3, inc, 4 sc (38)
- 5 sc, inc, sc, sc, inc, (2 sc, inc)*2, sc, sc, inc, 3 sc, inc, sc, sc, (inc, 2 sc)*2, inc, sc, sc, inc, 4 sc (48)
Cut the grey yarn and continue crocheting in white.
The pattern offers a useful visual tip here: if small grey spots appear on the white sections and you do not like their appearance, you can embroider over them with white yarn.
Step 10: Position the Safety Eyes
The safety eyes are inserted in the third and eighth increases in round 6. Follow the placement photograph carefully. There should be 4 increases visible between the eyes.
Continue the head:
- 48 sc
- 48 sc
- 48 sc
- 48 sc
Crochet 1–2 sc more so that the marker is exactly in the middle of the bottom of the head.
Step 11: Join the Ears to the Head
Place both ears with their front side facing you. The ears are incorporated directly into round 12.
12. 12 sc, 7 sc through the first ear and the head, 10 sc, 7 sc through the second ear and the head, 12 sc (48)
Check the symmetry of the ears before continuing. If one ear sits differently from the other, correct the stitches at this stage.
Continue with:
- 48 sc
- 48 sc
- 3 sc, dec, (6 sc, dec)*5, 3 sc (42)
- (5 sc, dec)*6 (36)
- 2 sc, dec, (4 sc, dec)*5, 2 sc (30)
- (3 sc, dec)*6 (24)
- (sc, dec)*8 (16)
- 8 dec (8)
Make sure the head is stuffed firmly, especially around the muzzle. Close the opening and hide the yarn inside the head.
Head Sculpting: Creating Mya’s Facial Shape
The facial sculpting is what gives Mya her characteristic expression. This step uses a long threaded needle and requires you to follow the marked points carefully.
Mark points 1–6 with pins as shown in the pattern photograph. Points 1 and 2 should be in round 7.
Insert a long threaded needle into point 1 and pull it out at point 3. Insert the needle into point 4 and pull it out at point 2. Next, insert the needle through point 1 and pull it out at point 5. Insert it into point 6 and pull it out at point 2.
The thread should pass underneath the eyes.
Pull the thread ends until the desired indentation is reached, then tie a knot. Hide the thread inside the head.
Do not rush this step. The amount of tension determines the depth of the facial indentation, so gradually tighten the thread while checking the front of the face.
Embroidering the Muzzle and Nose
For the muzzle, insert a needle with black or plush thread at the bottom of the muzzle and pull it out between rounds 3 and 4. Repeat this 2–3 times, pulling the thread tight enough for the muzzle to separate into two parts.
Tie a knot and then make another turn to create the black line down the middle of the muzzle.
The nose can be embroidered with black thread between rounds 3 and 4, or an optional plastic nose can be glued in place. The pattern specifies a 15 mm safety nose as an optional material.
For additional facial detail, the cheeks can be colored with pink blush. The eyes may also be embroidered or finished with doll lashes.
Final Assembly: Sewing the Head to the Body
Once the head is sculpted and the facial details are complete, it is time to attach it to the body.
Sew the head to the body through head rounds 8–13. As you sew, check that the head remains centered and that the face is pointing straight forward.
If a small hole remains while sewing, add more polyester fiber fill through the opening. The original pattern specifically recommends adding extra stuffing so the neck becomes more stable.
Work slowly around the entire neck rather than pulling one section excessively tight. The goal is a secure connection while maintaining the soft, rounded shape of the plush toy.
Final Finishing Checklist
- Both arms are securely attached and positioned symmetrically.
- The legs are firmly stuffed and connected evenly.
- The body is firmly stuffed, especially at the neck.
- The dress is securely attached to the front loops of round 11.
- The blue dress edging is complete.
- The blue flower is sewn to the dress in round 11.
- The pink flower is sewn near one ear.
- The tail is lightly stuffed and sewn to the back in rounds 5–7.
- The 14 mm safety eyes are positioned according to round 6 placement instructions.
- The optional 15 mm safety nose is installed if you are using one.
- The muzzle is divided and embroidered.
- The central black muzzle line is visible.
- The head is firmly stuffed, particularly around the muzzle.
- The head is securely sewn to the body through head rounds 8–13.
- All yarn tails are hidden securely inside the appropriate pieces.
Helpful Tips for Working With Plush Yarn
Plush yarn creates a wonderfully soft finish, but its texture can make individual stitches difficult to identify. Counting every round is therefore more important than relying on the appearance of the fabric alone.
Keep your stitch marker in the specified location and check your stitch count at the end of important rounds. The body, head, and dress all contain sections where a missed increase or decrease can affect the shape of later rounds.
Stuff gradually rather than filling the entire piece at the end. The original instructions specifically call for stuffing the legs as you go, only the lower two-thirds of the arms, and the body and head as you crochet them.
When attaching components, use the photographs as a visual checkpoint. The arm and ear joins are particularly important because symmetry affects the finished expression and posture.
Common Construction Checkpoints
Arm Checkpoint
Make sure the three decreases from arm round 5 are positioned in the middle of the arm before flattening the upper section.
Leg Checkpoint
Remember that the left and right legs finish differently at round 10. The left leg ends after 11 sc, while the right leg continues with 15 sc and remains attached to the working yarn for the body.
Body Checkpoint
When the arms are joined in round 16, compare their position with the legs before continuing. The original instructions specifically tell you to correct the stitches if the arms are not symmetrical.
Head Checkpoint
During round 12, compare the ears from the front before continuing. They should be symmetrical, and both ears should be joined with their front side facing you.
Face Checkpoint
The safety eyes are placed in specific increases in round 6, with 4 increases visible between them. The sculpting points should also be marked carefully because they determine the final shape of the eye area and muzzle.
Why This Panda Makes a Special Handmade Project
Mya has several features that make the finished project especially expressive. The combination of plush yarn and rounded shapes gives the panda a soft toy appearance, while the contrasting grey eye patches help define the face. The embroidered muzzle adds another layer of character, and the small flowers provide a decorative finishing touch.
The dress also makes the project more than a basic panda amigurumi. Its pink body and blue edging create a playful outfit, while the blue flower on the dress and pink flower near the ear tie the colors together.
Although the finished toy is soft and cuddly, the construction includes several detailed techniques that make this a rewarding medium-level project. The head sculpting, color placement, component joining, and dress construction all contribute to the final appearance.
Quick Pattern Reference
Finished size: approximately 26–28 cm (10–11″) tall.
Hook: 4.00 mm.
Eyes: 14 mm safety eyes.
Nose: 15 mm safety nose, optional.
Yarn: Himalaya Dolphin Baby 100 g / 120 m in dark grey 80320, white 80301, pink 80303, and blue 80306.
Stuffing: polyester fiber fill.
Terminology: US crochet terminology.
Difficulty: medium.
Main components: arms, legs, body, dress, flowers, ears, tail, head, head sculpting, facial embroidery, and final assembly.
Final Thoughts
Mya the Plush Panda is a delightful project for crocheters who enjoy soft yarn, expressive amigurumi faces, and decorative clothing details. The finished panda combines a rounded plush body with a carefully sculpted head, embroidered muzzle, sweet dress, small flowers, and balanced proportions.
The most important part of the project is careful counting. Rather than trying to work quickly, use each stitch count and construction checkpoint as a guide. Pay special attention when joining the legs, positioning the arms, attaching the ears, placing the eyes, and sculpting the face.
Once the final sewing is complete and the yarn ends are hidden, the separate crocheted components come together as one soft panda character. The result is a handmade plush approximately 26–28 cm (10–11″) tall when made with the specified materials.
This pattern was designed and written by MarizzaToys. The original source states that the pattern is for personal use and should not be sold, shared, reproduced, distributed, or altered. Finished items may be sold in a limited number with credit to MarizzaToys as the designer, particularly when listing them online.
For the original designer’s pattern information and social updates, credit the design to MarizzaToys and follow the usage conditions supplied with the original pattern.