


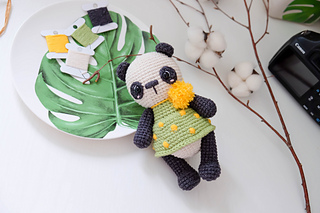
If you enjoy making small amigurumi animals with expressive faces and adorable handmade clothing, this Little Panda crochet pattern is a wonderful project to explore. The finished panda measures 16 cm (6.3″) tall and combines a rounded light beige head, black ears and limbs, a colorful dress, embroidered facial details, and a small pompon around the neck.
This project was designed by Marina Chuchkalova of MyCrochetWonders. The original pattern provides the complete construction for the legs, arms, body, head, ears, tail, eyes, skirt, and final decoration. It also includes the exact yarn colors, hook size, stuffing material, stitch abbreviations, stitch counts, and finishing instructions needed to reproduce the design.
The construction is particularly interesting because nearly every part is crocheted in a spiral, while the skirt is worked differently in closed rows. Understanding that distinction before starting will make the project much easier to organize.
What Makes This Little Panda Special?
At first glance, the panda looks like a simple small amigurumi, but several details give it a distinctive character. The round head creates the classic panda silhouette, while the black crocheted eye pieces and black halfbeads create expressive eyes. The embroidered nose and tiny pink cheek stitches add even more personality.
The dress provides another major visual feature. The body changes from light beige to the dress color, and the skirt is then built from the front loops of the 18th row. Decorative 4-hdc puff stitches are made with another color, creating the small contrasting accents visible on the finished toy.
The original photographs also show that the same design can be presented in different dress color combinations. The pattern lists green and yellow as one combination and orchid and pale pink as another.
Project Details at a Glance
- Finished toy: 16 cm (6.3″) tall
- Yarn weight: Sport / 5 ply (12 wpi)
- Crochet hook: 2.00 mm
- Main panda colors: Yarn Art Jeans №05 light beige and №28 black
- Green dress colors: Alize Cotton Gold №385 green and Yarn Art Jeans №35 yellow
- Alternative dress colors: Alize Cotton Gold №98 orchid and Yarn Art Jeans №18 pale pink
- Stuffing: hollofayber
- Eyes: two black halfbeads, 8 mm in diameter
- Construction: all details except the skirt are crocheted in a spiral
The finished size is based on the yarn and hook specified by the designer. If your tension differs, the dimensions of the completed toy may naturally vary, so consistent tension is useful when you want the proportions to resemble the original photographs.
Materials and Tools You Need

Gather all of the supplies before beginning. Having the materials ready is especially useful for amigurumi because several pieces require stuffing while they are being crocheted.
- Sport / 5 ply (12 wpi) yarn.
- Yarn Art Jeans №05 – light beige.
- Yarn Art Jeans №28 – black.
- Alize Cotton Gold №385 – green for the dress.
- Yarn Art Jeans №35 – yellow.
- Alize Cotton Gold №98 – orchid as the alternative dress color.
- Yarn Art Jeans №18 – pale pink as the alternative accent color.
- 2.00 mm crochet hook.
- Hollofayber stuffing.
- Two black halfbeads, 8 mm in diameter.
- Cotton strong thread (jute twine) for attaching the arms and legs.
- A needle with a big eye.
- A moment glue.
- A little white and pink thin thread for the finishing embroidery.
Abbreviations for the Pattern
The following abbreviations are used throughout the original instructions:
- st – stitch
- ch – chain
- sc – single crochet
- inc – increase (crochet 2 sc in one loop)
- dec – decrease (crochet 2 sc together)
- sl st – slip stitch
- puff st – 4-hdc Puff stitch
- (sc, inc) × n – repeat those in brackets n-times
One important construction note from the pattern is that all details except the skirt are crocheted in a spiral. The skirt is therefore the exception and needs to be treated as a closed-row section.
Before You Begin the Amigurumi
Because this panda is made from several small stuffed components, it helps to prepare your workspace before starting. Keep the black and light beige yarn separate and have your stuffing, large-eye needle, strong attachment thread, glue, and embroidery threads nearby.
Pay attention to the numbers at the end of the rounds. For example, the head increases progressively from 6 stitches to 48 stitches. These numbers are not decorative; they are useful checkpoints for confirming that the shaping is following the pattern.
The same principle applies to the body, arms, legs, and skirt. If your stitch count does not agree with the number shown in the pattern, check the previous round before continuing.
Step 1: Crochet the Two Legs
The legs are made with black yarn and are crocheted as two pieces. The pattern instructs you to stuff them in the course of crocheting. The initial chain creates the foundation for the rounded foot shape before the leg becomes narrower.
Legs – 2 Pieces
With the black color. Stuff in the course of crocheting.
Crochet 6 ch.
- 1 rnd: begin crocheting from the 2nd loop from the hook – inc, 3 sc, 4 sc in the last loop of the chain. 3 sc, inc (14)
- 2 rnd: inc, 3 sc, 6 inc, 3 sc, inc (22)
- 3-5 rnd: 1 sc in each st around (22)
- 6 rnd: 5 sc, 6 dec, 5 sc (16)
- 7 rnd: 5 sc, 3 dec, 5 sc (13)
- 8-17 rbd: 10 rows – 1 sc in each st around (13)
Pull the opening with the needle and hide the end of the thread inside the detail.
Make the second leg using the same instructions. Since the two legs will later be attached to the body, keeping their lengths and stuffing levels similar will help the finished panda remain visually balanced.
Step 2: Shape the Arms
The arms are also crocheted with black yarn. Unlike the legs, they begin with a magic ring and gradually increase before decreasing to form the tapered shape.
Arms – 2 Pieces
With the black color. Stuff in the course of crocheting.
- 1 rnd: 6 sc in the magic ring (6)
- 2 rnd: (1 sc, inc) × 3 (9)
- 3 rnd: (2 sc, inc) × 3 (12)
- 4 rnd: (3 sc, inc) × 3 (15)
- 5-6 rnd: 2 rows – 1 sc in each st around. (15)
- 7 rnd: (3 sc, dec) × 3 (12)
- 8-13 rnd: 6 rows – 1 sc in each st around (12)
- 14 rnd: (2 sc, dec) × 3 (9)
- 15-16 rnd: 2 rows – 1 sc in each st around (9)
Pull the opening with the needle and hide the end of the thread inside the detail.
Repeat the complete sequence for the second arm. Stuff both arms gradually rather than adding all of the filling at the end. This follows the original construction method and makes it easier to distribute the stuffing throughout each piece.
Step 3: Crochet the Body and Begin the Dress
The body begins in white or light beige. The first seven rounds create a steadily widening base, followed by six rounds worked without increases. The body then narrows slightly before the yarn changes to the dress color.
Body
With the white or light beige color. Stuff in the course of crocheting.
- 1 rnd: 6 sc in the magic ring (6)
- 2 rnd: 6 inc (12)
- 3 rnd: (1 sc, inc) × 6 (18)
- 4 rnd: (2 sc, inc) × 6 (24)
- 5 rnd: (3 sc, inc) × 6 (30)
- 6 rnd: (4 sc, inc) × 6 (36)
- 7 rnd: (5 sc, inc) × 6 (42)
- 8-13 rnd: 6 rows – 1 sc in each st around. (42)
- 14 rnd: (5 sc, dec) × 6 (36)
- 15-16 rnd: 2 rows – 1 sc in each st around (36)
Change the yarn to the dress color.
- 17 rnd: (4 sc, dec) × 6 (30)
- 18 rnd: back loops only – 1 sc in each st around. (30)
- 19-21 rnd: 3 rows – 1 sc in each st around (30)
- 22 rnd: (3 sc, dec) × 6 (24)
Leave enough thread for sewing.
Body Stitch Checkpoints
The body should contain 6 stitches after Round 1, 12 after Round 2, 18 after Round 3, 24 after Round 4, 30 after Round 5, 36 after Round 6, and 42 after Round 7. It remains at 42 through Rounds 8-13.
Round 14 brings the count to 36. Rounds 15-16 remain at 36. After the yarn change, Round 17 decreases to 30. Round 18 is worked through the back loops only, and Rounds 19-21 remain at 30 before Round 22 decreases to 24.

Step 4: Crochet the Head
The head is the largest individual crocheted component. It starts with 6 stitches in a magic ring, expands through eight rounds, stays at 48 stitches for ten rounds, and then decreases over four rounds.
Head
With the white or light beige color. Stuff in the course of crocheting.
- 1 rnd: 6 sc in the magic ring (6)
- 2 rnd: 6 inc (12)
- 3 rnd: (1 sc, inc) × 6 (18)
- 4 rnd: (2 sc, inc) × 6 (24)
- 5 rnd: (3 sc, inc) × 6 (30)
- 6 rnd: (4 sc, inc) × 6 (36)
- 7 rnd: (5 sc, inc) × 6 (42)
- 8 rnd: (6 sc, inc) × 6 (48)
- 9-18 rnd: 10 rows – 1 sc in each st around (48)
- 19 rnd: (6 sc, dec) × 6 (42)
- 20 rnd: (5 sc, dec) × 6 (36)
- 21 rnd: (4 sc, dec) × 6 (30)
- 22 rnd: (3 sc, dec) × 6 (24)
Cut the yarn and fasten off.
Sew the head to the body.
Head Shaping Check
The most important head checkpoint is Round 8, where the count reaches 48 stitches. Rounds 9-18 maintain that 48-stitch circumference. The final four rounds reduce the head through counts of 42, 36, 30, and 24.
Keeping the stuffing evenly distributed during the long 48-stitch section will help the head retain its rounded shape. The stuffing should support the crocheted fabric without distorting the stitches.
Step 5: Make the Ears and Tail
The pattern uses three pieces for the ears and tail. They share the same crochet instructions, but they are finished differently. The tail is stuffed, while the ears are folded in half and left unstuffed.
Ears and Tail – 3 Pieces
- 1 rnd: 6 sc in the magic ring (6)
- 2 rnd: 6 inc (12)
- 3-4 rnd: 2 rows – 1 sc in each st around (12)
- 5 rnd: (dec, 4 sc) × 2 (10)
Leave enough thread for sewing.
Stuff the tail.
Fold the ears in half, don’t stuff.
This difference is important during assembly. The unstuffed ears can be folded to create the compact rounded ear shape visible on the finished panda, while the stuffed tail maintains its volume.
Step 6: Crochet the Eye Pieces
The eye pieces are crocheted separately with black yarn. They are then sewn into position and combined with the 8 mm black halfbeads listed in the materials.
Eyes – 2 Pieces
With the black color.
Crochet 6 ch.
- 1 rnd: begin crocheting from the 2nd loop from the hook – 2 sc, 3 sc in the last loop of the chain. 1 sc, inc (8)
- 2 rnd: inc, 1 sc, 3 inc, 1 sc, 2 inc (14)
Leave enough thread for sewing.
Step 7: Build the Skirt
The skirt is the only major section that is not crocheted in a spiral. The original pattern gives three specific construction notes before the rounds begin.
- Crop the 1st row grasping front loops of the 18th row.
- Crochet with the closed rows.
- Begin the row with 1 ch and end it with the sl st in the first stitch of the row.
- Make 4-hcd puff stitches with another color.
Skirt Instructions
- 1 rnd: (4 sc, inc) × 6 (36)
- 2 rnd: (5 sc, puff st.) × 6 times (36)
- 3 rnd: (5 sc, inc) × 6 (42)
- 4 rnd: 1 sc in each st around (42)
- 5 rnd: 2 sc, puff st., (6 sc, puff st.) × 5 times, 4 sc (42)
- 6 rnd: (6 sc, inc) × 6 (48)
- 7 rnd: 1 sc in each st around (48)
- 8 rnd: 6 sc, puff st., (7 sc, puff. st.) × 5 times, 1 sc (48)
- 9 rnd: (7 sc, inc) × 6 (54)
- 10 rnd: 1 sc in each st around (54)
- 11 rnd: sl st in each st around
Cut the yarn and fasten off.
Skirt Count Checkpoints
The skirt starts at 36 stitches in Round 1. It remains at 36 in Round 2, increases to 42 in Round 3, remains at 42 in Rounds 4-5, increases to 48 in Round 6, remains at 48 in Rounds 7-8, and reaches 54 in Round 9. Round 10 remains at 54, followed by the slip-stitch finishing round.
These counts are useful when checking the flare of the skirt. If the lower edge looks too narrow or too wide, verify the stitch count before changing anything else.
Step 8: Assemble the Panda
With the individual crocheted components complete, the final stage is assembly and decoration. This is where careful placement becomes especially important because the finished panda’s expression and proportions depend on how the pieces are positioned.
Attach the Legs
The original instructions specify attaching the legs using thread fastening. The pattern provides a video reference for this technique:
https://youtu.be/rpLy3pzImy0
Use the strong cotton thread or jute twine specified in the materials list for the attachment of the arms and legs.
Attach the Head
The head is sewn to the body after the head has been completed and fastened off. Take care to keep the head centered on the body so that the face remains aligned with the dress and limbs.
Sew the Ears and Eyes
Sew the folded, unstuffed ears into position. Then sew the crocheted eye pieces to the face. The original pattern instructs you to glue the black halfbeads after sewing the eyes.
The two halfbeads are 8 mm in diameter. Use the specified moment glue carefully and allow the attachment to settle before handling the finished face extensively.
Embroider the Nose and Cheeks
Embroider the nose as shown in the original design. The cheeks are made with pink thread, and the source notes that a couple of stitches are enough.
This is a small finishing detail, so keeping the embroidery compact helps maintain the delicate expression shown in the photographs.
Add the Tail and Pompon
Sew the stuffed tail into place. Then make a small pompon and attach it to the neck.
The pompon is one of the defining decorative features of this panda. In the green version, the bright yellow accent creates a strong contrast against the light beige face and green dress.
Helpful Tips for Consistent Amigurumi Results
Count Before Moving On
Do not rely only on the appearance of a small amigurumi piece. The stitch counts are much more reliable checkpoints. If a round is supposed to finish with 42 stitches, verify that count before beginning the next round.
Stuff During Construction
The pattern specifically says to stuff the legs, arms, body, and head in the course of crocheting. Follow that instruction instead of waiting until the final opening.
Keep Matching Pieces Similar
The two arms should have similar stuffing and shape, and the same applies to the two legs. Matching components make final assembly easier and help the finished toy look balanced.
Do Not Stuff the Ears
The ears are intentionally folded in half without stuffing. Adding filling to them would change the construction described in the original instructions.
Remember the Special Body Round
Round 18 of the body is worked through the back loops only. This is an important structural instruction because the skirt is subsequently started by grasping the front loops of the 18th row.
Troubleshooting Guide
My Head Is Not Round
Check the stitch counts through Round 8 and make sure the head reaches 48 stitches. Then verify that Rounds 9-18 are worked with 1 sc in each stitch around. Uneven stuffing can also affect the appearance, so distribute the hollofayber gradually.
My Body Looks Different from the Dress Section
Verify the yarn change after Round 16. Round 17 is the first round using the dress color. Also check that Round 18 is worked through the back loops only.
The Skirt Is Not Flared Enough
Check the increases and stitch counts. The skirt should progress from 36 stitches to 42, then 48, and finally 54. Also make sure the first skirt row is worked from the front loops of the 18th row as instructed.
The Ears Look Too Large
Confirm that the ears are not stuffed. They are made from the same three-piece instructions as the tail, but the source specifically says to fold the ears in half and leave them unstuffed.
The Panda’s Legs Do Not Sit Evenly
Before permanently finishing the attachment, compare the two legs and check that they were made with the same number of rounds. The pattern uses thread fastening for attaching the legs, so careful positioning during this stage is worthwhile.
Quick Reference for the Complete Project
- Finished size: 16 cm (6.3″) tall.
- Hook size: 2.00 mm.
- Yarn: Sport / 5 ply (12 wpi).
- Light beige: Yarn Art Jeans №05.
- Black: Yarn Art Jeans №28.
- Green: Alize Cotton Gold №385.
- Yellow: Yarn Art Jeans №35.
- Alternative orchid: Alize Cotton Gold №98.
- Alternative pale pink: Yarn Art Jeans №18.
- Stuffing: hollofayber.
- Halfbeads: two black, 8 mm.
- Legs: 2 pieces.
- Arms: 2 pieces.
- Ears and tail: 3 pieces.
- Eyes: 2 pieces.
- Skirt: 11 rounds.
Final Assembly Checklist
- Complete both black legs.
- Complete both black arms.
- Stuff the legs and arms during crocheting as instructed.
- Complete and stuff the body.
- Change to the dress color after Round 16.
- Work Round 18 through back loops only.
- Complete the head and stuff it during crocheting.
- Sew the head to the body.
- Complete the ears and tail.
- Stuff the tail.
- Fold the ears in half without stuffing.
- Complete the two crocheted eye pieces.
- Sew the ears and eyes.
- Glue the two black 8 mm halfbeads.
- Embroider the nose.
- Embroider the cheeks with pink thread.
- Sew the tail.
- Attach the legs using thread fastening.
- Attach the arms.
- Complete the skirt using closed rows.
- Add the small pompon to the neck.

Frequently Asked Questions
How big is the finished Little Panda?
The original pattern states that the finished toy is 16 cm (6.3″) tall.
What hook size should I use?
The pattern specifies a 2.00 mm crochet hook.
What yarn weight is required?
The original materials list specifies Sport / 5 ply (12 wpi) yarn.
What colors are used for the panda?
The main panda colors are Yarn Art Jeans №05 light beige and Yarn Art Jeans №28 black.
What colors are available for the dress?
The pattern lists Alize Cotton Gold №385 green with Yarn Art Jeans №35 yellow. It also lists Alize Cotton Gold №98 orchid and Yarn Art Jeans №18 pale pink as an alternative combination.
What size are the eyes?
The materials list specifies two black halfbeads measuring 8 mm in diameter.
Are the ears stuffed?
No. The pattern instructs you to fold the ears in half and not stuff them. The tail is stuffed.
Are the arms and legs stuffed?
Yes. The pattern says to stuff both the legs and arms in the course of crocheting.
Is the skirt crocheted in a spiral?
No. All details except the skirt are crocheted in a spiral. The skirt is worked with closed rows, beginning each row with 1 ch and ending with a sl st in the first stitch of the row.
What happens in Body Round 18?
Round 18 is worked through the back loops only, with 1 sc in each stitch around for a total of 30 stitches.
How does the skirt begin?
The pattern instructs you to crochet the first skirt row grasping the front loops of the 18th row.
Enjoy the Finishing Process
One of the nicest parts of this Little Panda project is watching the character emerge from a collection of individual crocheted pieces. The legs and arms establish the panda’s recognizable black limbs, while the light beige body and head create the soft central shape. Once the ears, eyes, nose, cheeks, and tail are added, the animal begins to take on its personality.
The dress adds another layer of detail. The body color change establishes the upper dress section, while the separate skirt creates the flared silhouette. The puff stitches provide small contrasting decorations, and the pompon at the neck adds the final playful accent.
For the best result, work methodically through the stitch counts rather than rushing toward assembly. Small amigurumi benefit from careful counting, even stuffing, consistent tension, and patient sewing. The original instructions provide the technical foundation; your main task is to preserve those details while keeping the individual components neat and symmetrical.

Finished Little Panda
Once the final sewing and decoration are complete, your Little Panda is ready. The original pattern’s final instruction is simple: the little panda is ready. At 16 cm (6.3″) tall, the finished toy is compact enough to display as a handmade decoration while still having plenty of recognizable details.
The designer also asks makers who publish their finished photos on Instagram to mark @mycrochetwonders and use the hashtag #design_by_chuchkalova.
Pattern designer: Marina Chuchkalova (MyCrochetWonders), 2018.
Important finishing note: Keep the technical instructions, stitch counts, colors, hook size, measurements, and construction order exactly as specified when working from the original pattern. The charm of this project comes from the combination of its carefully shaped amigurumi pieces and its distinctive little dress.