
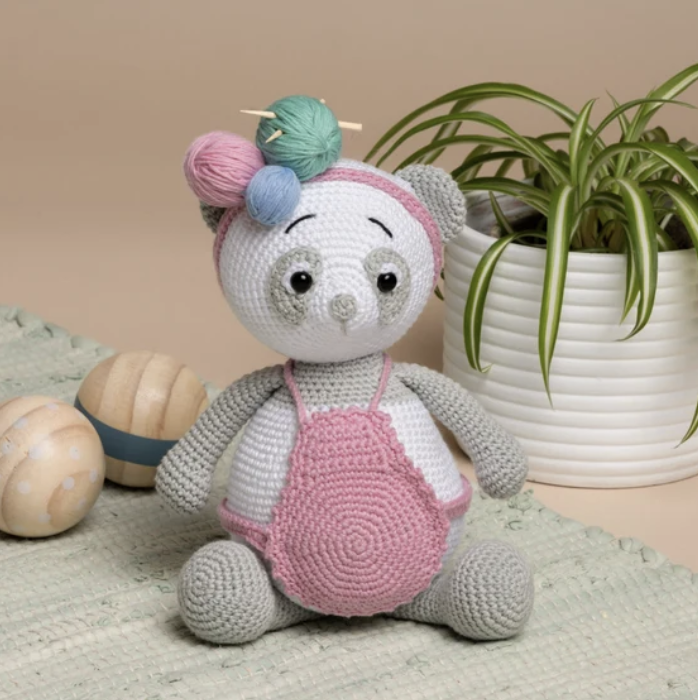

If you enjoy making character amigurumi with plenty of personality, this Pif Panda Mum crochet project is a charming intermediate-level make to add to your collection. The finished panda measures approximately 24 cm, or 9.4 inches, and combines a white body, silver-grey details, and a candyfloss-pink apron and accessories.
This project is more than a simple crocheted animal. The design includes shaped arms and legs, a carefully constructed head, distinctive grey eye pieces, a small snout, ears, a tail, an apron, tie-strings, and a decorative ribbon with three yarn balls. These details give the finished panda her recognizable handmade character.
The original pattern identifies the project as Pif – Panda Mum, pattern number 1020-211-3353, with an intermediate skill level and a 2.50 mm crochet hook. The instructions use Friends Cotton 8/4 yarn in White (#001), Silver (#118), and Candyfloss (#045), together with small additional materials for the face, apron, stuffing, and decorative ribbon.
Project Overview
The construction of Pif Panda Mum is organized into several crocheted components that are later assembled into the finished character. The head and body are worked separately, while the arms, legs, ears, snout, tail, apron, tie-strings, and ribbon are made as individual pieces.
The head is crocheted in White (#001), with the grey eye sections prepared separately in Silver (#118). The body begins in White and changes to Silver in the later rounds. The arms, legs, ears, snout, and tail are worked in Silver. The apron, apron tie-strings, and ribbon use Candyfloss (#045).
One of the most important features of this project is the facial construction. The safety eyes are positioned together with the grey crocheted eye pieces, and the white eye edging is added around them. The pattern gives exact placement instructions, so it is worth taking time to check the alignment before sewing the pieces permanently into place.
Materials You Will Need
Before beginning, prepare all of the materials listed in the original pattern. Having everything nearby makes the assembly stages much easier, especially because several components require sewing after the crochet work has been completed.
- Friends Cotton 8/4 in White (#001) – 1 skein
- Friends Cotton 8/4 in Silver (#118) – 1 skein
- Friends Cotton 8/4 in Candyfloss (#045) – 1 skein
- A piece of black scrap yarn for the eyebrows
- Scrap yarn in 3 different colors for the ribbon
- 2 safety eyes, 8 mm
- 1 wooden button, 12 mm
- 2 matches, or another suitable substitute, for the knitting needles in the ribbon
- Fiberfill
- 2.50 mm crochet hook
The original instructions include an important safety note concerning the matches used for the decorative yarn balls. The pattern recommends not using matches if the finished product is intended for babies or children.
Crochet Abbreviations
The pattern uses standard abbreviations throughout the instructions. Keeping this list nearby can make the round-by-round sections easier to follow.
- ch = chain
- sc = single crochet
- sl st = slip stitch
- mr = magic ring
- hdc = half double crochet
- inc = increase – 2 stitches in the same stitch
- dec = decrease – 2 stitches together
- rnd(s) = round(s)
- (xx) = number of stitches after the ended round
Before You Start: Three Important Crochet Tips
The original pattern gives three useful preparation and construction reminders. First, the head and body should always be stuffed firmly. Second, stuffing should also be added between the head and body while the head is being sewn on. This helps prevent a wobbly head after assembly.
Third, the crochet should be worked tightly enough to avoid holes between the stitches. This is particularly important for an amigurumi project because the fiberfill should remain inside the crocheted fabric rather than showing through the stitches.
These points are especially useful when working with the 2.50 mm hook and Friends Cotton 8/4 yarn. Maintaining a consistent tension will help the shaping remain close to the intended structure.
Step 1: Crochet the Arms
Begin the two arms using Silver (#118). Each arm starts with a magic ring and is shaped gradually before continuing into the longer arm section.
- Rnd 1: 6 sc in a mr.
- Rnd 2: (inc) 6 times (12).
- Rnd 3: (1 sc, inc) 6 times (18).
- Rnds 4-7: 1 sc in each st (18).
The pattern instructs you to stuff the hand and arm lightly as you work. Continue with Rnd 8: (dec) 5 times, 8 sc (13). Then work Rnds 9-23 with 1 sc in each st (13).
Fasten off after Rnd 23. Leave the appropriate yarn tail for the later sewing and assembly stage. Make two arms in total.
Step 2: Prepare the Eye Pieces
The eyes are built from two different crocheted components. The first is the white part around the eye, and the second is the grey portion that works together with the safety eye.
White Part Around the Eye
Using White (#001), make two pieces.
Rnd 1: 4 sc in a mr.
Do not tighten the loop. Leave a tail long enough for assembly. The pattern also notes that an alternative is to embroider a white edge around the eye.
Grey Part of the Eye
Using Silver (#118), make two pieces. Chain 1 to turn the work after each completed row.
- Row 1: Ch 4, turn.
- Row 2: Begin in the 2nd chain from the hook, (inc) 3 times, ch 1, turn (6).
- Row 3: (inc) 6 times, ch 1, turn (12).
- Row 4: Make an edge around the entire eye, working 1 sc in each st and 2 sc in each corner (19).
Fasten off and leave a tail long enough for sewing. Attach the 8 mm safety eye at the edge of the grey eye piece, 3 rounds below the top of the eye. Pay close attention to the curved direction described in the pattern so the curved part points outwards.
Step 3: Shape the Head

The head is crocheted in White (#001). This section contains a substantial increase sequence that expands the head from the initial magic ring to 66 stitches before the shaping begins to decrease.
- Rnd 1: 6 sc in a mr.
- Rnd 2: (inc) 6 times (12).
- Rnd 3: (1 sc, inc) 6 times (18).
- Rnd 4: 1 sc in each st (18).
- Rnd 5: (inc) 6 times, 12 sc (24).
- Rnd 6: (1 sc, inc) 6 times, 12 sc (30).
- Rnd 7: (4 sc, inc) 6 times (36).
- Rnd 8: 1 sc in each st (36).
- Rnd 9: (5 sc, inc) 6 times (42).
- Rnd 10: (6 sc, inc) 6 times (48).
- Rnd 11: (7 sc, inc) 6 times (54).
- Rnd 12: (8 sc, inc) 6 times (60).
- Rnd 13: (9 sc, inc) 6 times (66).
At this stage, attach the complete grey eye pieces together with the safety eyes. The pattern places the safety eyes between rounds 6 and 7 of the head, with 12 sc between the eyes and approximately 6 sc between the upper parts of the grey eye pieces. The snout should point upwards.
Place the white part around each safety eye and tighten the magic ring. Sew the grey eye pieces into place according to the pattern photographs. Continue stuffing the head as you crochet.
Complete the Head Shaping
Continue with Rnds 14-25: 1 sc in each st (66).
- Rnd 26: (9 sc, dec) 6 times (60).
- Rnd 27: (8 sc, dec) 6 times (54).
- Rnd 28: (7 sc, dec) 6 times (48).
- Rnd 29: (6 sc, dec) 6 times (42).
- Rnd 30: (5 sc, dec) 6 times (36).
- Rnd 31: (4 sc, dec) 6 times (30).
- Rnd 32: (3 sc, dec) 6 times (24).
- Rnd 33: (2 sc, dec) 6 times (18).
- Rnd 34: (1 sc, dec) 6 times (12).
- Rnd 35: (2 sc, dec) 3 times (9).
Fasten off and leave a tail long enough for closing the opening. Use a needle to gather the final 9 stitches in the front loop and tighten the yarn to close the hole neatly. Weave in the ends.
Step 4: Crochet the Body

The body begins in White (#001). The first eleven rounds gradually increase until the body reaches 66 stitches.
- Rnd 1: 6 sc in a mr.
- Rnd 2: (inc) 6 times (12).
- Rnd 3: (1 sc, inc) 6 times (18).
- Rnd 4: (2 sc, inc) 6 times (24).
- Rnd 5: (3 sc, inc) 6 times (30).
- Rnd 6: (4 sc, inc) 6 times (36).
- Rnd 7: (5 sc, inc) 6 times (42).
- Rnd 8: (6 sc, inc) 6 times (48).
- Rnd 9: (7 sc, inc) 6 times (54).
- Rnd 10: (8 sc, inc) 6 times (60).
- Rnd 11: (9 sc, inc) 6 times (66).
Work Rnds 12-24: 1 sc in each st (66). Stuff the body as you make it, keeping the filling firm and evenly distributed.
Continue with the following decreases:
- Rnd 25: (9 sc, dec) 6 times (60).
- Rnds 26-27: 1 sc in each st (60).
- Rnd 28: (8 sc, dec) 6 times (54).
- Rnds 29-30: 1 sc in each st (54).
- Rnd 31: (7 sc, dec) 6 times (48).
- Rnds 32-33: 1 sc in each st (48).
- Rnd 34: (6 sc, dec) 6 times (42).
Change to Silver (#118).
Work Rnds 35-36: 1 sc in each st (42), followed by Rnd 37: (5 sc, dec) 6 times (36).
The arms are crocheted into the body on the next round. The original instructions specifically state to crochet through both layers of the arm, meaning all 4 loops on the arm.
Rnd 38: 8 sc, 6 sc with arm, 15 sc, 6 sc with arm, 1 sc (36).
Rnd 39: 1 sc in each st (36).
Rnd 40: (4 sc, dec) 6 times (30).
Rnd 41: 1 sc in each st (30).
Fasten off and leave a tail long enough for sewing.
Step 5: Crochet the Legs
Make two legs in Silver (#118). The foot is shaped through the first twelve rounds, while the remaining section forms the longer leg.
- Rnd 1: 6 sc in a mr.
- Rnd 2: (inc) 6 times (12).
- Rnd 3: (1 sc, inc) 6 times (18).
- Rnd 4: (2 sc, inc) 6 times (24).
- Rnd 5: (3 sc, inc) 6 times (30).
- Rnd 6: (4 sc, inc) 6 times (36).
- Rnds 7-10: 1 sc in each st (36).
- Rnd 11: (dec) 6 times, 24 sc (30).
- Rnd 12: (3 sc, dec) 6 times (24).
- Rnd 13: (2 sc, dec) 6 times (18).
- Rnds 14-24: 1 sc in each st (18).
Stuff the foot firmly and the rest of the leg lightly with fiberfill. Fasten off and leave a tail long enough for sewing.

Step 6: Make the Ears
Make two ears in Silver (#118).
- Rnd 1: 6 sc in a mr.
- Rnd 2: (inc) 6 times (12).
- Rnd 3: (1 sc, inc) 6 times (18).
- Rnd 4: (5 sc, inc) 3 times (21).
- Rnds 5-7: 1 sc in each st (21).
Fasten off and leave a sufficiently long tail for sewing.
Step 7: Crochet the Pink Apron

The apron is made in Candyfloss (#045). It begins as a circular shape and then changes into the front panel.
- Rnd 1: 6 sc in a mr.
- Rnd 2: (inc) 6 times (12).
- Rnd 3: (1 sc, inc) 6 times (18).
- Rnd 4: (2 sc, inc) 6 times (24).
- Rnd 5: (3 sc, inc) 6 times (30).
- Rnd 6: (4 sc, inc) 6 times (36).
- Rnd 7: (5 sc, inc) 6 times (42).
- Rnd 8: (6 sc, inc) 6 times (48).
- Rnd 9: 1 sc in each st (48).
Now crochet the front panel in rows, chaining 1 to turn after each completed row.
- Rows 10-13: 8 sc, ch 1, turn.
- Row 14: skip the first st, 7 sc, ch 1, turn.
- Row 15: skip the first st, 6 sc, ch 1, turn.
- Row 16: make an sc row around the entire apron, approximately 58 sc.
- Row 17: skip 1 st, (1 sc, ch 2, 1 sc) in the same st, repeat all the way around.
- Row 18: ch 40 for the strap that goes around the neck and attach it at the other side of the row.
Fasten off and weave in the ends.
Step 8: Make the Apron Tie-Strings
Using Candyfloss (#045), make two tie-strings.
Rnd 1: ch 37.
Rnd 2: begin in the 3rd chain from the hook and work 35 hdc.
Fasten off and leave a tail long enough for sewing.
Step 9: Crochet the Snout and Tail
Snout
Using Silver (#118), work Rnd 1: 6 sc in a mr, 1 sl st.
Fasten off and leave a tail long enough for sewing.
Tail
Using Silver (#118), make the tail as follows:
- Rnd 1: 6 sc in a mr.
- Rnd 2: (inc) 6 times (12).
- Rnd 3: (1 sc, inc) 6 times (18).
- Rnds 4-6: 1 sc in each st (18).
- Stuff the tail lightly.
- Rnd 7: (1 sc, dec) 6 times (12).
Fasten off and leave a tail long enough for sewing.
Step 10: Make the Decorative Ribbon

Using Candyfloss (#045), make the ribbon.
Rnd 1: ch 75.
Rnd 2: join into a ring in the first ch and work 74 sc.
Fasten off and leave a tail long enough for sewing.
The pattern also includes three small balls of yarn for the ribbon decoration. Wind three balls of yarn in colors of your preference: one approximately 3.5 cm, one approximately 3 cm, and one approximately 2.5 cm.
The original project uses two matches as small knitting needles for these yarn balls, with their edges smoothed slightly using sandpaper. Again, the pattern specifically recommends avoiding matches when the finished product is intended for babies or children.
Assembly: Bringing Panda Mum Together
Assembly is where all the individual crocheted pieces become the finished Pif Panda Mum. Take your time at this stage because positioning affects the symmetry and overall appearance of the character.
Attach the Ears
Sew the ears onto round 23 of the head, leaving approximately 13 sc between them. Check that both ears sit at matching heights before securing them completely.
Embroider the Eyebrows
Using the black scrap yarn, embroider the eyebrows between rounds 11 and 12, with 6 sc between them. The eyebrows are a small detail, but they contribute strongly to the panda’s facial expression.
Add the Snout
Sew the snout onto the tip of the face. After attaching it, embroider a stripe downward from the snout as described in the pattern.
Attach the Legs
Sew the legs diagonally from round 3. Before completing the stitching, check that the legs are positioned symmetrically so the panda can sit naturally.
Add the Yarn Balls and Ribbon
Sew the three decorative yarn balls onto the head together with the ribbon. This is one of the most recognizable design features of Pif Panda Mum and should be positioned carefully.
Attach the Apron and Head
Attach the apron and then sew the head onto the body. While sewing the head, continue to add stuffing between the head and body as recommended in the original instructions. This helps create a firm connection and prevents the finished head from becoming wobbly.
Finish the Apron
Sew the tie-strings at each side of the apron and on the back side. Sew the 12 mm wooden button onto the tie-string on the back side of the apron.
Attach the Tail
Finally, sew the tail onto the middle of the back side of the panda.

Stitch Checkpoints for a Smoother Make
Because this project contains several shaping sequences, it helps to use the stitch counts as checkpoints rather than simply working through the instructions without checking them.
- The head reaches 66 stitches at Rnd 13.
- The head remains at 66 stitches through Rnds 14-25.
- The head decreases to 9 stitches by Rnd 35.
- The body reaches 66 stitches at Rnd 11.
- The body remains at 66 stitches through Rnds 12-24.
- The body reaches 42 stitches at Rnd 34 before changing to Silver.
- The body reaches 36 stitches at Rnd 37 before the arms are crocheted into the round.
- The final body round, Rnd 41, contains 30 stitches.
- Each arm finishes its long section at 13 stitches per round.
- Each leg finishes Rnds 14-24 at 18 stitches.
- Each ear finishes at 21 stitches.
- The apron reaches 48 stitches at Rnd 8 and remains at 48 stitches in Rnd 9.
Stuffing Advice
Stuffing is especially important for an amigurumi character with a rounded head and body. The original instructions specify firm stuffing for the head and body. The arms should be stuffed lightly as you work, while the foot should be stuffed firmly and the remainder of each leg lightly.
The tail is also stuffed lightly. Avoid allowing the fiberfill to create visible lumps or uneven areas. Adding small amounts gradually gives you more control than trying to fill a component all at once.
For the head and body, maintain enough firmness to preserve the intended shape while still allowing the crocheted fabric to retain its smooth surface. The original instruction to work tightly is particularly helpful here because loose stitches can create visible gaps around the stuffing.
Common Assembly Mistakes to Avoid
- Do not tighten the magic ring of the white eye piece before leaving the required assembly tail.
- Do not attach the safety eyes without checking their specified placement between rounds 6 and 7 of the head.
- Do not forget that the grey eye piece should have its curved section pointing outward.
- Do not skip the instruction to crochet through both layers of the arm when joining it to the body.
- Do not stuff the arms as firmly as the body; the original instructions specify light stuffing for the arms.
- Do not stuff the entire leg uniformly; the foot is stuffed firmly while the rest of the leg is stuffed lightly.
- Do not forget the color change to Silver at body Rnd 35.
- Do not sew the ears without checking the approximately 13 sc spacing between them.
- Do not forget the eyebrows between rounds 11 and 12.
- Do not omit the tail from the middle of the back side during final assembly.
Final Finishing Checklist
- Both safety eyes are 8 mm and securely positioned.
- The grey eye pieces are sewn neatly and symmetrically.
- The white eye edging is in place.
- The snout is attached to the tip of the face.
- The downward embroidered stripe has been added.
- The eyebrows are embroidered with black scrap yarn.
- Both ears are sewn onto round 23.
- Both arms are attached through both layers as instructed.
- Both legs are sewn diagonally from round 3.
- The Candyfloss apron is attached.
- The neck strap and apron tie-strings are attached.
- The 12 mm wooden button is sewn onto the back tie-string.
- The decorative ribbon is attached with the three yarn balls.
- The tail is sewn onto the middle of the back.
- The head is securely sewn to the body with stuffing between the pieces.
- All yarn ends are woven in securely.
What Makes This Panda Special?
Pif Panda Mum has a particularly playful look because the pattern combines several textures and shapes without requiring complicated colorwork. The white head and body provide a clean base, while Silver (#118) creates the ears, arms, legs, eye pieces, snout, and tail. Candyfloss (#045) then adds the soft pink apron and ribbon details.
The apron is especially effective because it is constructed directly from a circular base before the front panel and straps are formed. The decorative yarn balls on the head add another handmade element, making the finished panda look as though she is carrying her own little collection of yarn and knitting supplies.
Finished Size and Project Details
When completed according to the original pattern, Pif Panda Mum measures approximately 24 cm, or 9.4 inches. The project is classified as intermediate and uses a 2.50 mm crochet hook.
The yarn specified is Friends Cotton 8/4 in White (#001), Silver (#118), and Candyfloss (#045), with one skein of each color listed in the original materials section. The additional supplies include the 8 mm safety eyes, 12 mm wooden button, black scrap yarn, three colors of scrap yarn for the ribbon, fiberfill, and the small items used for the decorative yarn balls.
A Practical Way to Organize the Project
If you prefer to work in stages, this project can be organized into three practical groups. First, crochet the structural pieces: head, body, arms, legs, and ears. Second, prepare the decorative pieces: eye sections, snout, tail, apron, tie-strings, ribbon, and yarn balls. Third, complete all assembly and embroidery.
This approach makes it easier to keep track of the individual components. It also allows you to complete the head and facial details carefully before moving to the body and clothing.
When working through the rounds, pay particular attention whenever the stitch count changes. The increase sections create the rounded shapes, while the decrease sections close those shapes. Maintaining the exact stitch counts listed in the pattern helps keep the final proportions consistent.
Final Thoughts
Pif Panda Mum is a detailed intermediate crochet project that rewards careful stitch counting and patient assembly. The individual components are manageable, but the finished character comes from putting those components together accurately: the shaped head, distinctive eye pieces, silver limbs, rounded ears, pink apron, decorative ribbon, yarn balls, and small embroidered facial details.
The most important strategy is to follow the original round and row numbers exactly, especially around the head, body, eye pieces, and apron. Keep the stuffing firm where the pattern calls for firm stuffing and light where it calls for light stuffing. During assembly, use the specified placement points as your guide rather than relying only on visual estimation.
Once the final sewing is complete, the result is a sweet 24 cm crocheted panda with a charming handmade personality. Her pink apron and yarn-ball decoration make her particularly suitable as a decorative amigurumi project or as part of a larger collection of PifPaf-inspired crocheted characters.