
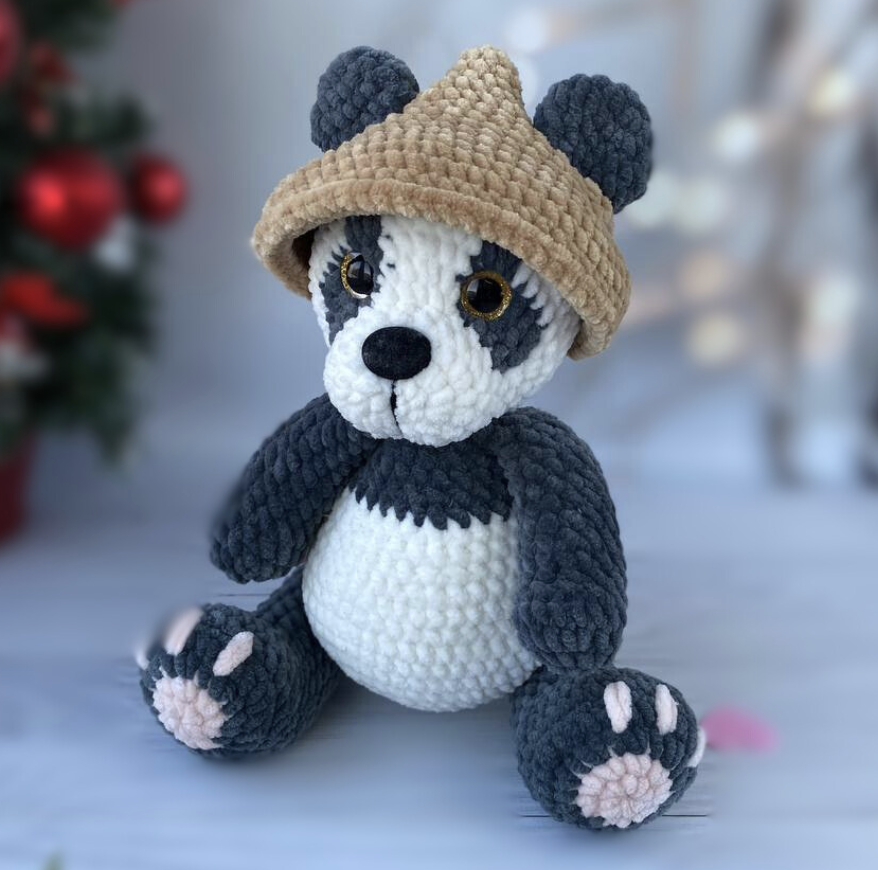
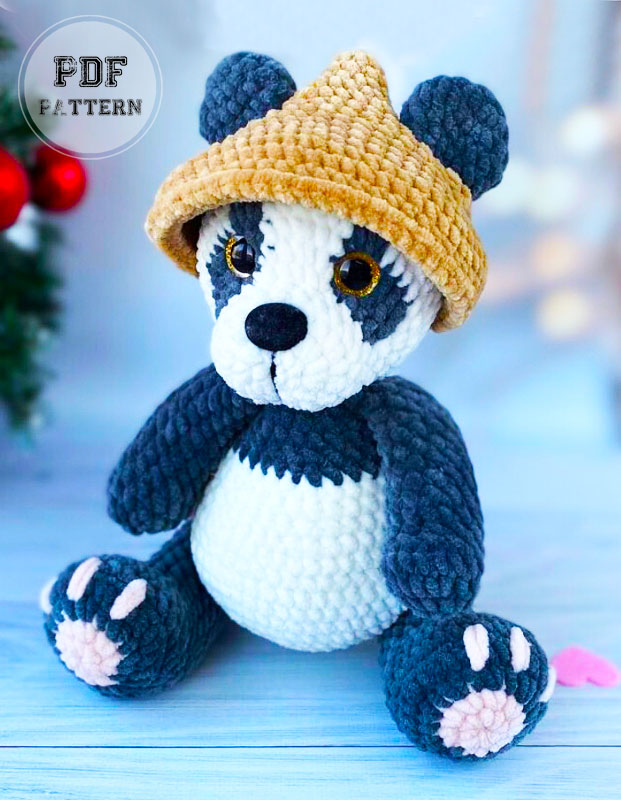
This crochet panda pattern by Rosalie_Toys is a plush amigurumi project built around a carefully controlled combination of increases, decreases, color changes, integrated attachments, and final shaping. The finished character features a rounded white-and-black body, pink-and-black feet, black ears and arms, a small tail, a detailed face, and a separate brown hat.
This fourth version of the tutorial is organized as a stitch-checkpoint and assembly masterclass. Instead of treating the pattern as a simple list of rounds, each section highlights the moments where stitch counts, orientation, color changes, stuffing, and attachment positions need particular attention.
The written instructions remain faithful to the original pattern. No finished size, gauge, yarn yardage, or other measurement has been added because those details are not provided in the source. The written PDF uses the no-joint leg construction, while the designer’s video demonstrates an optional jointed approach using 30 mm joints.
Project Overview: What You Will Build
The panda is made from several components that eventually form one plush character. You will first create the smaller independent pieces, including the ears, tail, arms, and legs. The body is then crocheted and the legs are incorporated directly into the no-joint version. The arms are attached later in the body. The head is worked separately, with the ears attached during one of its rounds, and the completed head is sewn to the body.
The tail is also sewn on separately. The brown hat is made as a separate accessory and is fitted to the head during its construction.
This construction order means that accuracy is not only about following the stitch counts. Orientation is equally important. The original pattern specifically asks you to make sure the feet face forward and that the legs are symmetrical when they are incorporated into the body.
Materials and Tools Checklist
Prepare the complete supply list before beginning:
- Crochet hook: 4 mm
- Main body yarn: Himalaya Dolphin Baby white
- Secondary yarn: Himalaya Dolphin Baby black and pink
- Hat yarn: brown
- Safety eyes: 16 mm
- Safety nose: 15/22 mm
- Joints: 30 mm, optional
- Yarn needle
- Scissors
- Hollowfiber
- Stitch marker
The source does not specify a finished size, gauge, or total quantity of yarn. These details should therefore not be estimated when presenting or following the pattern.
Abbreviations You Will See
- MR: magic ring
- ch: chain
- sl st: slip stitch
- sc: single crochet
- dec: decrease
- inc: increase, meaning 2 sc in one stitch
- BLO: back loop only
- cc: color change
- FO: fasten off
- (…): repeat the instructions in parentheses
- *…: repeat the indicated instructions the number of times shown
Important Construction Rule Before Starting
The original pattern includes an important instruction about yarn tails: do not leave yarn tails for sewing on pieces unless the pattern specifically says to do so. Only the head and tail are sewn onto the completed construction. The other pieces are attached while crocheting progresses.
This distinction is important because leaving long tails on every piece can create unnecessary ends and may encourage you to assemble the panda differently from the original design.
Checkpoint One: Crochet the Two Ears
The ears are worked in black yarn. Make two.
- R1: 8 sc in MR
- R2: 8 inc (16)
- R3: 3 sc, inc, 7 sc, inc, 4 sc (18)
- R4: 18 sc around
- R5: 4 sc, dec, 6 sc, dec, 4 sc (16)
- R6: 2 sc, 2 dec, 4 sc, 2 dec, 2 sc (12)
After R6, work 2 sc. Fold the piece in half and crochet 6 sc through both sides. Cut the yarn and fasten off. Do not stuff the ears.
Ear Checkpoint
Place the two ears next to each other before moving forward. They should have the same basic shape and size. Since they will later be incorporated into the head, it is useful to have both pieces prepared and easy to identify.
The ears do not need sewing tails because they are attached during head R16.
Checkpoint Two: Make the Tail
The tail is worked in black yarn and is lightly stuffed.
- R1: 6 sc in MR
- R2: 6 inc (12)
- R3: 12 sc
- R4: (sc, dec)*4 (8)
Stuff the tail lightly. Cut the yarn and fasten off, leaving a tail for sewing. The tail is placed between R7 and R9 of the body.
Tail Checkpoint
The key word here is lightly. The pattern does not call for a heavily stuffed tail. A small amount of hollowfiber is enough to support the shape while keeping the piece soft.
Checkpoint Three: Build the Arms
Make two arms in black yarn. The pattern instructs you to stuff the arms as you go through rounds 1-12.
- R1: 6 sc in MR
- R2: 6 inc (12)
- R3: 4 sc, 3 inc, 5 sc (15)
- R4: 15 sc
- R5: 5 sc, 3 dec, 4 sc (12)
- R6: 12 sc
- R7: 5 sc, inc, 6 sc (13)
- R8-R13: 13 sc around (6 rows)
- R14: 5 sc, dec, 6 sc (12)
- R15: 12 sc
Work 2 sc, fold the arm in half, and crochet 6 sc through both sides. Cut the yarn and fasten off.
Keep both arms comparable in shape before starting the body. The final attachment happens much later, during body R22.
Checkpoint Four: Work the Pink-and-Black Legs
The legs are one of the most important preparation stages because their final orientation affects the appearance of the whole panda.
Make two legs. Start in pink.
- R1: 8 sc in MR
- R2: 8 inc (16), cc to black
- R3: (sc, inc)*8 (24)
- R4: (3 sc, inc)*6 (30)
- R5: 30 sc (BLO)
- R6: 30 sc around
- R7: 9 sc, 6 dec, 9 sc (24)
- R8: 6 sc, 6 dec, 6 sc (18)
- R9: 7 sc, 2 dec, 7 sc (16)
- R10-R12: 16 sc around (3 rows)
- R13: dec, 14 sc (15)
- R14-R16: 15 sc around (3 rows)
- R17: (sc, dec)*5 (10)
Stuff the legs as you go from R1 through R15.
After R17, work 2 sc and fold the leg in half. Before closing it, make sure the foot faces forward and not to the side. Adjust the stitches if necessary. Crochet 5 sc through both sides. Cut the yarn and fasten off.
The Forward-Facing Foot Test
Hold the finished leg upright and look at the foot from the front. This small inspection can save significant adjustment later. Repeat the same orientation check on the second leg. The two pieces should be prepared so that they can sit symmetrically when joined to the body.
Checkpoint Five: Establish the Body
The body begins in the main white color.
- R1: 6 sc in MR
- R2: 6 inc (12)
- R3: (sc, inc)*6 (18)
- R4: (2 sc, inc)*6 (24)
- R5: (3 sc, inc)*6 (30)
- R6: (4 sc, inc)*6 (36)
- R7: (5 sc, inc)*6 (42)
- R8: (6 sc, inc)*2, 2 sc, inc, 6 sc, inc, 3 sc, inc, 6 sc, inc, 7 sc (48)
No-Joint Leg Attachment
The written PDF uses the no-joint version. For this construction:
R9: 9 sc, 5 sc tog with leg, 18 sc, 5 sc tog with leg, 11 sc (48).
Make sure the legs face the front and are symmetrical. The pattern allows you to adjust the stitch if necessary.
Optional Jointed Construction
The pattern also lists 30 mm joints as optional. In the jointed version, R9 is 48 sc around, and the jointed legs are attached after R12. The designer demonstrates this alternative construction in the video tutorial.
Do not combine the no-joint attachment instructions with the jointed method. Choose one construction approach and follow it consistently.
Continue the Body Through the Arm Attachment
- R10-R12: 48 sc around (3 rows)
- R13: (6 sc, dec)*6 (42)
- R14: (5 sc, dec)*6 (36)
- R15: 36 sc around
- R16: (4 sc, dec)*6 (30)
- R17: 30 sc around, cc to black
- R18: (3 sc, dec)*6 (24)
- R19-R20: 24 sc around (2 rows)
- R21: (2 sc, dec)*6 (18)
Now attach the arms during R22:
R22: 2 sc, 6 sc tog with arm, 3 sc, 6 sc tog with arm, sc (18), cc to white.
Adjust the stitch if necessary.
Finish the body with:
R23: dec, 7 sc, dec, 7 sc (16).
Cut the yarn and fasten off, leaving a tail for sewing.
Body Checkpoint
Turn the body toward you and check the overall alignment. The feet should face forward, the legs should be symmetrical, and the arms should be attached during the intended round. The body is now ready for the separately crocheted head.
Checkpoint Six: Shape the Head
The head begins in the main color and contains the most detailed color-changing section of the pattern.
- R1: 6 sc in MR
- R2: 6 inc (12)
- R3: 2 sc, (3 sc in one st)*2, 4 sc, (3 sc in one st)*2, 2 sc (20)
- R4: 5 sc, inc, 8 sc, inc, 5 sc (22)
- R5-R6: 22 sc around (2 rows)
Rounds R7-R10 use color changes. In the original source, the black text represents white yarn and the red text represents black yarn. The designer’s video can be used as a visual reference for these rounds.
- R7: 6 sc, 3 inc, 3 inc, 3 inc, 7 sc (31)
- R8: 6 sc, inc, 3 sc, inc, 2 sc, sc, inc, 2 sc, 2 sc, inc, 3 sc, inc, 7 sc (36)
- R9: 7 sc, inc, sc, 3 sc, inc, 2 sc, 2 sc, inc, 2 sc, 2 sc, inc, 3 sc, sc, inc, 8 sc (41)
- R10: 9 sc, inc, 5 sc, inc, sc, 3 sc, inc, 2 sc, sc, inc, 6 sc, inc, 9 sc (46)
- R11: 13 sc, inc, 19 sc, inc, 12 sc (48)
Face Placement Checkpoint
At this stage, place the facial safety pieces exactly as specified.
The 16 mm safety eyes go between rows 8 and 9, with approximately 7 visible stitches between them.
The 15/22 mm safety nose goes between rows 3 and 4.
These row positions are part of the original design and should not be replaced with estimated measurements.
Continue the Head and Incorporate the Ears
- R12-R14: 48 sc around (3 rows)
- R15: (6 sc, dec)*6 (42)
The ears are attached during R16:
R16: 12 sc, 6 sc tog with ear, 7 sc, 6 sc tog with ear, 11 sc (42).
Adjust the stitch if necessary and refer to the photo when adding the ears.
- R17: (5 sc, dec)*6 (36)
- R18: (4 sc, dec)*6 (30)
Start stuffing at R18.
- R19: (3 sc, dec)*6 (24)
- R20: (2 sc, dec)*6 (18)
- R21: (sc, dec)*6 (12)
- R22: 6 dec
Cut the yarn, close the hole, and sew the head to the body.
Head Stuffing Checkpoint
The head should not be stuffed from the beginning. The source specifically starts stuffing at R18. This allows the head’s earlier shaping and color-change structure to develop before the filling is introduced.
Once you reach the stuffing stage, add hollowfiber gradually and distribute it around the interior. Avoid creating a dense lump in one area. The purpose of the stuffing is to support the shape created by the crochet rounds, not to change the dimensions of the pattern.
Sewing the Head to the Body
Once the head is closed, it is sewn to the body. This is one of the two major sewing stages identified in the original construction. The other is the tail placement.
Before sewing, check the front of the head against the front of the body. The face should be oriented correctly, and the ears should sit symmetrically enough to complement the body below.
Because the source does not introduce a separate numerical sewing chart for the head, do not invent one. Use the finished construction and the pattern photographs as the visual guide.
Checkpoint Seven: Crochet the Brown Hat
The hat is worked separately in brown yarn. Its construction begins with a small magic ring and expands progressively.
- R1: 5 sc in MR
- R2: 5 inc (10)
- R3: 10 sc around
- R4: (sc, inc)*5 (15)
- R5: (2 sc, inc)*5 (20)
- R6: (3 sc, inc)*5 (25)
R7 introduces the two chain sections:
R7: 3 sc, ch 9, 6 st skip, 8 sc, ch 9, 6 st skip, 3 sc (32).
At this point, try the hat on the head and adjust the stitch if necessary, following the original instruction.
- R8: 3 sc, 9 sc on chain, 8 sc, 9 sc on chain, 3 sc (32)
- R9: (6 sc, inc)*3, 5 sc, inc, 5 sc (36)
- R10: (5 sc, inc)*6 (42)
- R11: (6 sc, inc)*6 (48)
- R12: (7 sc, inc)*6 (54)
- R13: (8 sc, inc)*6 (60)
- R14-R15: 60 sc around (2 rows)
- R16: 60 sl st
Cut the yarn and fasten off.
Hat Fitting Checkpoint
The hat fitting stage is intentionally positioned at R7. This is where the pattern asks you to try the hat on the head and adjust the stitch if necessary.
Do not add unlisted rounds or create a new stitch count to resize the hat. The original pattern already provides its own fitting checkpoint.
Assembly Map: What Gets Sewn and What Gets Crocheted In?
Understanding the assembly map makes the entire project easier to manage.
- Ears: crocheted separately, then attached during head R16.
- Tail: crocheted separately, lightly stuffed, then sewn between R7 and R9.
- Arms: crocheted separately, then incorporated during body R22.
- Legs: crocheted separately and incorporated into the body in the written no-joint version.
- Head: completed separately and sewn to the body.
- Hat: crocheted separately and fitted onto the head.
This assembly map also explains why the project should not be approached as a simple sew-everything-together-at-the-end amigurumi.
Stitch Count Control: The Most Useful Habit
For a project with several attachment rounds and color changes, stitch counting is an effective way to detect problems before they affect later construction. Keep track of the counts at the major expansion and decrease checkpoints.
- Ears R6: 12 stitches
- Tail R4: 8 stitches
- Arms R7: 13 stitches
- Arms R14: 12 stitches
- Legs R4: 30 stitches
- Legs R17: 10 stitches
- Body R8: 48 stitches
- Body R9: 48 stitches in the no-joint version
- Body R22: 18 stitches
- Head R11: 48 stitches
- Head R16: 42 stitches
- Head R18: 30 stitches
- Hat R13: 60 stitches
- Hat R16: 60 slip stitches
Color-Change Checkpoints
Color changes are another area where organization pays off. The legs begin in pink and change to black after R2. The body changes to black at R17 and returns to white at R22. The head uses multiple color changes during R7-R10, with the original source explaining that the color-coded text identifies the yarn.
When changing colors, avoid allowing the unused yarn to create unnecessary tension. The goal is to preserve the shape created by the written stitch sequence while maintaining the visual contrast of the panda.
Common Troubleshooting Situations
The Feet Are Facing the Wrong Direction
Before closing the legs, check their orientation. The pattern specifically states that the feet should face forward rather than sideways. Adjust the stitches if necessary before working the final 5 sc through both sides.
The Legs Are Not Symmetrical on the Body
Check body R9. In the no-joint version, the legs are incorporated directly into this round. Make sure they are facing the front and remain symmetrical. The pattern permits a stitch adjustment if needed.
The Arms Are Positioned Incorrectly
Review R22 carefully. The attachment sequence is 2 sc, 6 sc tog with arm, 3 sc, 6 sc tog with arm, sc. If necessary, adjust the stitch position according to the original instruction.
The Ears Look Uneven
Check their attachment during head R16. The round is 12 sc, 6 sc tog with ear, 7 sc, 6 sc tog with ear, 11 sc. The source also recommends referring to the photo when adding the ears.
The Face Looks Unbalanced
First verify the row positions. The eyes go between rows 8 and 9 with approximately 7 visible stitches between them. The nose goes between rows 3 and 4.
The Head Feels Too Firm
Check the amount and distribution of hollowfiber. The pattern starts stuffing at R18, and the filling should support the shape rather than create excessive hardness.
The Hat Does Not Sit Correctly
Use the fitting checkpoint at R7. The pattern specifically tells you to try the hat on the head and adjust the stitch if necessary.
A Beginner-Friendly Working Order
If you prefer to organize the project into manageable sessions, the pattern naturally divides into several stages.
- Prepare the ears and tail.
- Complete both arms.
- Complete both legs and verify the foot direction.
- Start and build the body.
- Attach the legs during the no-joint body construction.
- Continue the body and attach the arms at R22.
- Make the head and complete the facial placement.
- Attach the ears at R16.
- Stuff the head from R18 and close it.
- Sew the head to the body.
- Place the tail between R7 and R9.
- Make the brown hat.
- Check the hat fit at R7.
- Complete the final hat rounds.
- Finish the face shaping and embroidery using the designer’s video tutorial.
Finishing and Face Details
The source refers makers to the creator’s video tutorial for the face-shaping and embroidery portion. This is especially useful because the final facial details are visual rather than described through a separate numerical embroidery chart.
Keep the safety-eye and safety-nose placement consistent with the written pattern before beginning the finishing work. Once the face is shaped, small changes can have a noticeable effect on the final expression.
Visual Reference for the Hat and Face
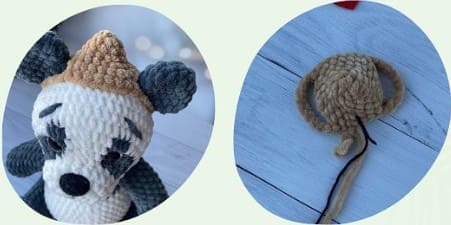
The brown hat adds an important character element to the panda. Its final appearance depends on the gradual increase sequence and the chain sections created in R7. The fitting step at that point is therefore worth treating as a deliberate checkpoint rather than rushing directly through the remaining rounds.
Optional 30 mm Joints: Keep the Two Methods Separate
The materials list includes 30 mm joints as optional. The written pattern itself follows the no-joint construction. In that version, R9 joins the legs to the body. The alternative jointed version uses 48 sc around for R9 and attaches the hinged legs after R12.
If you want to use the jointed method, refer to the designer’s video rather than modifying the written no-joint attachment sequence yourself. Keeping the two methods separate prevents conflicting construction instructions.
Pattern Accuracy Checklist
- Use the specified 4 mm crochet hook.
- Use the specified Himalaya Dolphin Baby colors.
- Use 16 mm safety eyes.
- Use a 15/22 mm safety nose.
- Keep 30 mm joints optional.
- Do not stuff the ears.
- Lightly stuff the tail.
- Stuff the arms through R1-R12.
- Stuff the legs through R1-R15.
- Keep the feet facing forward.
- Attach the legs using the correct construction method.
- Attach the arms during body R22.
- Place the eyes between rows 8 and 9.
- Keep approximately 7 visible stitches between the eyes.
- Place the nose between rows 3 and 4.
- Attach the ears during head R16.
- Begin head stuffing at R18.
- Sew the head to the body.
- Place the tail between R7 and R9.
- Try the hat on the head at R7.
- Finish the hat with 60 sl st in R16.
Frequently Asked Questions
What crochet hook is used for the panda?
The pattern uses a 4 mm crochet hook.
What yarn is used for the body?
The main body color is Himalaya Dolphin Baby white. Himalaya Dolphin Baby black and pink are used as secondary colors, and brown is used for the hat.
What size are the safety eyes?
The specified safety eyes are 16 mm.
What size is the safety nose?
The pattern specifies a 15/22 mm safety nose.
Are the 30 mm joints necessary?
No. They are optional. The written PDF uses the no-joint version, while the video demonstrates a jointed alternative.
Which parts are sewn onto the finished panda?
The head and tail are sewn on. The other parts are attached as crocheting progresses.
When do I stuff the head?
Head stuffing begins at R18.
Where should I place the eyes?
Place the 16 mm safety eyes between rows 8 and 9, with about 7 visible stitches between them.
Where should I place the nose?
Place the 15/22 mm safety nose between rows 3 and 4.
When are the ears attached?
The ears are incorporated during R16 of the head.
Where does the tail go?
The tail is placed between R7 and R9.
Does the source specify a finished size?
No finished size is given in the source.
Does the source specify a gauge?
No gauge is provided in the source.
Does the source specify total yarn yardage?
No total yarn yardage or meterage is provided in the source.
Pattern Credit and Usage
The design is credited to @Rosalie_Toys. The original source requests that the creator receive credit and states that the pattern should not be copied or redistributed as someone else’s work. The source also states that finished handmade items may be sold.
The designer provides a video tutorial that can be used for visual assistance, particularly for the head color changes, face shaping, and optional jointed construction.
Final Assembly Review
Before calling the project complete, look at the panda as one finished character rather than as a collection of separate crochet pieces. The feet should point forward, the legs should appear balanced, the arms should sit correctly on the body, and the ears should complement the face.
Check the eye spacing and nose placement one final time. Then inspect the head-to-body connection and the tail placement. Finally, place the brown hat on the head and make sure its construction follows the fitting point specified in the pattern.
Because this design uses plush yarn, visual inspection is especially useful. The texture can make individual stitches less obvious than they would be in smooth yarn, so stitch markers and written checkpoints can help maintain control throughout the project.
Final Thoughts
This panda is best approached as a construction project where every attachment round has a purpose. The separate ears, tail, arms, and legs establish the major components, while the body and head bring those components together through integrated crochet techniques.
The most important checkpoints are the forward-facing feet, the symmetrical leg attachment in body R9, the arm placement in body R22, the facial placement between the specified rows, the ear attachment in head R16, and the beginning of stuffing at head R18.
The hat provides the final decorative stage, but even here the pattern includes a specific fitting checkpoint at R7. Following that instruction makes it easier to preserve the intended shape without inventing additional rounds or measurements.
By keeping the stitch counts, color changes, attachment rounds, and placement instructions exactly as written, you can work through the panda systematically while using the visual references for the stages where shape and orientation matter most. The result is a soft, characterful crochet panda with a distinctive face, rounded body, contrasting feet, and a carefully shaped brown hat.