
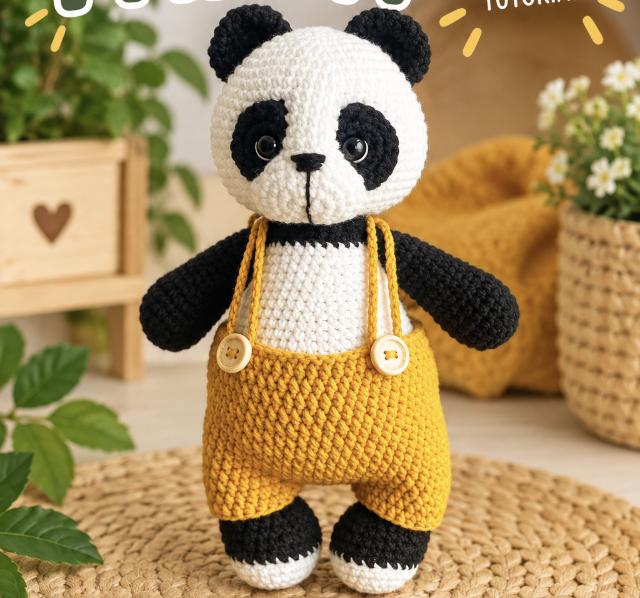

Ron the Panda in Pants is a delightful amigurumi project that combines a classic panda character with a removable crocheted outfit. The finished toy is approximately 24 cm tall and features a rounded head, sculpted face, black-and-white body, separate arms and legs, a small tail, and a pair of overalls completed with two straps and buttons.
This project is worked with a 2 mm crochet hook and YarnArt Jeans yarn in three specified colors: white, black, and yellow. The construction involves several individual pieces, so keeping track of each round and stitch count is essential. The pattern also includes several distinctive finishing details, including 10 mm safety eyes, embroidered eye whites and nose, facial sculpting, and carefully specified attachment points.
This guide presents the panda as a complete construction project, taking you from the first magic ring through the final assembly. All technical instructions, stitch counts, round numbers, color changes, measurements, stuffing points, and placement instructions are preserved exactly as provided in the original pattern.
Meet the Finished Panda
The appeal of this amigurumi comes from the combination of simple crocheted shapes and detailed finishing. The head and body are built with increases and decreases to create rounded forms. The ears, arms, legs, muzzle, eyes, and tail are made separately and later attached.
The clothing adds another dimension to the design. The overalls are removable rather than permanently sewn onto the panda. A tail opening is incorporated into the clothing, while two separate straps are made from chains of 70. Buttons are used to fasten the straps.
The face is especially important. The pattern calls for the face to be sculpted according to the reference image. The muzzle is sewn between the eyes, while the eye whites and nose are embroidered. These finishing steps help create the characteristic expression of the completed panda.
Materials and Tools Checklist
Prepare the following supplies before beginning the project:
- YarnArt Jeans 62: White
- YarnArt Jeans 53: Black
- YarnArt Jeans 84: Yellow
- Crochet hook: 2 mm
- Safety eyes: 10 mm
- Stuffing material: Polyfill or similar
- Stitch markers
- Pins
- Buttons
- Sewing needle for assembling parts
- Scissors
The recommended yarn is YarnArt Jeans, a cotton blend. The specified yarn colors are white, black, and yellow. Keeping the three colors organized from the beginning makes the required transitions easier to manage.
Abbreviations to Keep Nearby
The pattern uses the following crochet abbreviations:
- MR: Magic Ring
- ch: Chain stitch
- sl st: Slip stitch
- sc: Single crochet
- hdc: Half double crochet
- inc: Increase, meaning 2 sc in the same stitch
- dec: Decrease, invisible preferred
- (…) x n: Repeat the sequence n times
Because the pattern contains repeated increases and decreases, stitch markers can be especially useful for maintaining your place. The written stitch count at the end of each round should be treated as an important checkpoint.
Part One: Crochet the Head
The head begins with only 6 stitches and gradually expands until it reaches 60 stitches. After a long section worked at 60 stitches, the head is narrowed through several decrease rounds.
- Rnd 1: 6 sc in MR (6)
- Rnd 2: 6 inc (12)
- Rnd 3: (1 sc, inc) repeat 6 times (18)
- Rnd 4: (2 sc, inc) repeat 6 times (24)
- Rnd 5: (3 sc, inc) repeat 6 times (30)
- Rnd 6: (4 sc, inc) repeat 6 times (36)
- Rnd 7: (5 sc, inc) repeat 6 times (42)
- Rnd 8: (6 sc, inc) repeat 6 times (48)
- Rnd 9: (7 sc, inc) repeat 6 times (54)
- Rnd 10-11: 54 sc
- Rnd 12: (8 sc, inc) repeat 6 times (60)
- Rnd 13-21: 60 sc
- Rnd 22: (8 sc, dec) repeat 6 times (54)
- Rnd 23: (7 sc, dec) repeat 6 times (48)
- Rnd 24: (6 sc, dec) repeat 6 times (42)
- Rnd 25: (5 sc, dec) repeat 6 times (36)
- Rnd 26: (4 sc, dec) repeat 6 times (30)
- Rnd 27: (1 sc, dec) x 10 (20)
Fasten off and leave a long tail for sewing. The long tail is reserved for assembly, so it should remain available until the head is attached.

Part Two: Shape the Body
The body is the largest crocheted section. It starts with a magic ring and increases through Round 11, where the stitch count reaches 66. The body then remains at 66 stitches through Round 18 before the shaping begins.
- Rnd 1: 6 sc in MR (6)
- Rnd 2: 6 inc (12)
- Rnd 3: (1 sc, inc) repeat 6 times (18)
- Rnd 4: (2 sc, inc) repeat 6 times (24)
- Rnd 5: (3 sc, inc) repeat 6 times (30)
- Rnd 6: (4 sc, inc) repeat 6 times (36)
- Rnd 7: (5 sc, inc) repeat 6 times (42)
- Rnd 8: (6 sc, inc) repeat 6 times (48)
- Rnd 9: (7 sc, inc) repeat 6 times (54)
- Rnd 10: (8 sc, inc) repeat 6 times (60)
- Rnd 11: (9 sc, inc) repeat 6 times (66)
- Rnd 12-18: 66 sc
- Rnd 19: (9 sc, dec) repeat 6 times (60)
- Rnd 20: 60 sc
- Rnd 21: (8 sc, dec) repeat 6 times (54)
- Rnd 22: 54 sc
- Rnd 23: (7 sc, dec) repeat 6 times (48)
- Rnd 24: 48 sc
- Rnd 25: (6 sc, dec) repeat 6 times (42)
- Rnd 26: 42 sc
- Rnd 27: (5 sc, dec) repeat 6 times (36)
- Rnd 28: 36 sc
- Rnd 29: (4 sc, dec) repeat 6 times (30)
- Rnd 30: 30 sc
- Rnd 31: Change yarn to black, 30 sc
- Rnd 32: (1 sc, dec) x 10 (20)
- Rnd 33-34: 20 sc
Fasten off and stuff firmly, especially around the belly area. The stuffing should be added with the shape of the body in mind so the finished piece retains its intended structure.
Part Three: Make the Two Eye Pieces
Each eye is crocheted separately. These small pieces create the surrounding structure for the safety eyes and are attached to the head after they have been completed.
Make 2:
- Rnd 1: 5 sc in MR, sl st (5)
- Rnd 2: ch 1, 5 inc (10)
- Rnd 3: ch 1, inc, 8 sc, inc (12)
- Rnd 4: ch 1, 12 sc
Continue in turning rows as specified. Fasten off and leave a tail for sewing. Insert the 10 mm safety eyes through the center of the magic ring.
Attach the eyes between rows 16-17 of the head, leaving 10 stitches between them. This spacing is an important placement detail and should be checked before the eye pieces are sewn securely.
Part Four: Crochet the Muzzle
The muzzle is another compact component that contributes significantly to the face. It is worked in four rounds:
- Rnd 1: 8 sc in MR (8)
- Rnd 2: 8 inc (16)
- Rnd 3: 3 sc, 4 inc, 4 sc, 4 inc, 1 sc (24)
- Rnd 4: 24 sc
Fasten off and leave a long tail for sewing. The muzzle will be positioned between the eyes during assembly. Its placement works together with the facial sculpting to create the panda’s three-dimensional expression.
Part Five: Create the Ears
Make two ears using the following sequence:
- Rnd 1: 6 sc in MR (6)
- Rnd 2: 6 inc (12)
- Rnd 3: (1 sc, inc) repeat 6 times (18)
- Rnd 4-6: 18 sc
Fold each ear in half and sew across the open edge with 8 sc. After completing both ears, keep them ready for the final assembly stage.
Part Six: Build the Arms
The arms have a rounded lower section followed by a narrower upper section. Two identical arms are required.
- Rnd 1: 6 sc in MR (6)
- Rnd 2: 6 inc (12)
- Rnd 3: (1 sc, inc) repeat 6 times (18)
- Rnd 4: (2 sc, inc) repeat 6 times (24)
- Rnd 5-8: 24 sc
- Rnd 9: (2 sc, dec) repeat 6 times (18)
- Rnd 10-12: 18 sc
- Rnd 13: (7 sc, dec) repeat 2 times (16)
- Rnd 14-20: 16 sc
- Rnd 21: (2 sc, dec) repeat 4 times (12)
Stuff each arm until row 12. Fold it in half and sew across the open edge with 6 sc. Repeat the same instructions to make the second arm.
Part Seven: Crochet the Legs
The legs have a specific color transition. Begin with white yarn, then change to black yarn at Round 6. The sixth round is worked in back loops only, making this an important checkpoint in the construction.
- Rnd 1: 8 sc in MR (8)
- Rnd 2: 8 inc (16)
- Rnd 3: (1 sc, inc) repeat 8 times (24)
- Rnd 4-5: 24 sc
- Rnd 6: Change to black yarn, work in back loops only, 24 sc
- Rnd 7-9: 24 sc
- Rnd 10: 9 sc, 3 dec, 9 sc (21)
- Rnd 11: 8 sc, 3 dec, 7 sc (18)
- Rnd 12: 7 sc, 2 dec, 7 sc (16)
- Rnd 13-22: 16 sc
Fold each leg in half and sew across the open edge with 8 sc. Stuff firmly up to row 13. Make two legs using the same sequence.
Part Eight: Make the Tail
The tail is a small component made in just two rounds:
- Rnd 1: 6 sc in MR (6)
- Rnd 2: (1 sc, inc) repeat 3 times, sl st (9)
Fasten off and leave a tail for sewing. The finished tail will be attached at the center of the back between rows 13-15.
Part Nine: Crochet the Removable Overalls
The overalls are worked separately from the panda and are designed to be removable. Their construction includes a tail opening and separate pant legs.
- Rnd 1: Chain 55, join into a ring
- Rnd 2: 55 sc
- Rnd 3: 10 hdc, (inc) repeat 5 times (60)
- Rnd 4-6: 60 hdc
- Rnd 7-8: Create tail opening: 57 hdc, ch 6, skip 4 stitches, insert hook into 5th stitch, 60 hdc
- Rnd 9-15: 62 hdc

To form the pant legs, mark 6 center stitches on both the front and back and sew them together. Each pant leg has 25 stitches. Crochet 2 rows of 25 hdc for each pant leg.
The clothing construction is an important part of the finished design because it gives the panda a recognizable outfit while allowing the overalls to be removed when desired.
Part Ten: Make the Overall Straps
The straps are made separately from the main pants section. Make two straps:
Straps (make 2): Chain 70.

The straps are fastened with buttons. Because the overalls are removable, this fastening system allows the clothing to be taken off the panda rather than permanently attached to the body.
Assembly: Bring Every Piece Together
Once all the crocheted pieces are ready, assembly transforms the separate shapes into the finished character. This stage requires careful attention to the placement details in the original instructions.
Sculpt the Face
Sculpt the face according to the reference image. This technique creates depth in the facial area and contributes to the finished character’s expression.
Attach the Muzzle
Sew the muzzle between the eyes. Its placement should be checked carefully before the sewing is completed.
Embroider the Eye Whites and Nose
Embroider the eye whites and the nose. These details are part of the final facial finish and work together with the safety eyes and crocheted eye pieces.
Attach the Ears
Attach the ears between the designated rows. Check their position from the front so that the finished face remains balanced.
Attach the Legs
Attach the legs between rows 13-14. The specified placement should be followed when positioning both legs.
Attach the Tail
Sew the tail at the center of the back between rows 13-15.

Facial Sculpting and Placement Guide
The face deserves extra attention because it is the feature that gives the panda its personality. The pattern specifically instructs the crocheter to sculpt the face according to the reference image.
The safety eyes are 10 mm and are inserted through the centers of the magic rings of the two eye pieces. These pieces are attached between rows 16-17 of the head, with 10 stitches between them.
The muzzle is sewn between the eyes. After the muzzle is positioned, the eye whites and nose are embroidered. Keeping the facial details aligned helps preserve the intended character of the design.
The facial sculpting should be completed according to the reference rather than improvising a different arrangement. The sculpting technique is specifically included to create depth in the face.
Stuffing Checkpoints to Remember
Stuffing is not handled identically for every component. The body should be stuffed firmly, especially around the belly area.
For the arms, stuffing continues until row 12. After that point, the arm is folded and sewn across the open edge with 6 sc.
For the legs, stuffing continues firmly up to row 13. The legs are then folded and sewn across the open edge with 8 sc.
Following these stated stuffing checkpoints helps maintain the intended construction of each component. Add stuffing carefully so that it supports the shape without forcing the crocheted stitches apart.
Important Color-Change Checkpoints
There are two particularly important color transitions in the supplied pattern.
The body begins with its main color and changes to black at Round 31. Round 31 is worked as 30 sc after changing the yarn to black.
The legs begin with white yarn. At Round 6, change to black yarn and work 24 sc in the back loops only. Rounds 7-9 then continue with 24 sc.
Because these changes form part of the visual appearance of the panda, it is useful to verify the color before continuing to the next round.
Stitch Count Checkpoints
The head reaches 54 stitches at Round 9, remains at 54 through Rounds 10-11, then increases to 60 stitches at Round 12. Rounds 13-21 remain at 60 stitches. The shaping then begins and eventually reaches 20 stitches at Round 27.
The body reaches 66 stitches at Round 11 and remains at 66 through Round 18. The shaping sequence then progresses through 60, 54, 48, 42, 36, and 30 stitches before the black section and final reduction to 20 stitches.
The legs reach 24 stitches through Round 9 before the decreases begin. Round 10 brings the count to 21, Round 11 to 18, and Round 12 to 16. Rounds 13-22 remain at 16 sc.
These checkpoints can help identify where you are in the pattern while preserving the original round-by-round instructions.
Tips for a Clean Assembly
Before sewing pieces permanently, pins can be used to hold components temporarily in place. This is particularly useful for the facial pieces and ears, where placement has a direct effect on the appearance of the finished panda.
Check the eyes from the front before completing the sewing. The pattern specifies that they should be between rows 16-17 and 10 stitches apart. The muzzle should then be positioned between the eyes.
For the legs, confirm their position between rows 13-14. For the tail, locate the center of the back and attach it between rows 13-15.
When assembling the overalls, remember that the tail opening is intentionally included in the clothing. The opening allows the tail to remain outside the pants while the panda is dressed.
Removable Overalls: Final Clothing Details
The overalls are more than a decorative addition. Their removable construction means they can be taken off the finished panda. The main piece begins with a chain of 55 joined into a ring, followed by a 55-sc round and several hdc rounds.
The tail opening is created during Rounds 7-8 using 57 hdc, a chain of 6, skipping 4 stitches, and inserting the hook into the 5th stitch before continuing. Rounds 9-15 then contain 62 hdc.
After the main section is complete, the pant legs are formed by marking 6 center stitches on both the front and back and sewing them together. Each pant leg has 25 stitches and receives 2 rows of 25 hdc.
Two separate straps are then made with chains of 70. Buttons are used to fasten the straps, completing the removable outfit.
Final Assembly Checklist
- Complete the head through Round 27.
- Complete the body through Round 34.
- Make 2 eye pieces.
- Insert the 10 mm safety eyes through the centers of the magic rings.
- Attach the eyes between rows 16-17 with 10 stitches between them.
- Complete the muzzle.
- Make 2 ears and fold each in half.
- Make 2 arms and stuff them until row 12.
- Make 2 legs and stuff them firmly up to row 13.
- Make the tail.
- Complete the removable overalls.
- Create the tail opening as specified.
- Form the two pant legs.
- Make 2 straps using a chain of 70 for each.
- Prepare the buttons.
- Sculpt the face according to the reference image.
- Sew the muzzle between the eyes.
- Embroider the eye whites and nose.
- Attach the ears between the designated rows.
- Attach the legs between rows 13-14.
- Sew the tail at the center of the back between rows 13-15.
- Fasten the removable overalls with the straps and buttons.
What to Check Before Calling the Project Finished
A final inspection is useful once every part has been sewn together. Look at the panda from the front and confirm that the eyes, muzzle, and ears are positioned correctly. The safety eyes should remain 10 stitches apart and between rows 16-17 of the head.
Check the body for firm stuffing, particularly in the belly area. The arms and legs should also retain their intended forms according to their specified stuffing points.
Turn the panda around and check the tail. It should be centered on the back between rows 13-15. Then put on the overalls and check that the tail opening allows the tail to pass through correctly.
Finally, check the straps and buttons. The straps should be made from the specified chains of 70, and the buttons should allow the overalls to remain removable.
A Charming Project for Amigurumi Lovers
Ron the Panda in Pants brings together many of the techniques that make amigurumi enjoyable. The project includes magic rings, increases, decreases, color changes, back-loop-only crochet, separate facial pieces, embroidery, sculpting, stuffing, sewing, and clothing construction.
The finished size of approximately 24 cm gives enough room for the facial details and clothing to stand out. The panda’s black-and-white body provides the recognizable foundation, while the yellow overalls add a cheerful accent.
The removable clothing also makes this project particularly playful. Instead of being permanently dressed, Ron can have his overalls removed and put back on using the straps and buttons.
Final Thoughts
Making Ron the Panda is a rewarding process because the project develops gradually from simple circular pieces into a fully assembled character. The head and body provide the main structure, while the smaller components add definition and personality.
For the most faithful result, keep the written stitch counts and round numbers unchanged, follow the specified color transitions, and respect the stuffing and placement instructions. The facial sculpting and embroidered details should be treated as important finishing stages rather than optional decorations.
Once the body, face, limbs, tail, and ears have been assembled, the removable overalls provide the final character detail. The tail opening, 25-stitch pant legs, two 70-chain straps, and buttons complete the outfit.
The result is a cheerful handmade panda approximately 24 cm tall, combining traditional amigurumi construction with a fun removable wardrobe. Once the final assembly is complete, your crocheted Ron the Panda is ready to enjoy.
Finished Size: Approximately 24 cm tall.
Designer: evgi_toys.khv