
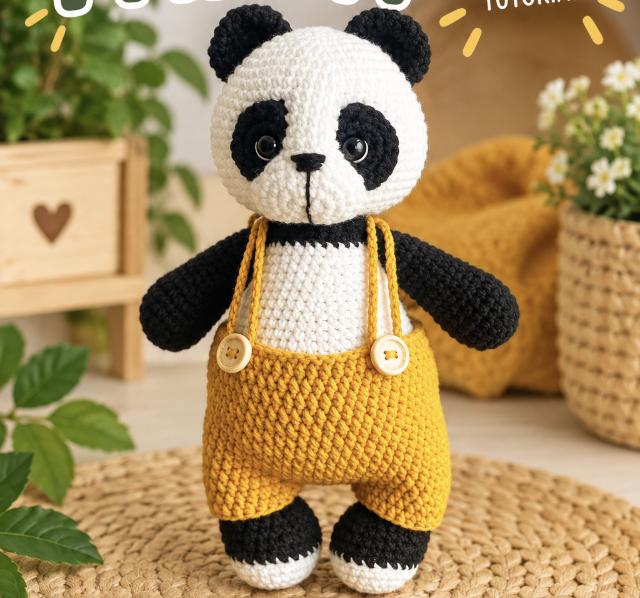

There is something especially appealing about a handmade amigurumi character that has both personality and a complete outfit. Ron the Panda in Pants is exactly that kind of project. This charming crochet panda combines a rounded black-and-white body with a removable pair of overalls, creating a finished toy that feels carefully designed from head to toe.
The project is worked with the amigurumi technique and uses a relatively small 2 mm crochet hook. Its construction involves several individual pieces, including the head, body, eyes, muzzle, ears, arms, legs, and tail. The clothing is then crocheted separately, with two long straps and buttons completing the outfit.
This second tutorial presents the project as a construction workshop. Rather than simply moving from one written section to another, we will focus on the important checkpoints that help keep the finished panda symmetrical, correctly shaped, and faithful to the supplied instructions. Every stitch count, round number, color change, measurement, and placement detail remains exactly as specified.
What Makes Ron the Panda Special?
The finished panda is approximately 24 cm tall. Its appearance comes from the combination of a white head and body sections, black accents, safety eyes, embroidered facial details, and yellow clothing. The overalls are removable, which gives the finished toy a fun interactive element.
The face is another important feature. The pattern calls for the face to be sculpted according to the reference image, helping create depth around the facial area. The muzzle is positioned between the eyes, while the eye whites and nose are embroidered during finishing.
The construction also gives the crocheter several opportunities to practice shaping. The head expands gradually from 6 stitches to 60 stitches, remains at its widest point for several rounds, and then narrows through carefully planned decreases. The body follows a similar principle but reaches 66 stitches before its shaping begins.
Materials You Need Before Starting
Prepare all of the materials before beginning. Having the colors, tools, stuffing, and sewing supplies ready makes it easier to move between the individual construction stages.
- YarnArt Jeans 62: White
- YarnArt Jeans 53: Black
- YarnArt Jeans 84: Yellow
- Crochet hook: 2 mm
- Safety eyes: 10 mm
- Stuffing material: Polyfill or similar
- Stitch markers
- Pins
- Buttons
- Sewing needle for assembling parts
- Scissors
The original project recommends YarnArt Jeans, a cotton-blend yarn. The three specified colors are white, black, and yellow. Keep these colors available throughout the project because the legs and body both contain specific color changes.
Pattern Language and Essential Abbreviations
The pattern uses standard crochet terminology. The abbreviations below should be kept nearby while working, especially if you are following the pattern row by row.
- MR: Magic Ring
- ch: Chain stitch
- sl st: Slip stitch
- sc: Single crochet
- hdc: Half double crochet
- inc: Increase, meaning 2 sc in the same stitch
- dec: Decrease, with invisible decrease preferred
- (…) x n: Repeat the sequence n times
Stitch markers are useful for maintaining your place, while pins can be used later when checking the position of the individual parts before sewing them permanently.
Workshop 1: Building the Head
The head is the main foundation for Ron’s expression. Begin with white yarn and create the first circular rounds in a magic ring. The increases are regular through Round 9, followed by additional shaping and a long section of 60 sc.
- Rnd 1: 6 sc in MR (6)
- Rnd 2: 6 inc (12)
- Rnd 3: (1 sc, inc) repeat 6 times (18)
- Rnd 4: (2 sc, inc) repeat 6 times (24)
- Rnd 5: (3 sc, inc) repeat 6 times (30)
- Rnd 6: (4 sc, inc) repeat 6 times (36)
- Rnd 7: (5 sc, inc) repeat 6 times (42)
- Rnd 8: (6 sc, inc) repeat 6 times (48)
- Rnd 9: (7 sc, inc) repeat 6 times (54)
- Rnd 10-11: 54 sc
- Rnd 12: (8 sc, inc) repeat 6 times (60)
- Rnd 13-21: 60 sc
- Rnd 22: (8 sc, dec) repeat 6 times (54)
- Rnd 23: (7 sc, dec) repeat 6 times (48)
- Rnd 24: (6 sc, dec) repeat 6 times (42)
- Rnd 25: (5 sc, dec) repeat 6 times (36)
- Rnd 26: (4 sc, dec) repeat 6 times (30)
- Rnd 27: (1 sc, dec) x 10 (20)
Fasten off while leaving a long tail for sewing. The tail is important for the later assembly stage, so avoid cutting it too short.

Workshop 2: Shaping the Body
The body is larger than the head and has a longer shaping sequence. Start in the same way with a magic ring, then steadily increase until reaching 66 stitches.
- Rnd 1: 6 sc in MR (6)
- Rnd 2: 6 inc (12)
- Rnd 3: (1 sc, inc) repeat 6 times (18)
- Rnd 4: (2 sc, inc) repeat 6 times (24)
- Rnd 5: (3 sc, inc) repeat 6 times (30)
- Rnd 6: (4 sc, inc) repeat 6 times (36)
- Rnd 7: (5 sc, inc) repeat 6 times (42)
- Rnd 8: (6 sc, inc) repeat 6 times (48)
- Rnd 9: (7 sc, inc) repeat 6 times (54)
- Rnd 10: (8 sc, inc) repeat 6 times (60)
- Rnd 11: (9 sc, inc) repeat 6 times (66)
- Rnd 12-18: 66 sc
- Rnd 19: (9 sc, dec) repeat 6 times (60)
- Rnd 20: 60 sc
- Rnd 21: (8 sc, dec) repeat 6 times (54)
- Rnd 22: 54 sc
- Rnd 23: (7 sc, dec) repeat 6 times (48)
- Rnd 24: 48 sc
- Rnd 25: (6 sc, dec) repeat 6 times (42)
- Rnd 26: 42 sc
- Rnd 27: (5 sc, dec) repeat 6 times (36)
- Rnd 28: 36 sc
- Rnd 29: (4 sc, dec) repeat 6 times (30)
- Rnd 30: 30 sc
- Rnd 31: Change yarn to black, 30 sc
- Rnd 32: (1 sc, dec) x 10 (20)
- Rnd 33-34: 20 sc
Fasten off and stuff the body firmly, especially the belly area. The stuffing is part of the shaping process, so make sure the body receives firm support while keeping the crocheted fabric neat.
Workshop 3: Creating the Eye Pieces
Make two eye pieces. These are worked separately from the head and are then positioned with the safety eyes. The pattern begins with 5 sc in a magic ring and continues in turning rows.
- Rnd 1: 5 sc in MR, sl st (5)
- Rnd 2: ch 1, 5 inc (10)
- Rnd 3: ch 1, inc, 8 sc, inc (12)
- Rnd 4: ch 1, 12 sc
Fasten off and leave a tail for sewing. Insert the 10 mm safety eyes through the center of the magic ring.
The completed eyes are attached between rows 16-17 of the head. The spacing between the eyes is 10 stitches. This placement is an important facial checkpoint, so it is worth checking the spacing before permanently sewing the pieces into position.
Workshop 4: Adding the Muzzle
The muzzle is made with only four rounds, but it has a major visual role in the finished character. Work it as follows:
- Rnd 1: 8 sc in MR (8)
- Rnd 2: 8 inc (16)
- Rnd 3: 3 sc, 4 inc, 4 sc, 4 inc, 1 sc (24)
- Rnd 4: 24 sc
Fasten off and leave a long tail for sewing. The muzzle is sewn between the eyes during assembly. The face is also sculpted according to the reference image, making this component especially important for the character’s final expression.
Workshop 5: Forming the Panda Ears
Two ears are required. Their construction is short and straightforward, but folding them correctly gives them their finished shape.
- Rnd 1: 6 sc in MR (6)
- Rnd 2: 6 inc (12)
- Rnd 3: (1 sc, inc) repeat 6 times (18)
- Rnd 4-6: 18 sc
Fold each ear in half and sew across the open edge with 8 sc. Once both ears are prepared, keep them aside until the assembly stage.
Workshop 6: Crocheting the Arms
The arms begin with a rounded section and gradually narrow. Both arms are made using the same instructions.
- Rnd 1: 6 sc in MR (6)
- Rnd 2: 6 inc (12)
- Rnd 3: (1 sc, inc) repeat 6 times (18)
- Rnd 4: (2 sc, inc) repeat 6 times (24)
- Rnd 5-8: 24 sc
- Rnd 9: (2 sc, dec) repeat 6 times (18)
- Rnd 10-12: 18 sc
- Rnd 13: (7 sc, dec) repeat 2 times (16)
- Rnd 14-20: 16 sc
- Rnd 21: (2 sc, dec) repeat 4 times (12)
Stuff each arm until row 12. Fold the arm in half and sew across the open edge with 6 sc. Repeat for the second arm.
Workshop 7: Constructing the Legs and Their Color Change
The legs are especially important because they introduce the black yarn in a specific round. Begin each leg with white yarn.
- Rnd 1: 8 sc in MR (8)
- Rnd 2: 8 inc (16)
- Rnd 3: (1 sc, inc) repeat 8 times (24)
- Rnd 4-5: 24 sc
- Rnd 6: Change to black yarn, work in back loops only, 24 sc
- Rnd 7-9: 24 sc
- Rnd 10: 9 sc, 3 dec, 9 sc (21)
- Rnd 11: 8 sc, 3 dec, 7 sc (18)
- Rnd 12: 7 sc, 2 dec, 7 sc (16)
- Rnd 13-22: 16 sc
Fold each leg in half and sew across the open edge with 8 sc. Stuff firmly up to row 13. The color transition at Round 6 should be kept clear and consistent because it forms part of the leg’s visual design.
Workshop 8: The Small Tail
The tail requires only two rounds, making it one of the quickest components to finish.
- Rnd 1: 6 sc in MR (6)
- Rnd 2: (1 sc, inc) repeat 3 times, sl st (9)
Fasten off and leave a tail for sewing. The tail will later be positioned at the center of the back between rows 13-15.
Workshop 9: Making the Removable Overalls
The overalls give Ron his distinctive personality. They are not permanently sewn onto the panda, so they can be removed. This section uses half double crochet for much of the clothing construction.
- Rnd 1: Chain 55, join into a ring
- Rnd 2: 55 sc
- Rnd 3: 10 hdc, (inc) repeat 5 times (60)
- Rnd 4-6: 60 hdc
- Rnd 7-8: Create tail opening: 57 hdc, ch 6, skip 4 stitches, insert hook into 5th stitch, 60 hdc
- Rnd 9-15: 62 hdc

After completing these rounds, form the pant legs. Mark 6 center stitches on both the front and back, then sew them together. Each pant leg has 25 stitches, and 2 rows of 25 hdc are crocheted for each pant leg.
Workshop 10: Adding the Two Straps
The straps are separate from the main body of the overalls. Make two straps, each beginning with the same chain length.
Straps: Make 2.
Chain 70.

The straps fasten with buttons, allowing the clothing to remain removable. Make sure the two straps are kept consistent with each other during preparation.
Assembly: Turning the Pieces into Ron
With the individual pieces complete, the project moves into its most visual stage: assembly. This is where careful placement becomes just as important as crochet technique.
Sculpt the Face
Start by sculpting the face according to the reference image. The sculpting technique creates depth and helps define the panda’s expression.
Sew the Muzzle
Position the muzzle between the eyes and sew it securely. Check the placement from the front before finishing the sewing.
Embroider the Facial Details
Embroider the eye whites and the nose. These details complete the main facial expression and complement the 10 mm safety eyes.
Attach the Ears
Attach the ears between the designated rows. Before sewing them permanently, compare both sides of the head to ensure the placement is balanced.
Attach the Legs
Attach the legs between rows 13-14. Their positioning should be checked carefully because they establish the lower-body stance of the panda.
Attach the Tail
Sew the tail at the center of the back between rows 13-15. Keeping it centered gives the panda a balanced appearance when viewed from behind.

Important Stitch Checkpoints
When making amigurumi, it is easy to lose track of where the shaping changes. Ron’s pattern has several useful checkpoints that can help you verify your progress without changing the original instructions.
For the head, the first major checkpoint is Round 12, where the piece reaches 60 stitches. Rounds 13-21 continue with 60 sc before the decreases begin at Round 22. The head finishes at 20 stitches on Round 27.
The body reaches its widest point at Round 11 with 66 stitches. It remains at 66 sc through Round 18. Shaping begins at Round 19, while the important black yarn change occurs at Round 31.
For the legs, the white section ends at Round 5. Round 6 introduces black yarn and specifically requires working in back loops only. The leg reaches 16 stitches at Round 12 and remains at that stitch count through Round 22.
The overalls have a different rhythm because they use hdc after the initial sc round. The tail opening appears during Rounds 7-8, and the final main section continues through Round 15.
Stuffing Without Losing the Shape
Stuffing should support the shape of each component while respecting the specific instructions. The body should be stuffed firmly, especially around the belly area. This helps the larger central piece retain its structure.
The arms have a clearly stated stuffing checkpoint: stuff until row 12. After that, fold the piece and sew the open edge with 6 sc.
The legs should be stuffed firmly up to row 13. Their folded upper edges are then sewn with 8 sc. Following these specific stuffing instructions keeps the construction aligned with the original pattern.
Assembly Tips for Better Symmetry
Symmetry is particularly important for a character such as Ron because the eyes, ears, arms, and legs all contribute to his recognizable silhouette. Before sewing, temporarily position components with pins and view the panda from the front.
The eyes should remain 10 stitches apart and should be attached between rows 16-17 of the head. The muzzle should be placed between them. The ears should be positioned according to their designated rows, while the legs belong between rows 13-14.
For the back, locate the center carefully before attaching the tail. The pattern specifically places it between rows 13-15. Keeping the tail at the center of the back helps maintain the intended arrangement.
Clothing and Final Presentation
Once the panda itself is assembled, place the removable overalls onto the body. The pants have a dedicated tail opening, allowing the tail to remain properly positioned while the clothing is worn.
The straps are made separately from chains of 70. With two straps and buttons, the overalls can be fastened and removed. This feature is one of the playful details that distinguishes the project from a standard panda amigurumi.
The finished panda is approximately 24 cm tall. The combination of black and white yarn with yellow clothing gives the character a bright, recognizable appearance while keeping the traditional panda theme.
Ron the Panda Project Checklist
- Prepare YarnArt Jeans 62, 53, and 84.
- Use a 2 mm crochet hook.
- Prepare 10 mm safety eyes.
- Keep polyfill or similar stuffing available.
- Make the head through Round 27.
- Make the body through Round 34.
- Make two eye pieces.
- Make the muzzle.
- Make two ears.
- Make two arms.
- Make two legs.
- Make the tail.
- Make the overalls.
- Make two straps with a chain of 70.
- Prepare the buttons.
- Sculpt the face according to the reference.
- Sew the muzzle between the eyes.
- Embroider the eye whites and nose.
- Attach the ears.
- Attach the legs between rows 13-14.
- Attach the tail between rows 13-15 at the center of the back.
- Fasten the removable overalls with the straps and buttons.
Final Quality Check
Before considering the project complete, inspect the panda from the front, side, and back. Confirm that the facial pieces are secure and that the eye placement follows the stated measurements. Check the ears for balanced placement and make sure the limbs are firmly attached.
Look at the body stuffing as well. The belly should be firmly stuffed as instructed, while the arms and legs should follow their specific stuffing limits. The overalls should sit correctly around the body, with the tail passing through its designated opening.
Finally, check the straps and buttons. Since the overalls are designed to be removable, the fastening system should allow the clothing to be taken on and off without permanently attaching the pants to the panda.
A Complete Amigurumi Character from Individual Pieces
One of the most rewarding aspects of this project is watching the separate crocheted pieces gradually become a recognizable character. The head creates the expression, the body establishes the central shape, and the limbs give Ron his stance. The muzzle, eyes, ears, and embroidered details then bring the face to life.
The clothing adds another creative layer. Rather than simply crocheting a fixed accessory, the pattern includes a removable pair of overalls with a dedicated tail opening, separate straps, and buttons. This makes the finished panda more interactive and gives you the option of displaying the character in different ways.
At approximately 24 cm tall, Ron is large enough for all of these details to be appreciated while still retaining the compact charm associated with amigurumi. The project is therefore a satisfying choice for crocheters who enjoy character construction, shaping, sewing, and decorative finishing.
Conclusion
Ron the Panda in Pants is a detailed amigurumi project that combines structured crochet shaping with expressive finishing and removable clothing. The key to a successful result is careful attention to the supplied stitch counts, color changes, stuffing instructions, and assembly positions.
Work through the head and body patiently, then complete the smaller components before beginning assembly. Pay particular attention to the eye spacing, facial sculpting, leg placement, and centered tail placement. Once the panda is assembled, finish the overalls, add the two 70-chain straps, and use the buttons to secure the removable outfit.
With the final sewing and embroidered details complete, Ron the Panda is ready to show off his cheerful outfit. The finished combination of a classic panda design and removable pants makes this a memorable handmade amigurumi project and a rewarding piece to add to a crochet collection.
Finished Size: Approximately 24 cm tall.
Designer: evgi_toys.khv